2010 Giant Bowery Mashup Urban Track Bike - 50cm (18/09/2016)

I know what you’re thinking, because it’s exactly what I’m thinking….what the? Yes I built up the centurion fixie but have now passed it onto my mate Cath and she has officially been converted to a new speed like myself now. So I have no single speed….not anymore!
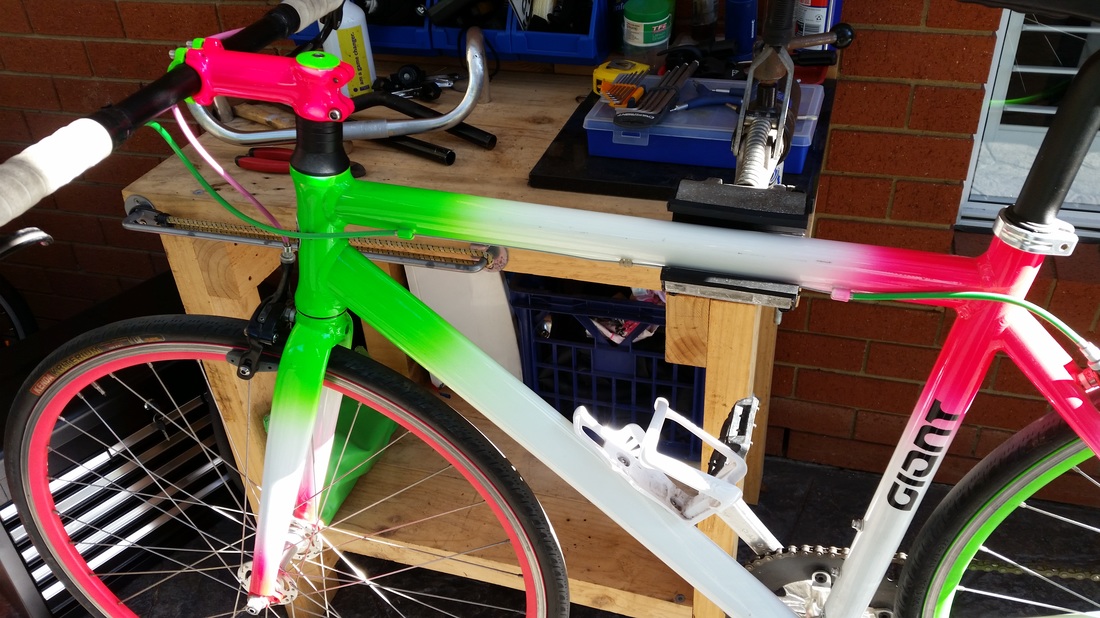
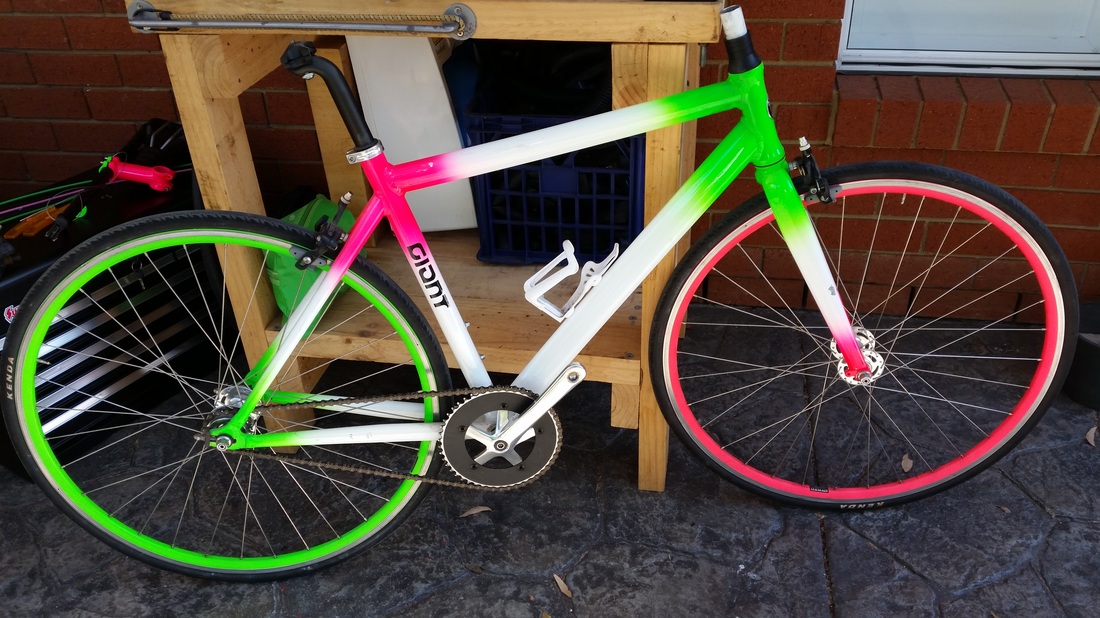
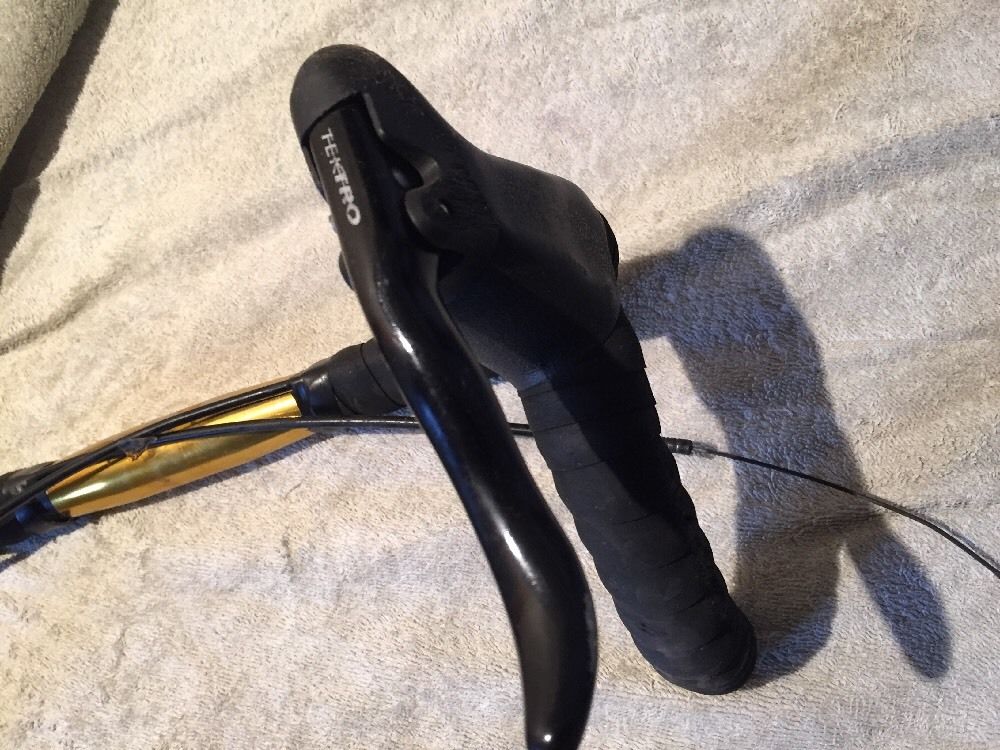
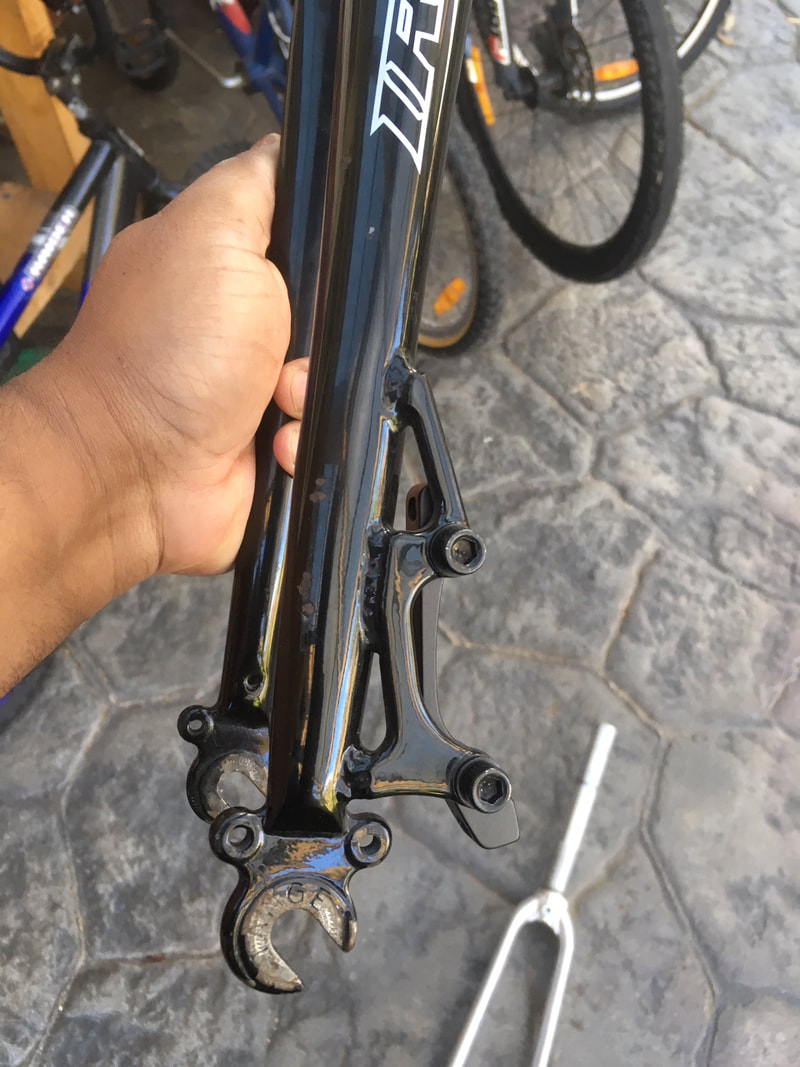
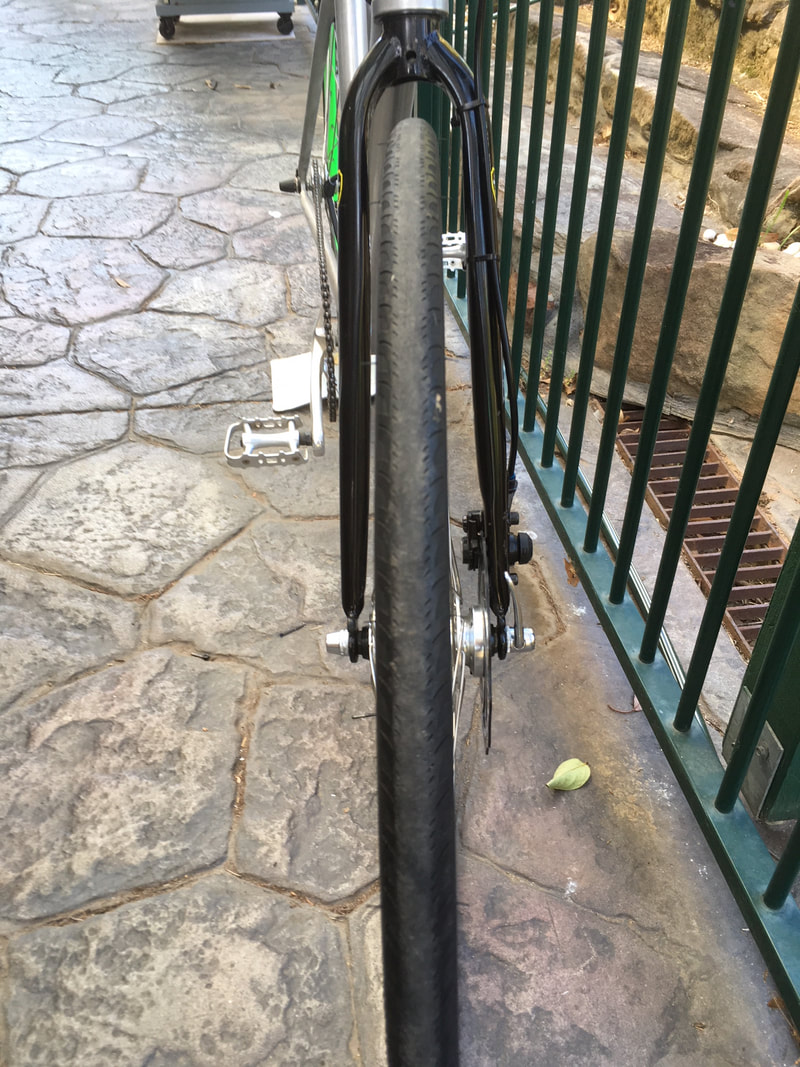
I got the bug again so this time I’ve gone all modern and actually bought a bike. Yes I paid money for it. $100!! This is a 2010 Giant Bowery Mashup. There were 4 colour choices when it was released but one particular model was the stand out ugly one (can you guess?) It is however a solid track bike, has water bottle mounts, good tektro brakes, Everything is bolted on with no quick releases (theft-proof), and not rusted as it is aluminium (which is not really my preference) but it has a steel fork though. The bike rides really well, is light and fast and fits me perfect, the best fitting single speed I’ve owned if I’m honest.
Now the downsides:
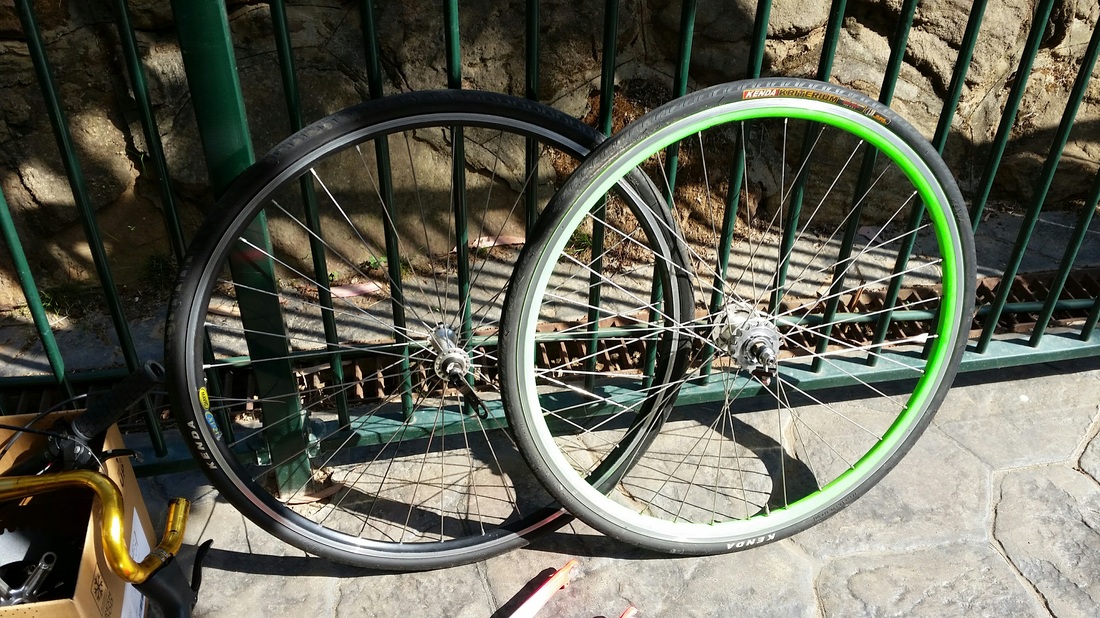
I hate the backward mounted brake levers, I hate the colour scheme (especially the pink), I hate the bar tape, I hate the stem and handlebars, I hate the cheap Kenda tyres, I hate the coloured wheels and I especially hate the seat. Did I mention I hate the colour scheme? I feel a seizure coming on just looking at it! The green rear wheel I can live with for a while but I already have a bid on a front wheel on ebay. I thought about painting the existing front wheel but I reckon it is too much hassle so will just sell it. Plus it would always be pink wheel on the inside!!!
So what needs to be done….
I got the bug again so this time I’ve gone all modern and actually bought a bike. Yes I paid money for it. $100!! This is a 2010 Giant Bowery Mashup. There were 4 colour choices when it was released but one particular model was the stand out ugly one (can you guess?) It is however a solid track bike, has water bottle mounts, good tektro brakes, Everything is bolted on with no quick releases (theft-proof), and not rusted as it is aluminium (which is not really my preference) but it has a steel fork though. The bike rides really well, is light and fast and fits me perfect, the best fitting single speed I’ve owned if I’m honest.
Now the downsides:
I hate the backward mounted brake levers, I hate the colour scheme (especially the pink), I hate the bar tape, I hate the stem and handlebars, I hate the cheap Kenda tyres, I hate the coloured wheels and I especially hate the seat. Did I mention I hate the colour scheme? I feel a seizure coming on just looking at it! The green rear wheel I can live with for a while but I already have a bid on a front wheel on ebay. I thought about painting the existing front wheel but I reckon it is too much hassle so will just sell it. Plus it would always be pink wheel on the inside!!!
So what needs to be done….
- Remove the tyres and keep them as back ups.
- Remove the saddle and chuck it
- Remove crankset (keep) and pedals (chuck)
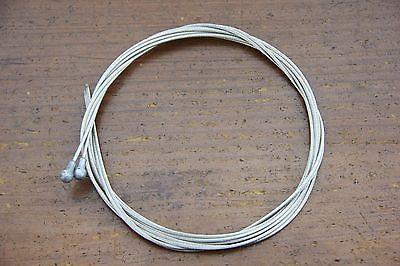
- Get rid of the ugly brake cable outers (pink and green)
- Remove the backward brake levers and bar tape
- Strip the whole bike of all components and bolts
- Remove bottom bracket and headset + crown race
- Prep frame by stripping existing paint scheme
- Take to powder coaters for its new colour (not sure yet)
- Re-assemble the bike with different front wheel, same callipers and pads, new saddle, new brake cable outers/inners, new tyres (Marathons or Gatorskins), add a bell, permanently mounted lights, second bottle cage, existing headset and bb with new lithium grease, probably use the old green rear wheel until I can find a replacement, re-install crankset, add different pedals. Grease and lube everything up.
- On yer bike!
The bike before the break down!


On the bench.....
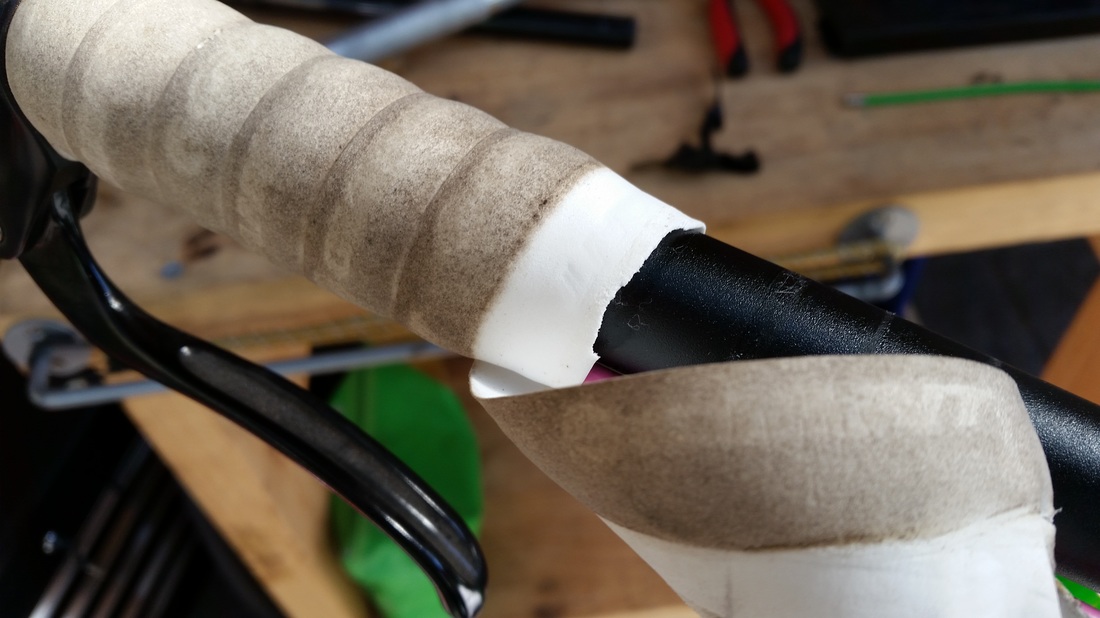
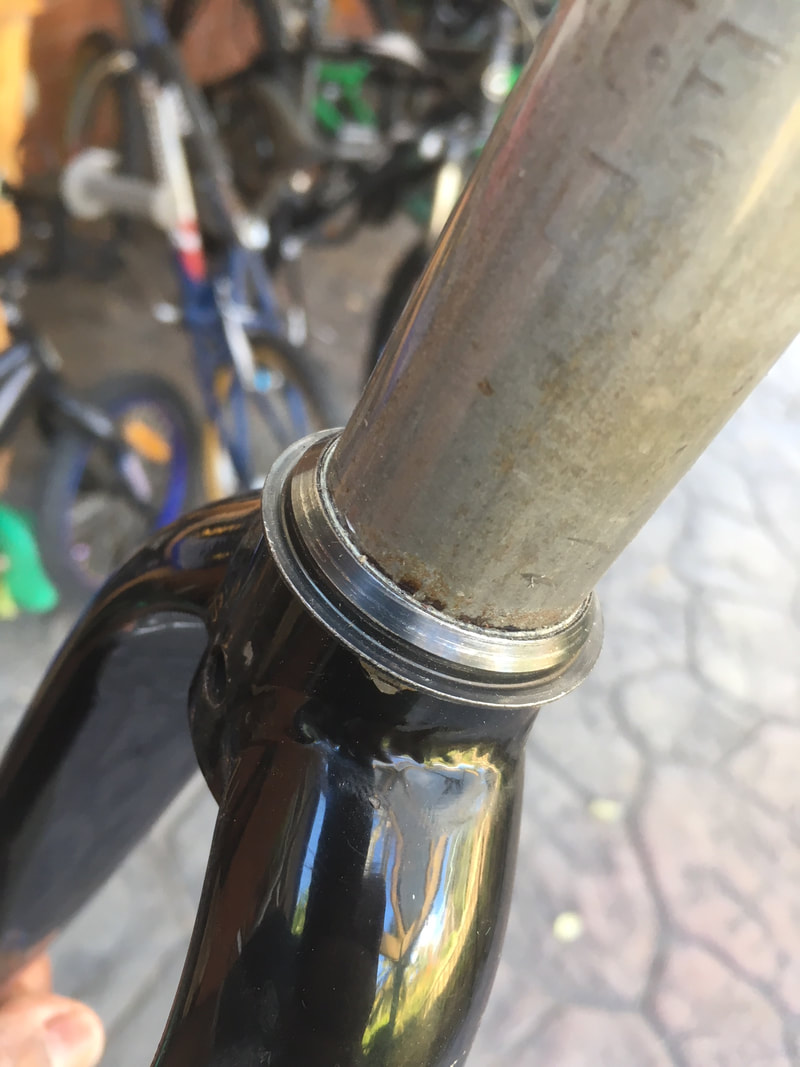
Hmm where to begin?!!? Apart from the hideous colour scheme, this is a pretty solid bike and I am quite happy with the build quality, headset, seat post and braking system. All the clamps and bolts are in good condition too. Ok, first things first, start with the pink stuff!!!
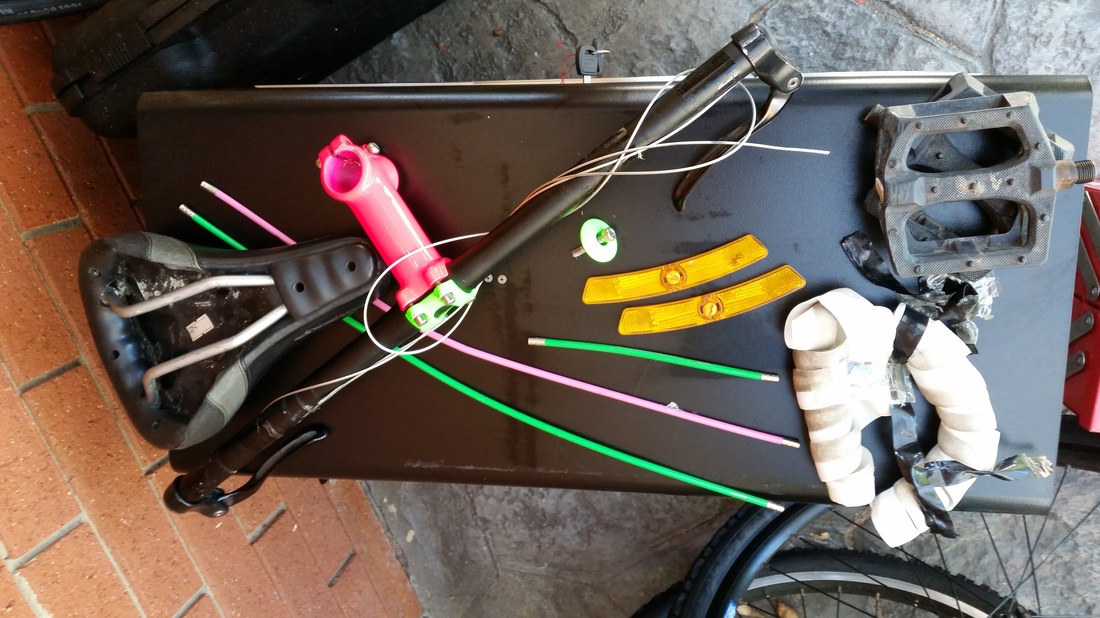
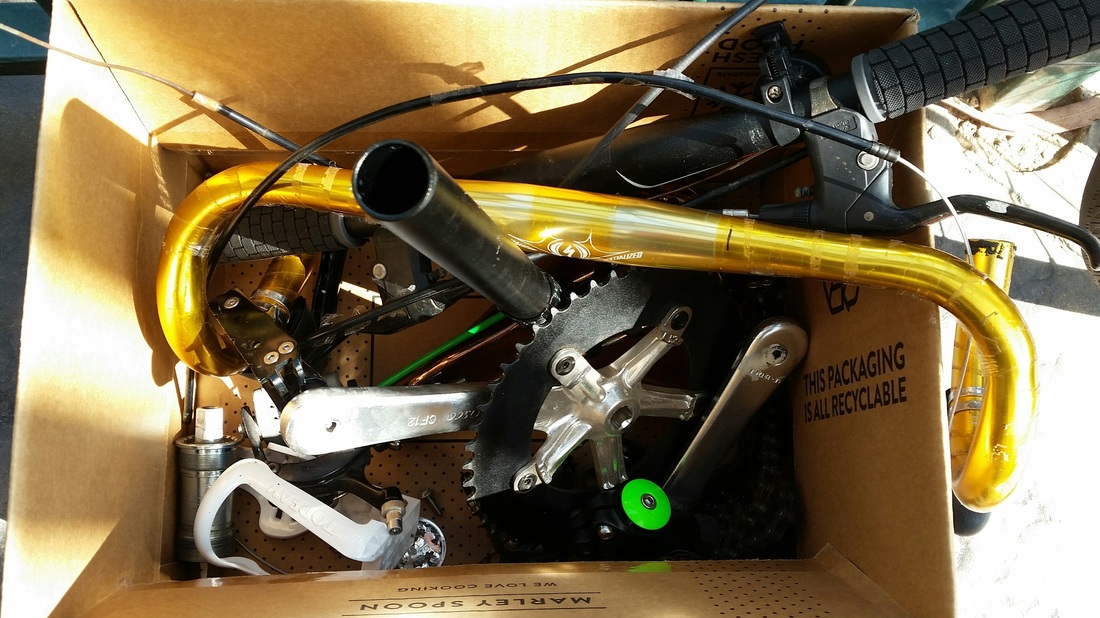
Parts removed.....
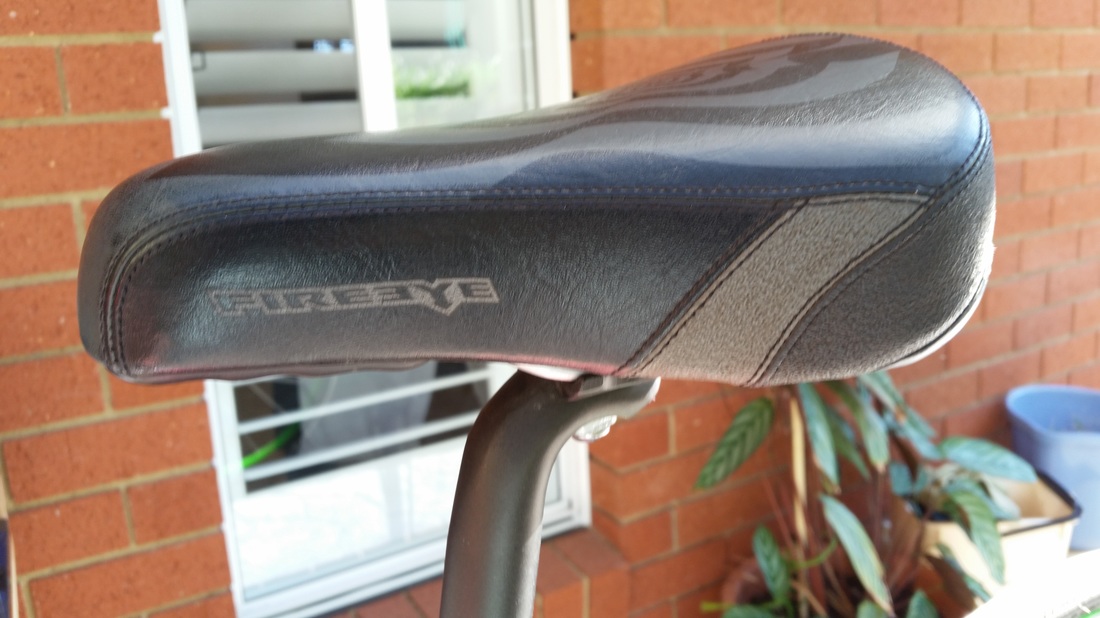
So the first thing to go was the ridiculous pink stem, green stem cap, flat bars which were a bit too long for my use, dirty bar tape that used to be white, bullhorn brake levers which worked stupid, ugly brake cable outers (pink and green), nasty Fireeye seat which looks like its from child's bike, cheap plastic pedals, reflectors from the wheels which I may put back when selling them, but will use the rear wheel temporarily, I can live with the green for a bit. What I had left was the remaining components I would use. My plan is to strip the whole thing down and change the colour completely but for now I'll have a look around my parts bin (milk crate!) to see what I can find to get it functional again. The last pic shows the bike with the crap stuff removed.
Existing Tyres - Kenda Kriterium 700 x 25
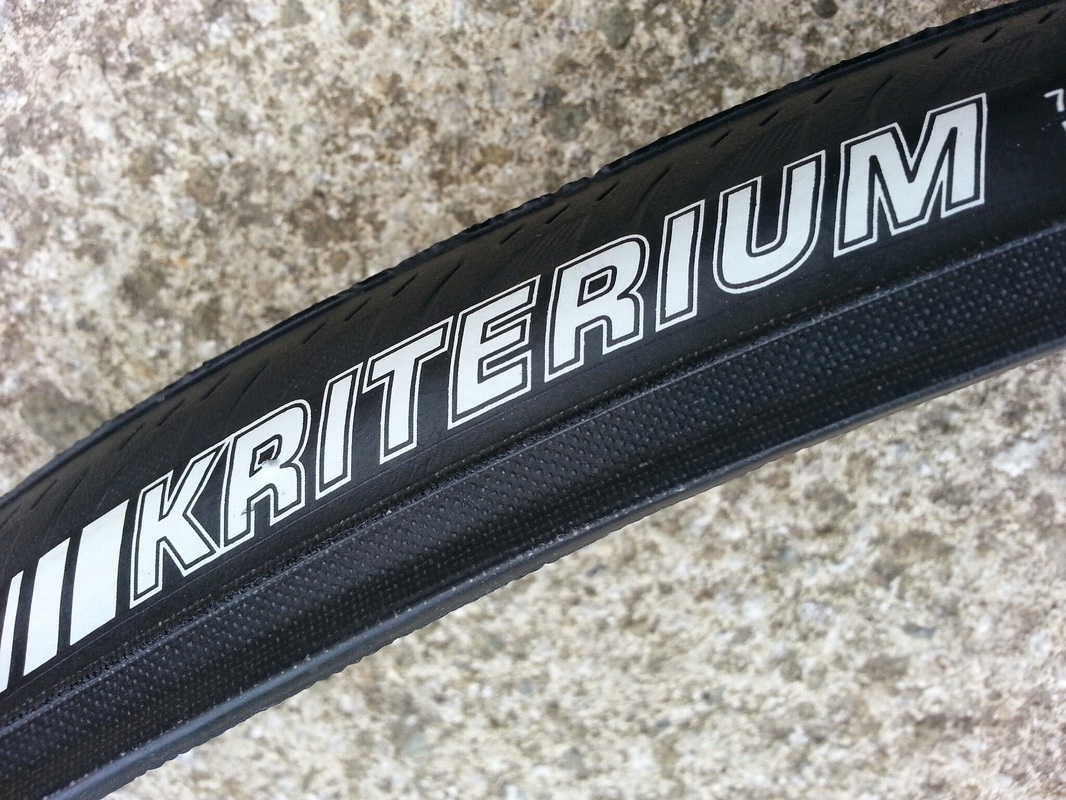
Existing ones are Kenda Kriterium 700x25’s. They are abit worn but are holding up fine. The tubes could do with longer pesta valves, but for now they will be fine. I’ll use them for the Spring Cycle. I’ll eventually get some Schwalbe’s or Gatorshkins on there.
Saddle upgrade - Prologo Scratch Pro Road Saddle
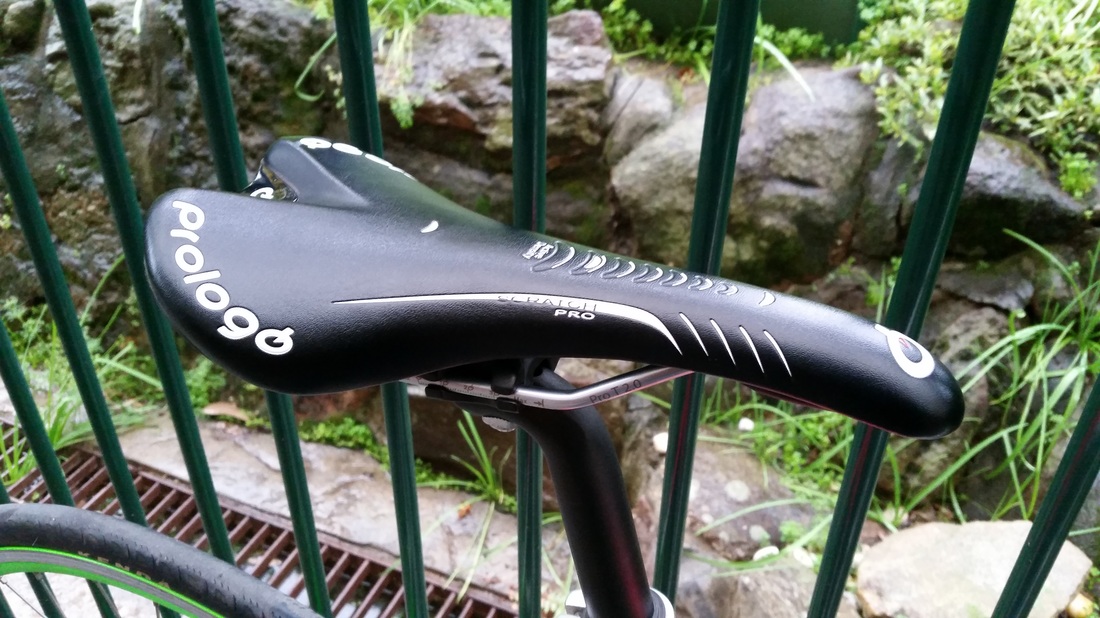
Believe it or not I had run out of saddles! Normally I have them everywhere, but I needed one and wanted something that was primarily black. So I found this one online on Gumtree for $40. Was removed from a bike which had it as a standard factory saddle. Picked it up near the city on my way back from visiting my sis. Looks the part, is pretty comfy and does the job.
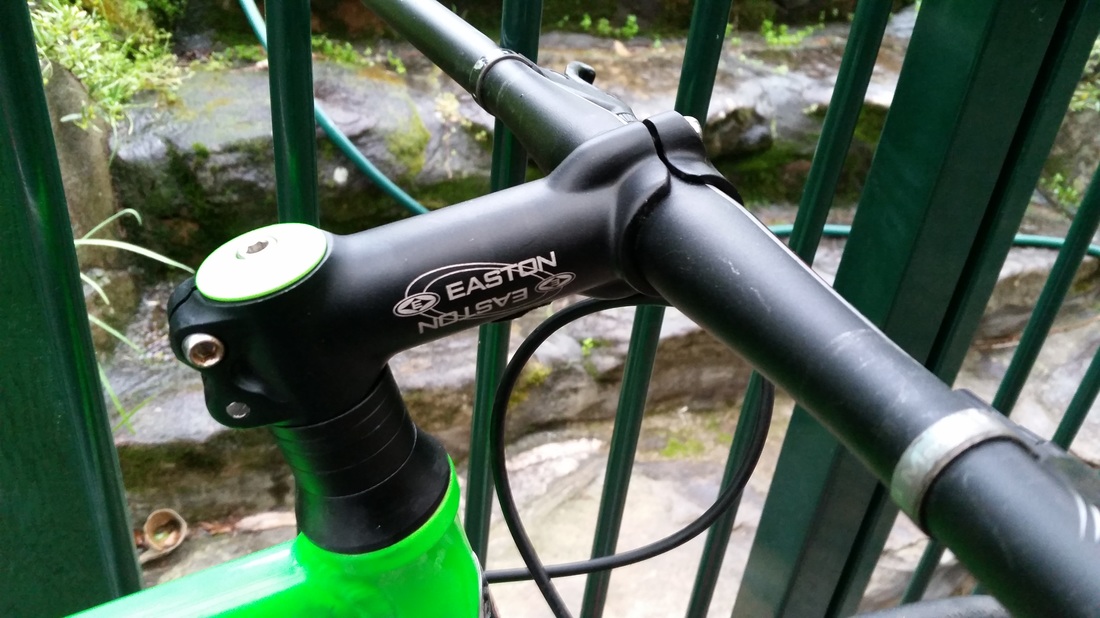
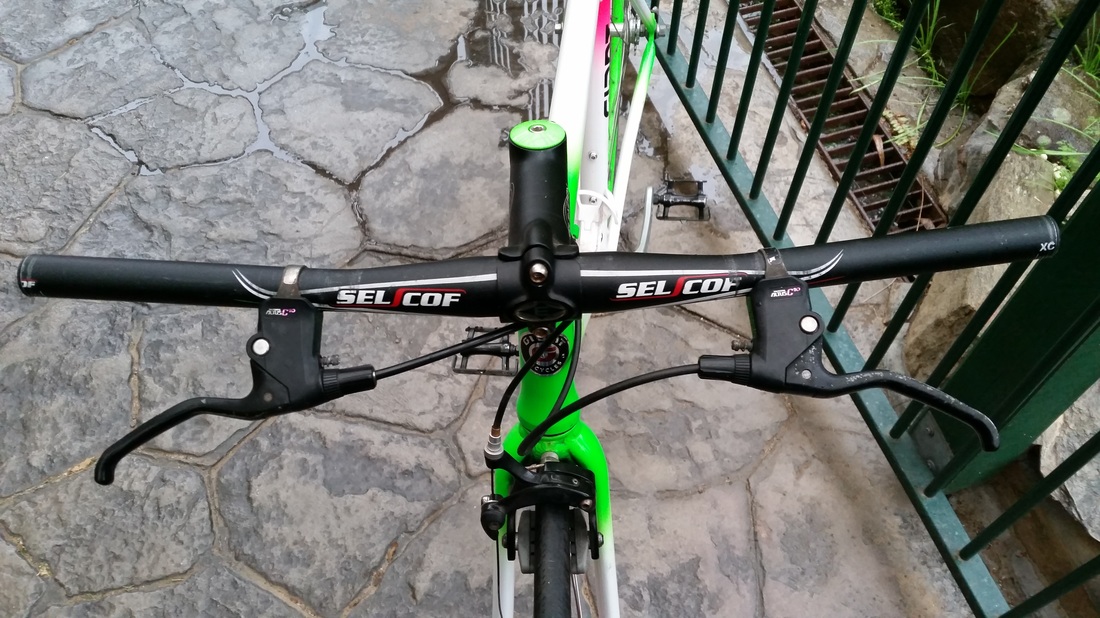
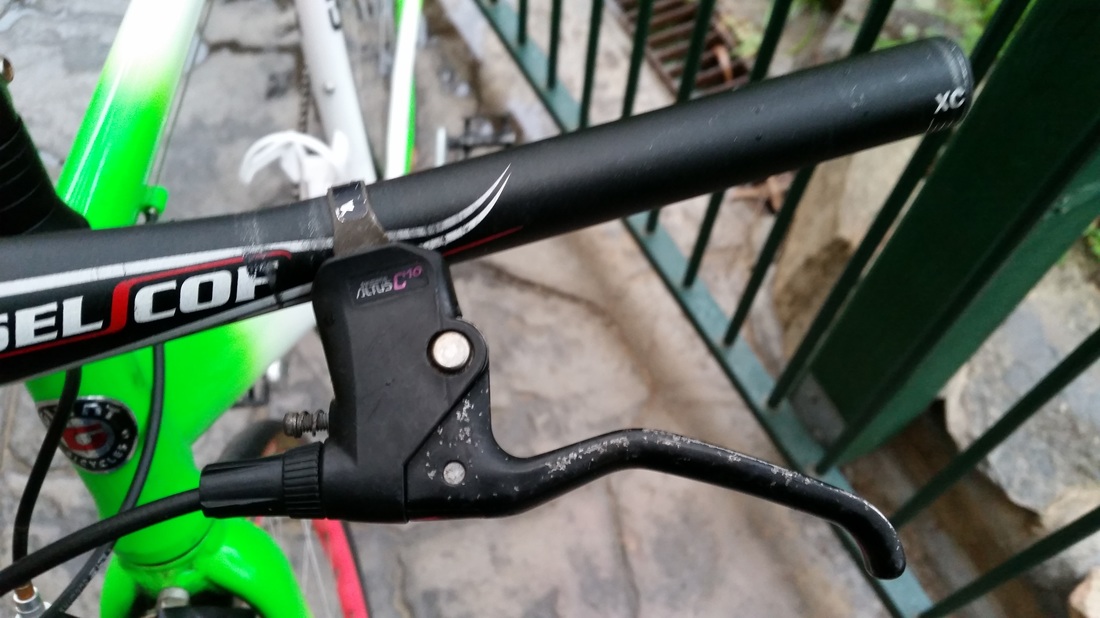
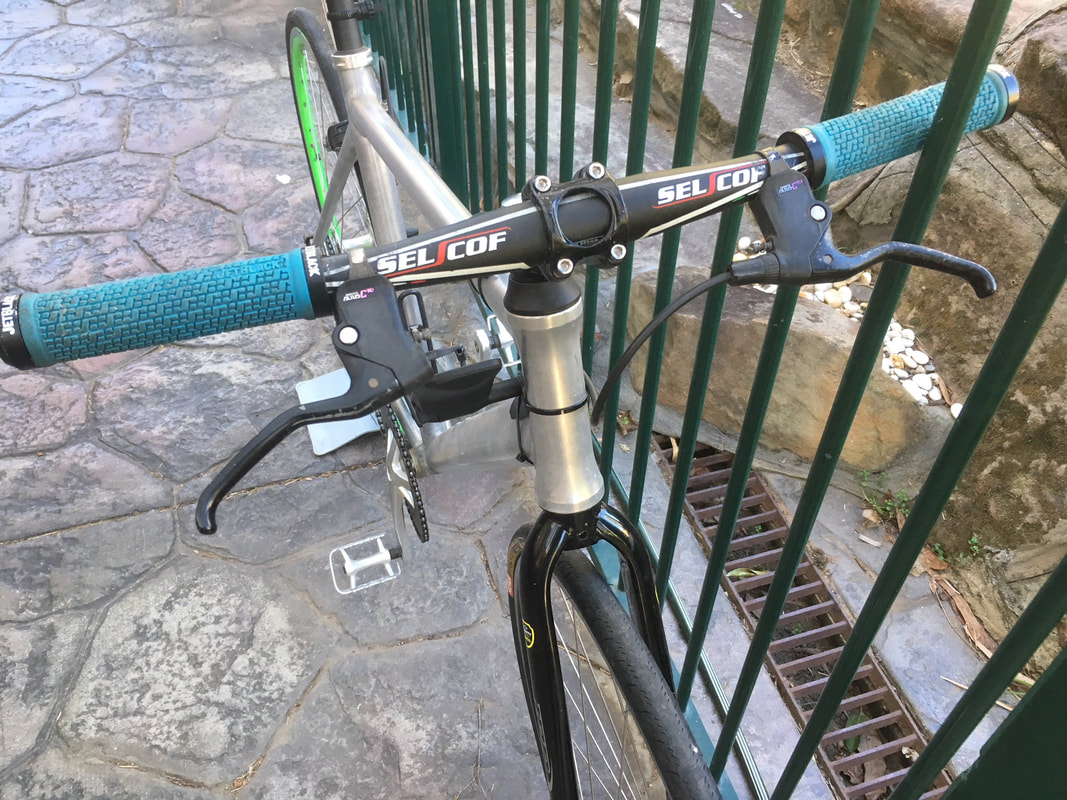
Easton stem, Selcof handlebar and Shimano Altus brake levers, Wellgo pedals (temp)
This was what I was looking forward to the most, replacing the awful stem. I had an easton stem which was from an old road bike so used it. Was also the same length as the pink one. I also brought out my trusty Selcof mtb bar which I used on my very first fixie, so a part of it still lives on. I had some vintage Shimano Altus brake levers which are there more for functionality and they work fine. Plus I also replaced the brake cabling to some Specialized mtb cables and Shimano SLR outers.
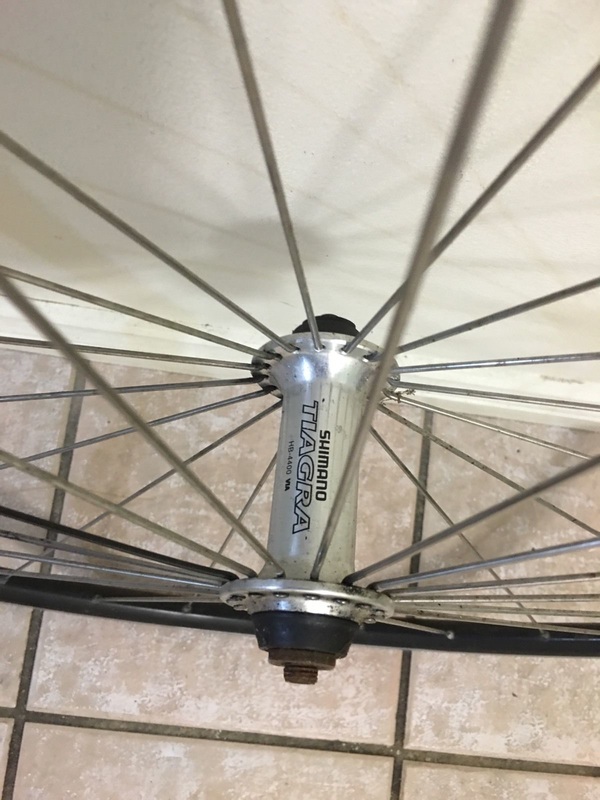
Different front wheel - Tiagra hub, Mavic rim
Even though this is only a temporary solution I think I will still keep this wheel. I have ordered other wheels already. I can live with the green rear wheel but just cannot live with the front pinky one! So this is a #40 wheel with a pretty good hub and rim which will be a temporary solution. I’ll be doing the 2016 Spring Cycle with my mate from work and we’re both riding single speeds. I’m only getting the other wheels in November so this will have to do for now.


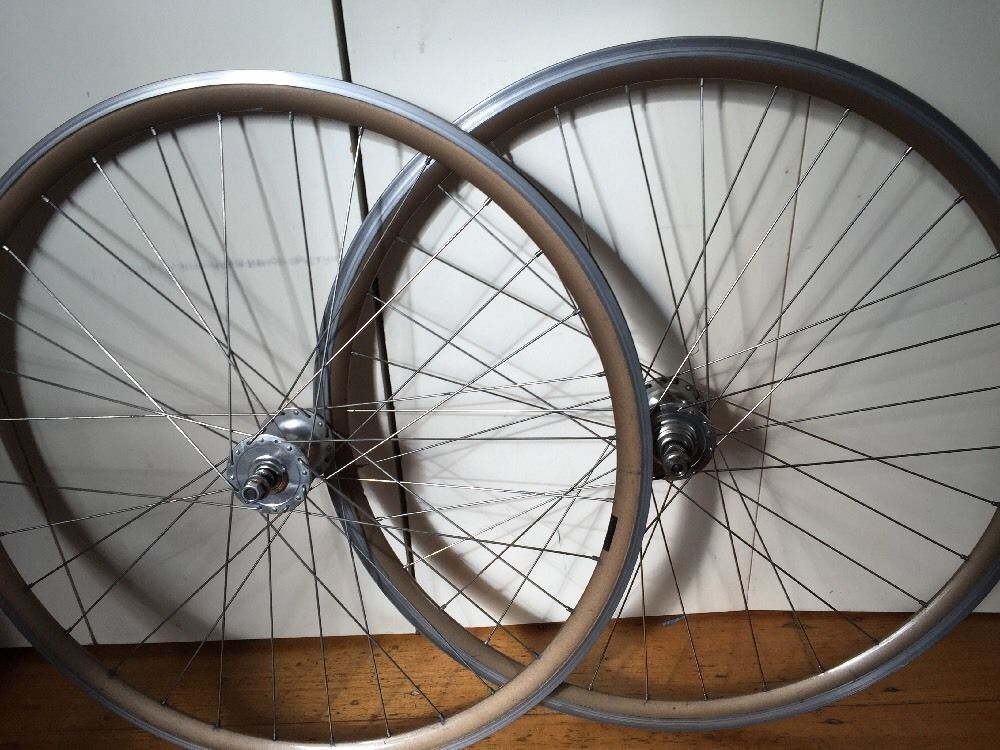
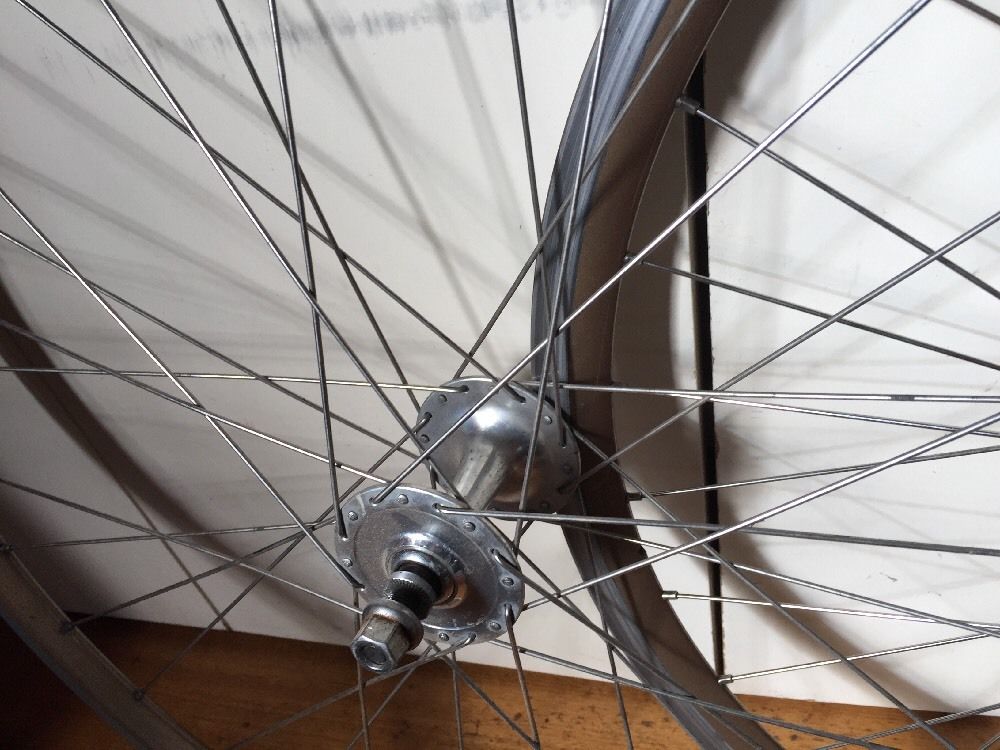
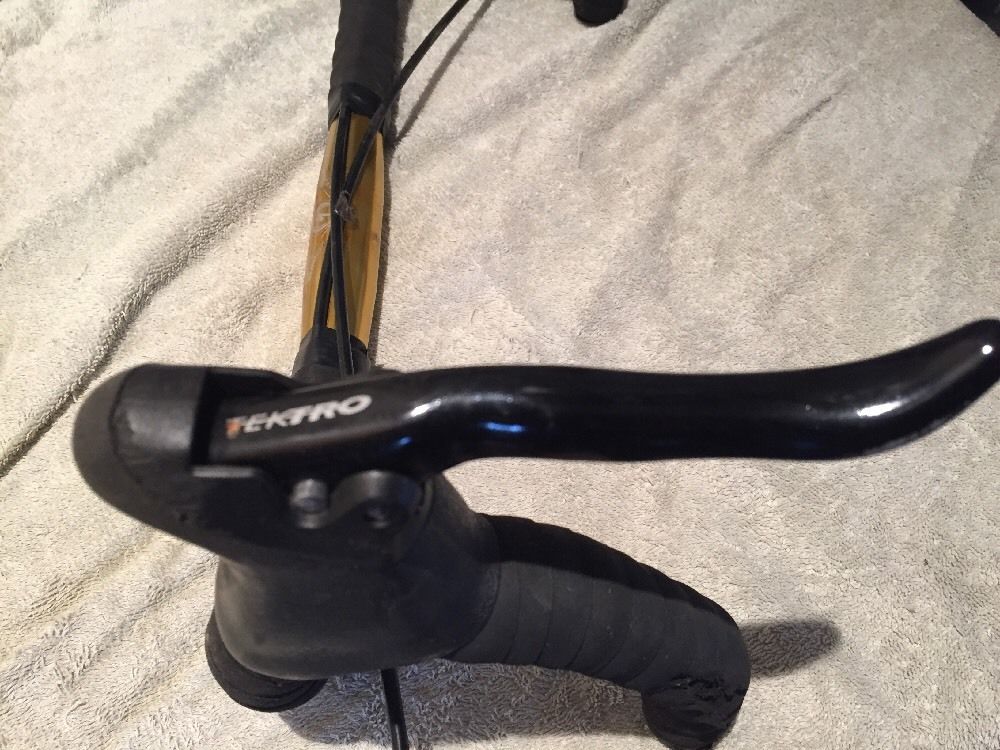
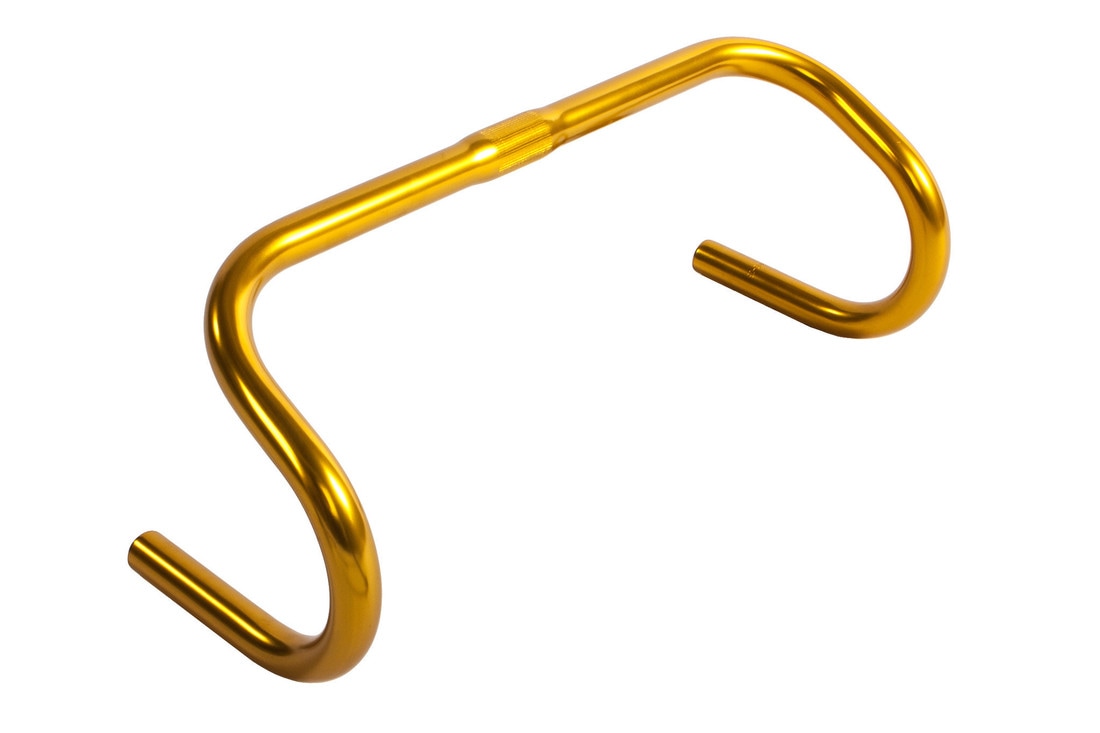
Parts on their way - Trek Wheel set, Specialised drop bars with Tektro levers/hoods.
I recently purchased some ex Trek 3rd District single speed wheels for $50 which have hardly been used. They are a gold/brown colour. I also bought some Specialised fixie drop bars with black bar tape and Tektro brake levers with all cabling ready to go for $40. The problem I have is getting them sent to me in Sydney. I didn’t want to pay for postage because I’ll be heading to Derrimut VIC for business in November and the seller for both these items is located at North Fitzroy VIC. I’ll be staying in Caroline Springs which is only a 30 minute drive away and I’ll have a rental car with me. If I take a big suitcase I should be able to fit the wheels and the handlebar in there as the airline will allow me to carry up to 23kgs in my checked in luggage. If that is not possible then I will give it to our Derrimut depot and they will put it on the truck to Sydney which should arrive the next day. That’s the benefit of working for a logistics company! Once I get these parts onto the bike, hopefully it will be painted by then and the transformation will be complete!

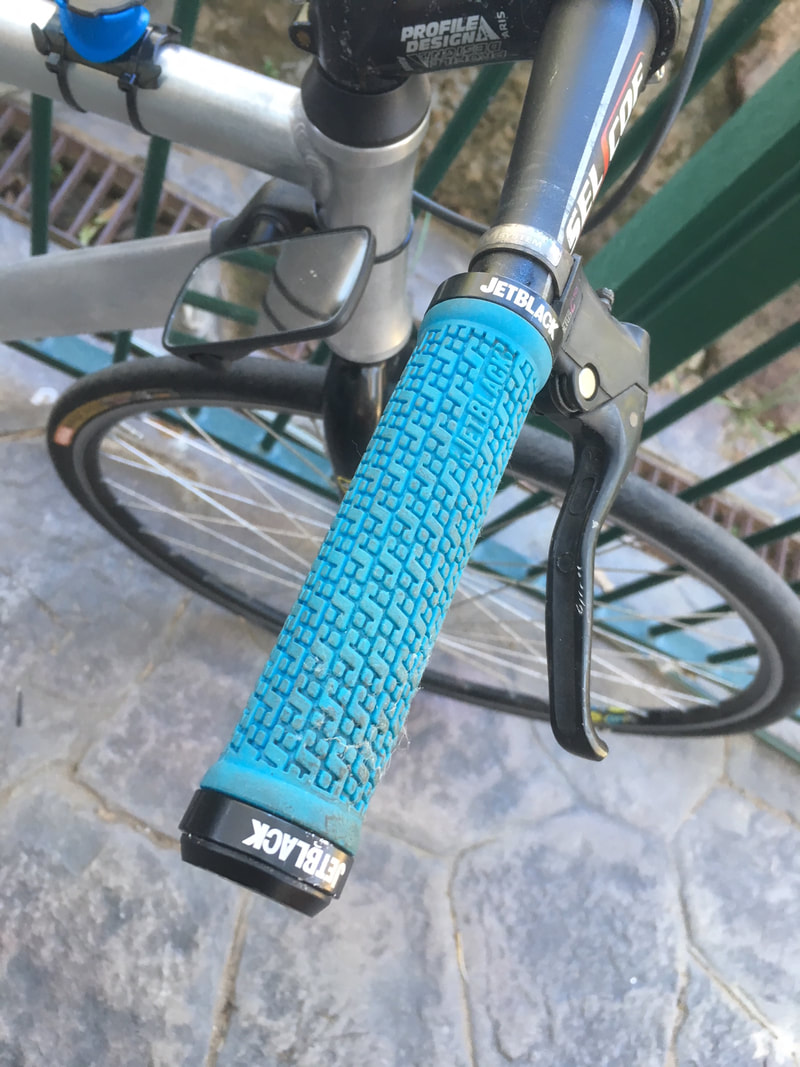
BBB Push On Grips
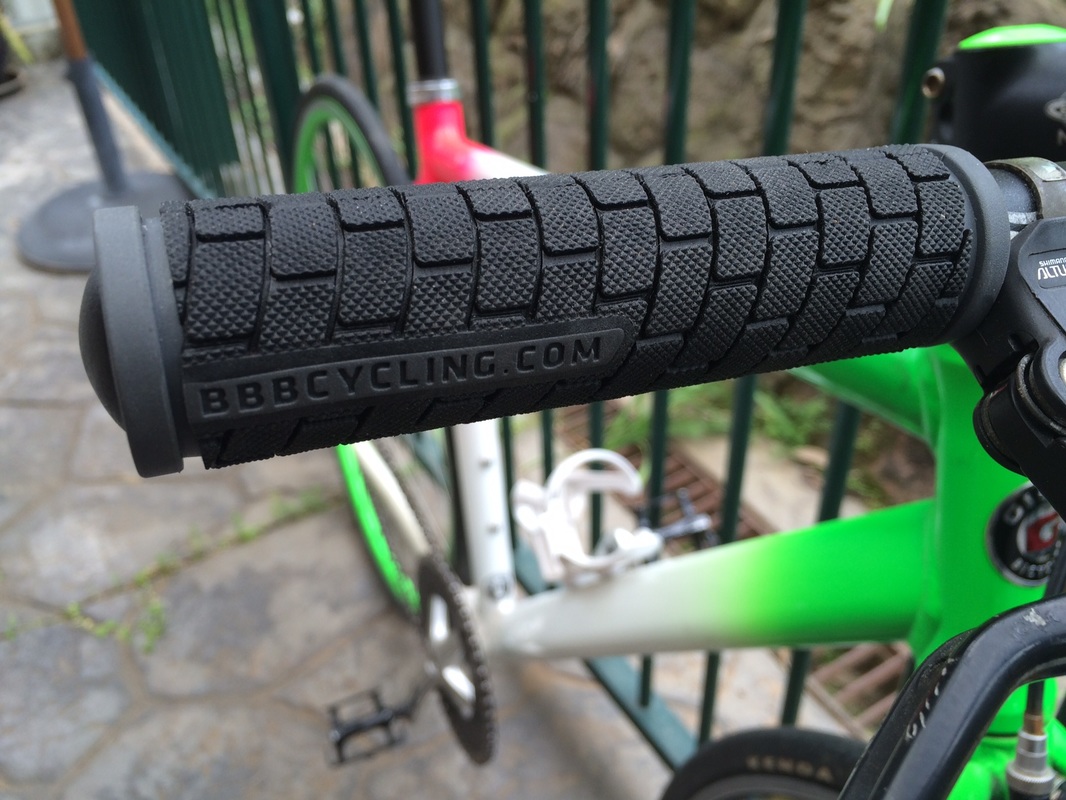
So I spent $10 and got some basic grips for the current setup. I wanna be comfortable for daily riding and the spring cycle when October 16 comes around. These do the job nicely. I also picked up the front wheel and fitted it. Removed the awful pink one.
The New Improved Mashup

Visually I'm sure you'll agree it is a huge improvement! The tyres seem to have held up well. Was going to replace them but I think I will see how I go with them. They are not really that worn. All I need now are some lights and a bell and I'll be ready for riding.
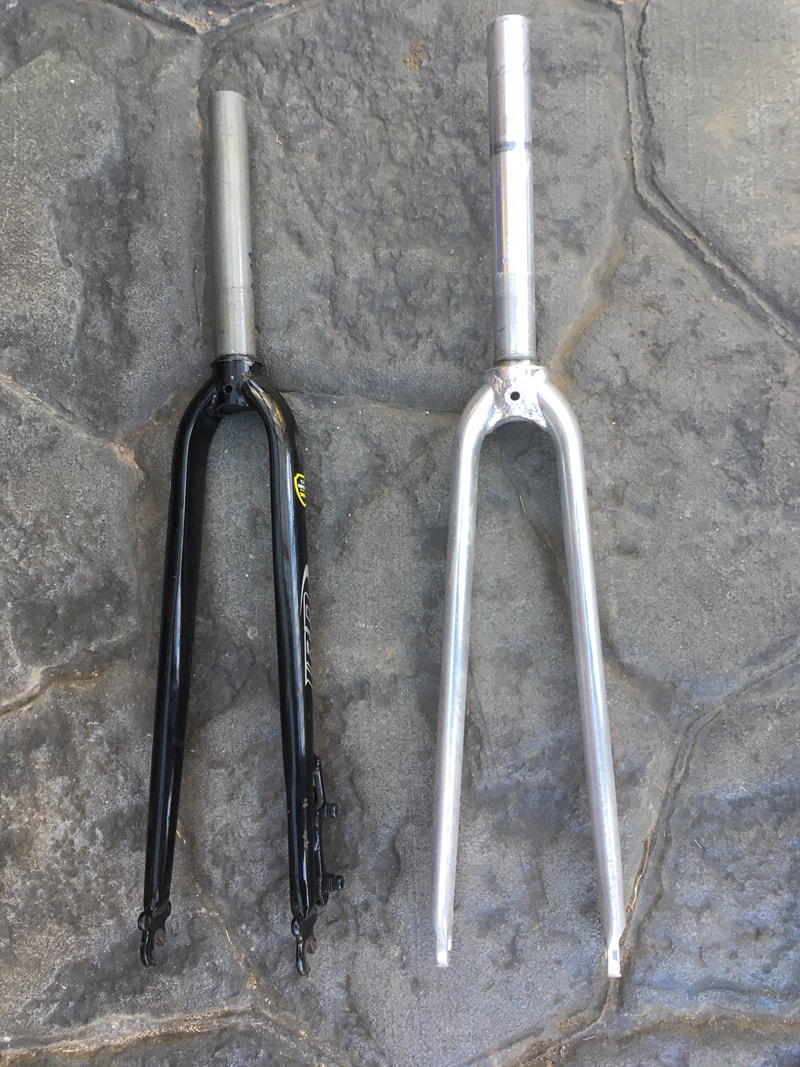
The changes have not finished yet. I still have to pick up and replace the handlebars to drop bars and levers, and also the updated wheel set. And the bike one, to paint it. I'm still tossing up between a rattle can job or a proper powder coat like I always do. The powder coat might help fill/fix up that bit of paint/metal damage on the front fork.
The changes have not finished yet. I still have to pick up and replace the handlebars to drop bars and levers, and also the updated wheel set. And the bike one, to paint it. I'm still tossing up between a rattle can job or a proper powder coat like I always do. The powder coat might help fill/fix up that bit of paint/metal damage on the front fork.
Still haven't worked out a colour, was thinking of doing it in this dark aqua, would look good with the brown/gold on the wheels and handlebars. May have to spray the stem cap gold too! ----> |

|
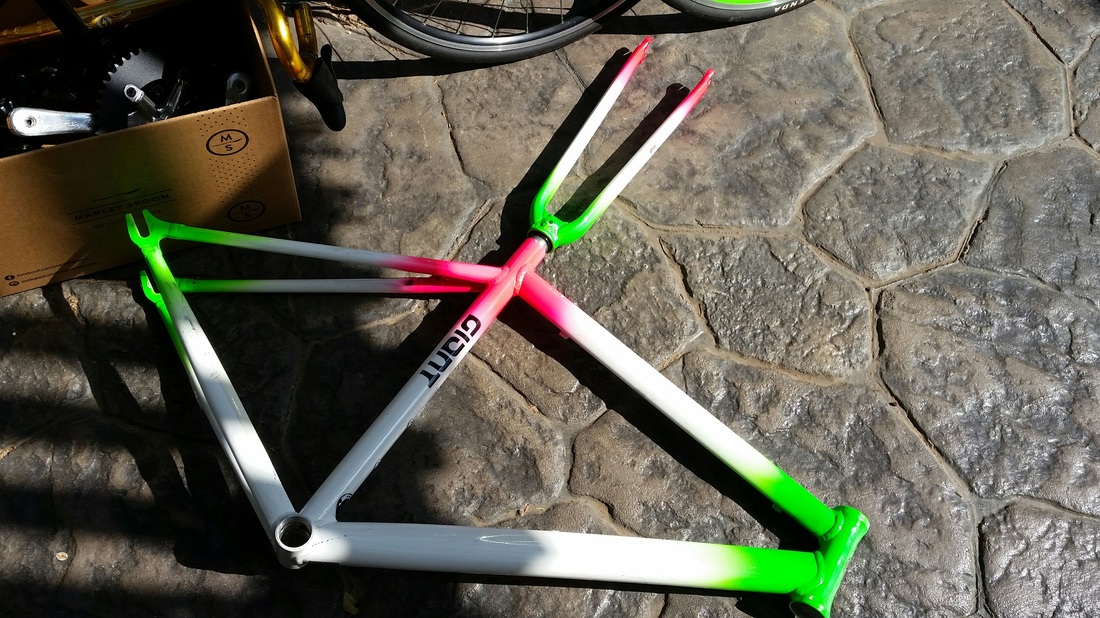
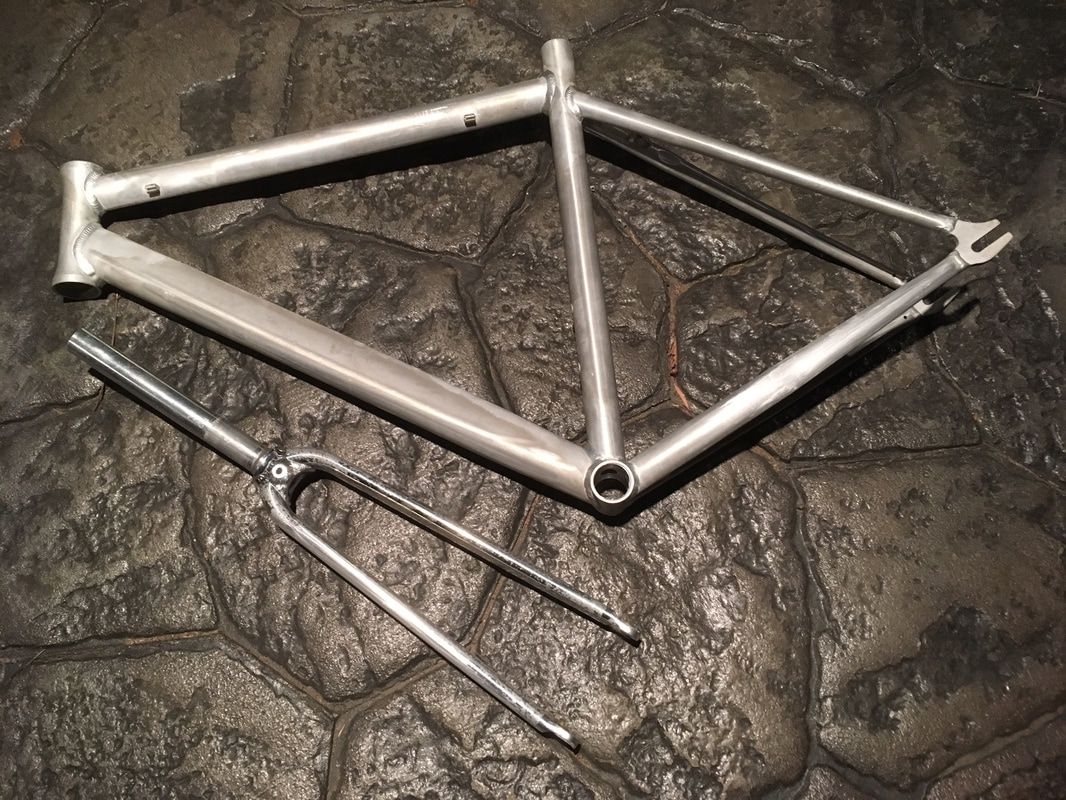
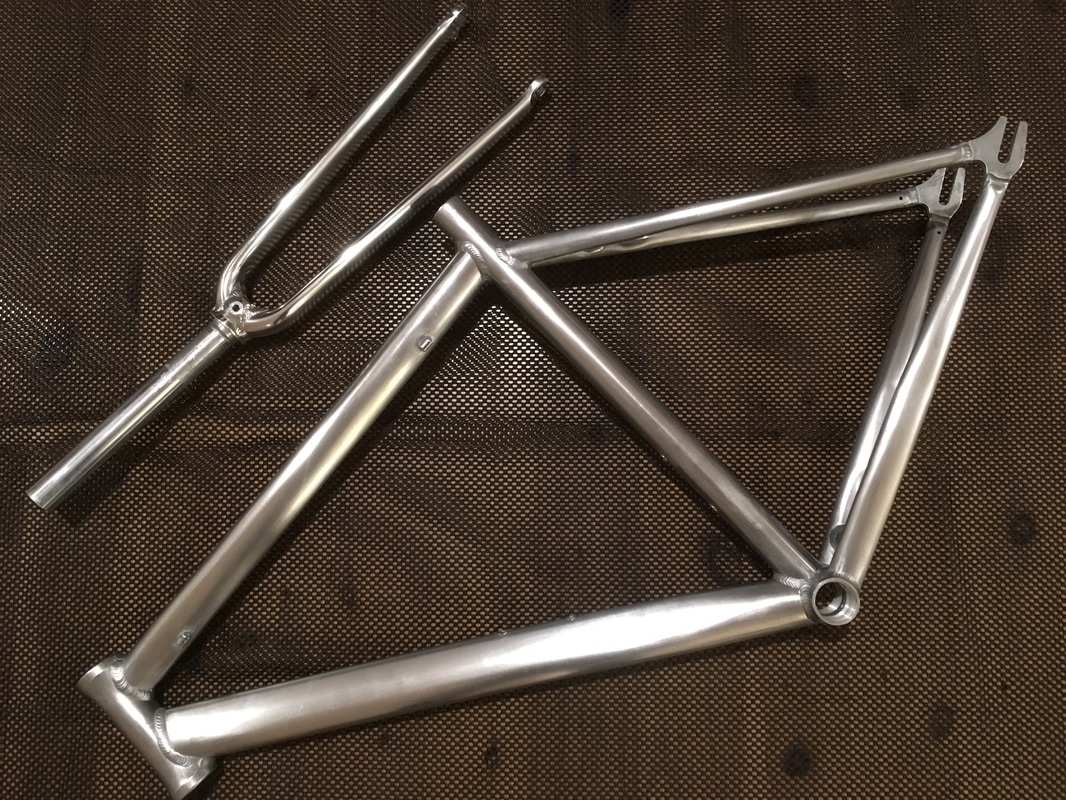
The current state of the bike - in pieces 3/12/16
So I have pulled the bike apart, every peice has been separated. Now it is time to change it's look.
Update: 29/5/2017 - WORK HAS RESUMED!!
So I have picked up my game and have decided to finish the renovation on the Giant Bowery. I took it to my favourite powder coaters in my neighbourhood. Was going to get them to blast and coat it but because it is powder coated already and it is aluminium, the sand blasting may warp the metal. So I have taken it to a company that chemically strips paint. I was told depending on the kind of metal used to build the bike the chemical process may cause some pitting. I’m not that worried because powder coat will fill in all the gaps. The stripping process will take about two weeks, I’m in no hurry. Once this is done, I will then return to the powder coaters to get the frame painted. Still deciding on the colour. Not sure to go with my original Milano Red (bright orange) or something completely different. The wheels have a bit of gold in them and so does the handlebars. So I’m not sure. I did however find a really unique Giant head tube badge which I bought for $20 so that is on its way to me now. I am also considering re-making the transfers for the down tube. I liked the different design. So we’ll see. Took a photo just in-case.
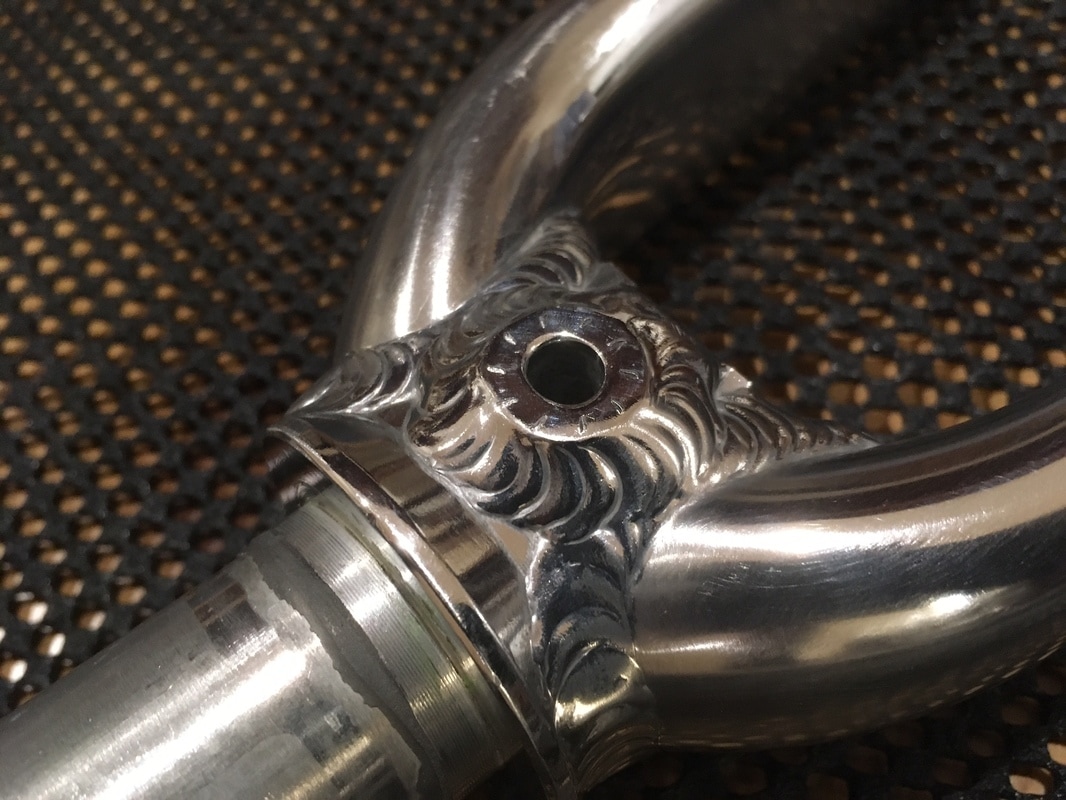
Chemical Stripping complete!
Ok the stripping has been completed and the result is awesome! The aluminium welding on the fork is really a great job, whoever did it. Problem is as soon as you have bare aluminium, it starts oxidising
which is not really a bad thing because it will protect it, in a weird sort of way. See the pic. So this has changed my whole idea regarding the colour scheme.
which is not really a bad thing because it will protect it, in a weird sort of way. See the pic. So this has changed my whole idea regarding the colour scheme.
Sand Paper - Wet n' Dry 800 & 2000 Grit
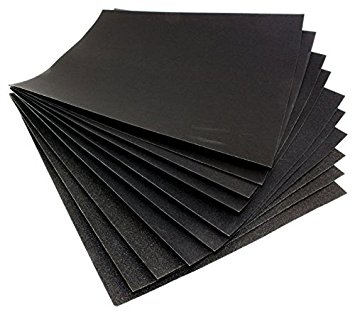
So, to the colour scheme of this bike. I have decided to not paint it at all! Instead I have gotten some 800 grit and 2000 grit wet n' dry sand paper and will be sanding out this whole frame until it gets to a smooth finish. Then I intend to polish the hell out of it until it comes to a gleaming shine. I'm not interested in getting it super perfect like chrome. Just shiny enough to look good.
Mothers - Aluminium and Mag Polish

...and this is how I'll do it! Good 'ol Mothers! Word on the web is that this is the best stuff you can get to polish up aluminium. I was lucky to get this as it is really popular at my local auto shop. Got the last one. This is only a small tub of the stuff which should be fine for what I'm doing. Will probably only use a quarter of it. Still it cost AUD $16 ! So we'll see if it lives up to the standard. Wish me luck. Perhaps I'll polish our wheels a after!
Polishing Complete!
I didn't really want a show shine, just a bit shiny but still looking a bit rough. Bit of a brushed aluminium look. I have to say the welds are really good on this frame and fork!
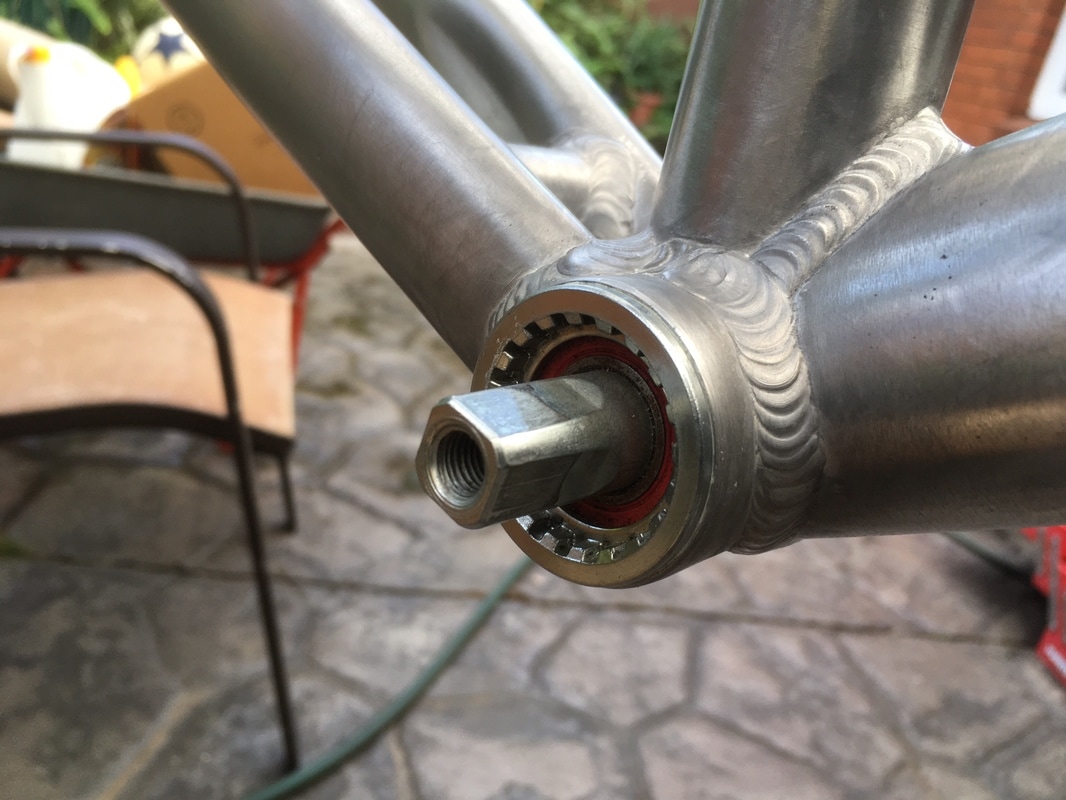
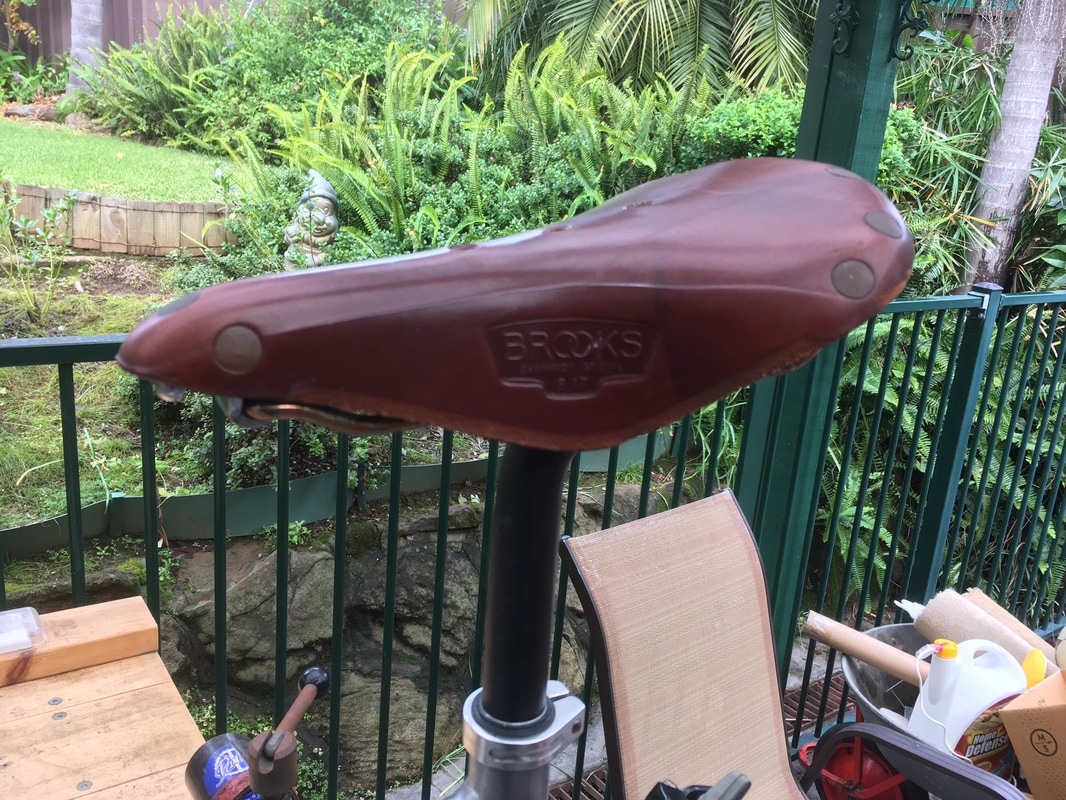
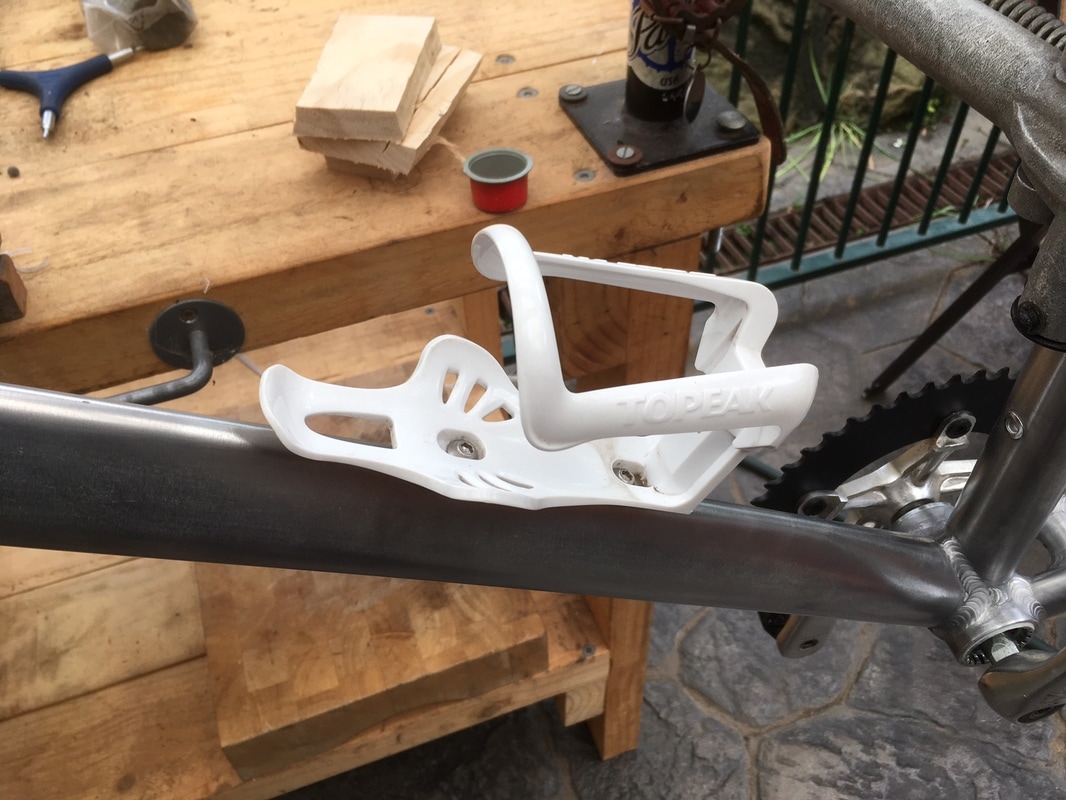
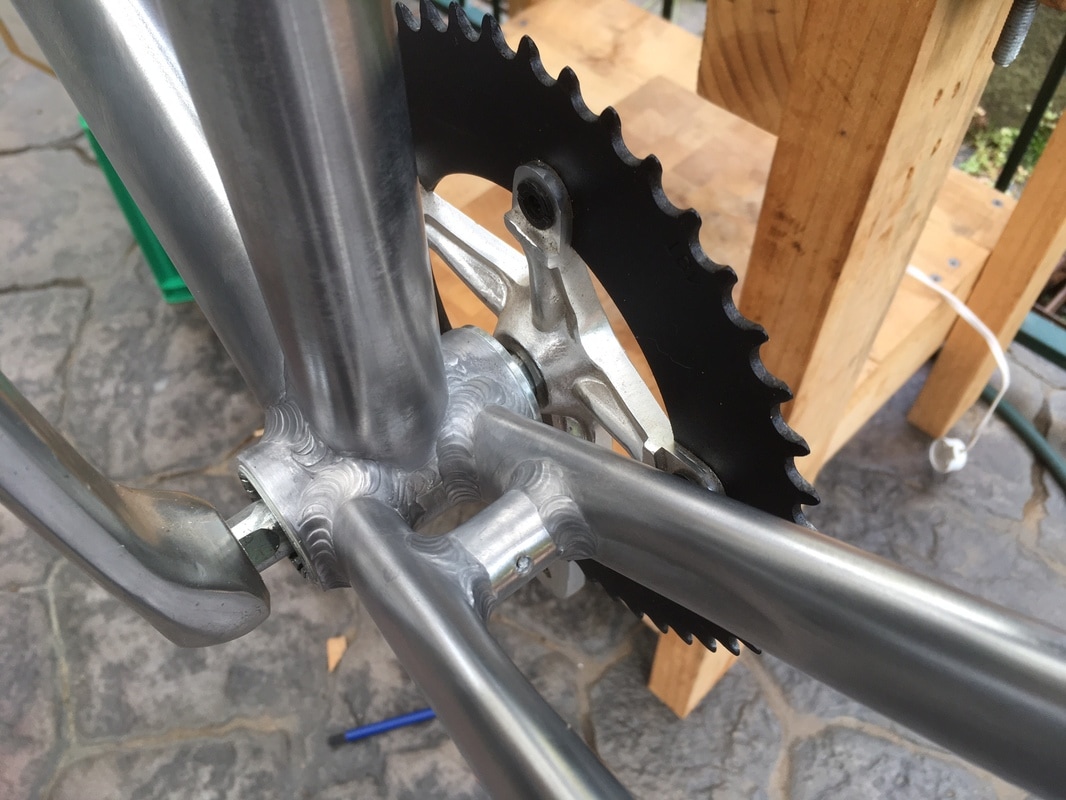
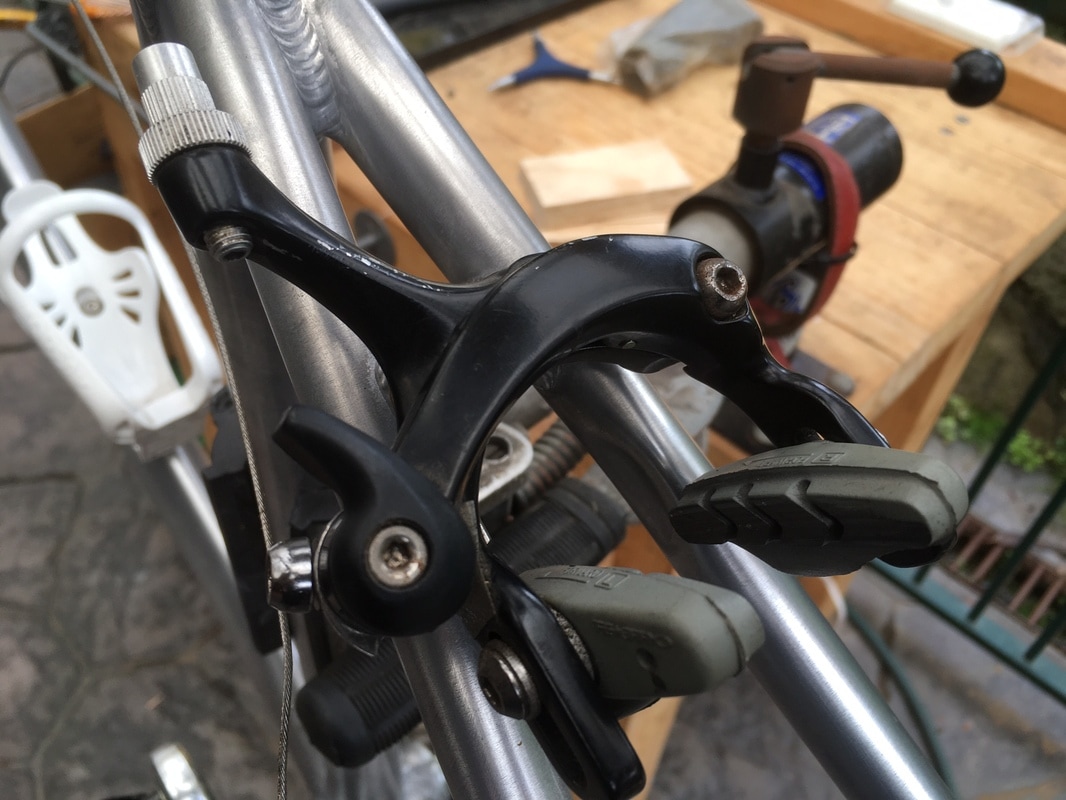
Bottom Bracket, Headset, Bottle Cage, Cranks, Seat Post, Saddle and Calipers
I cleaned up, re-greased and re-installed the bottom bracket. The head seat was an Aheadset and installed no problem. Even getting the crown race on was a doddle. I re-installed the seatpost which also included a plastic spacer and rubber seal to prevent dirt getting into the seat tube. I was in two minds about re-installing the Topeak bottle cage but did it anyway as it is a decent cage. The Lasco cranks and front chainring went back on. The Tektro brake calipers were cleaned and re-installed and finally I replaced the original seat with a brown Brooks B17 saddle that came with my Dahon Smooth Hound a while back. It's practically new and the gold anodized seat rails will need abit of a polish as they have some green spots on them. I have to say it was nice installing components that were a perfect fit and measurement for the frame, as most are original. Very satisfying!

Latest Upgrade - 15/6/2017 - Aerospoke Rear Flip Flop Wheel - Raw Carbon Look
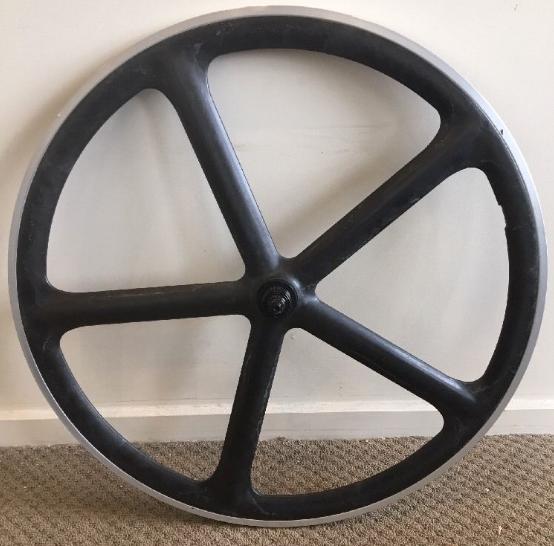
So even though I already have the Trek SS wheel set, I thought I'd try my luck at finding an Aerospoke rear wheel. So I got onto ebay and guess what, there was a black one available second hand. So I placed a bit and managed to score it for $128! This one is new and very dirty from storage and has not been used much. Trial fitted a few times. So I have this coming. At present I am using a black Mavic front rim with a dura-ace hub. So I thought this black rear wheel would match it nicely. So I may end up putting the Trek wheel set up for sale along with the ugly pink and green fixie wheels that came with the bike originally. Then again I may keep the Trek set as a back up in case the current setup fails. Looking forward to slapping this baby onto the Bowery frame. When it arrives!
I also messaged the seller asking if the wheel was actually new or if it was just dirty looking. He had just bought a bike business and the business used to be a supplier for Aerospoke. This was one of the items left behind. The reason it looks a bit faded is because it is a raw carbon look, and he assured me it is brand spanking new. So that was a bit of luck for me eh!
Here's a site tour of the Aerospoke factory - http://www.fixedgeargallery.com/interviews/aerospoke/
Other parts - changed, re-used, upgraded etc.
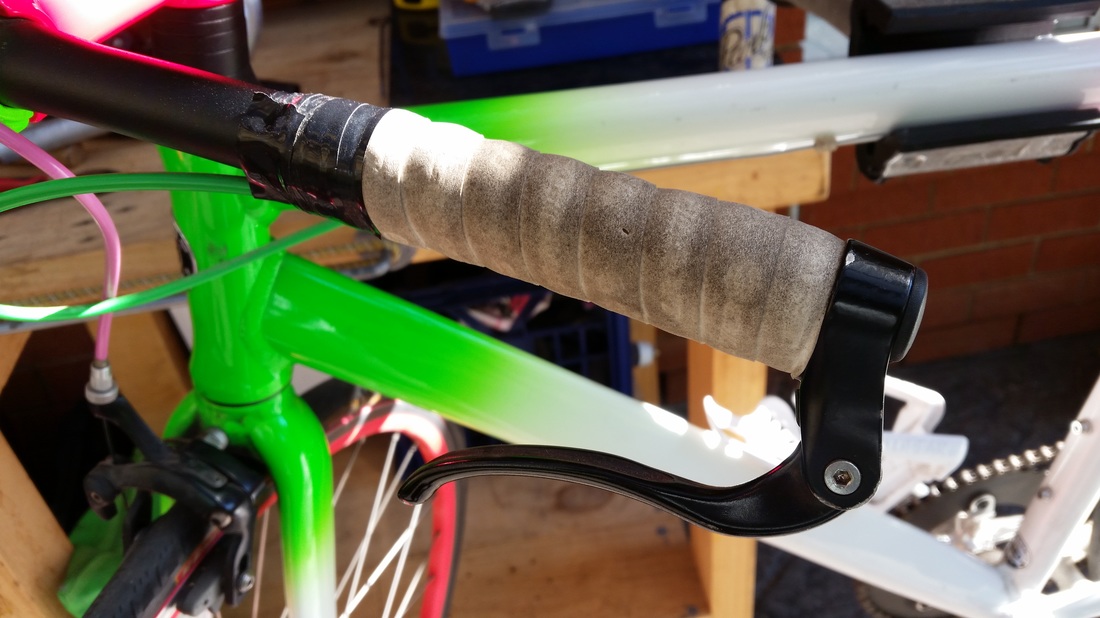
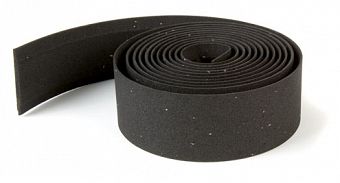
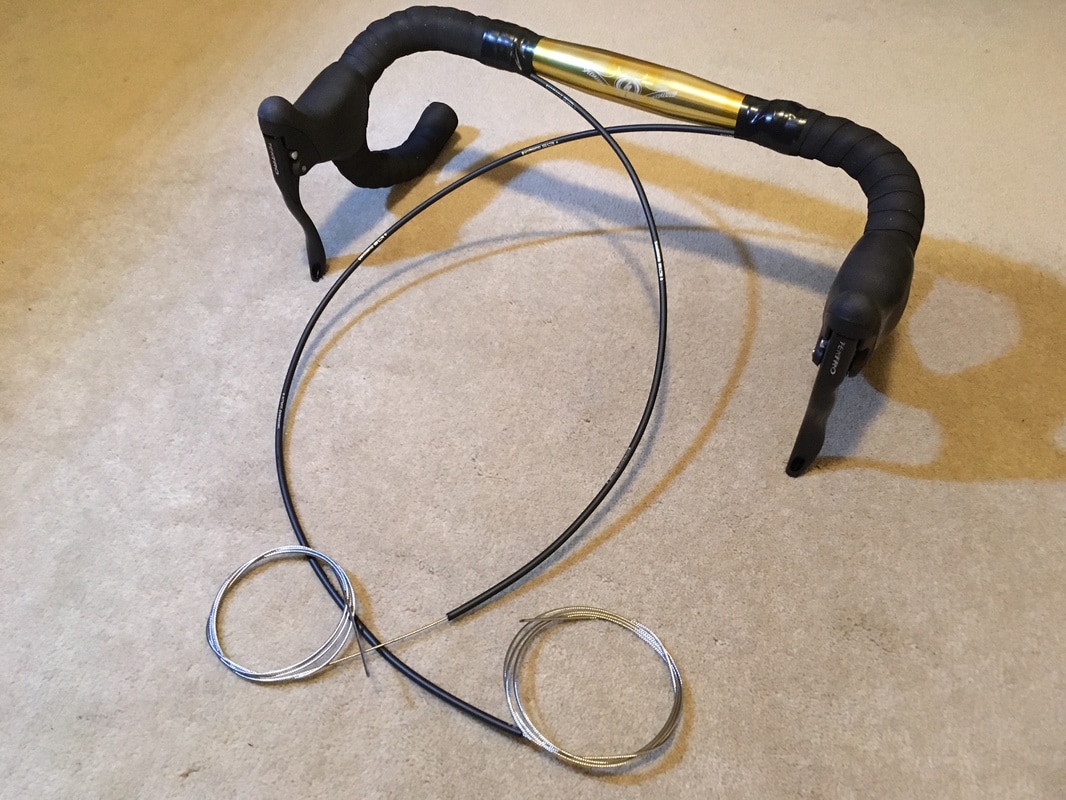
As I will be adding drop bars to the bike, I decided to upgrade some parts. I already have the handlebar which I have cleaned and stripped. I had some spare length of Shimano SLR outer cable housing in my toolbox which could be used. Also bought some new brake cables to go with the Tektro road brake levers. I will be re-using my profile design bar tape as there is nothing really wrong with it. This is why I love profile tape that is non-adhesive, it can be re-used! As I do not have the end caps anymore that came with the tape, I bought some BBB caps from the bike shop too. To help put it all together I am using Nitto electrical tape which is also heat resistant. I have been using Nitto tape for years on my bikes and also for my electrical and solar projects. Will not use anything else!


Ok, time to sort out these handlebars.....twice!
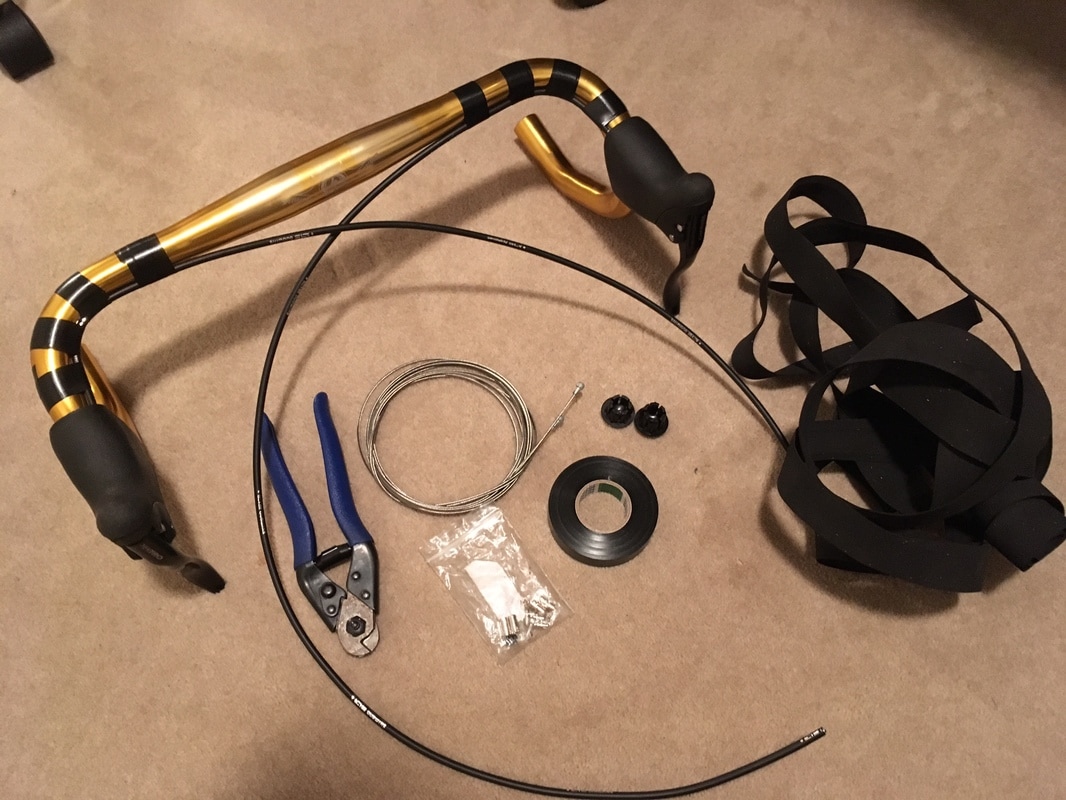
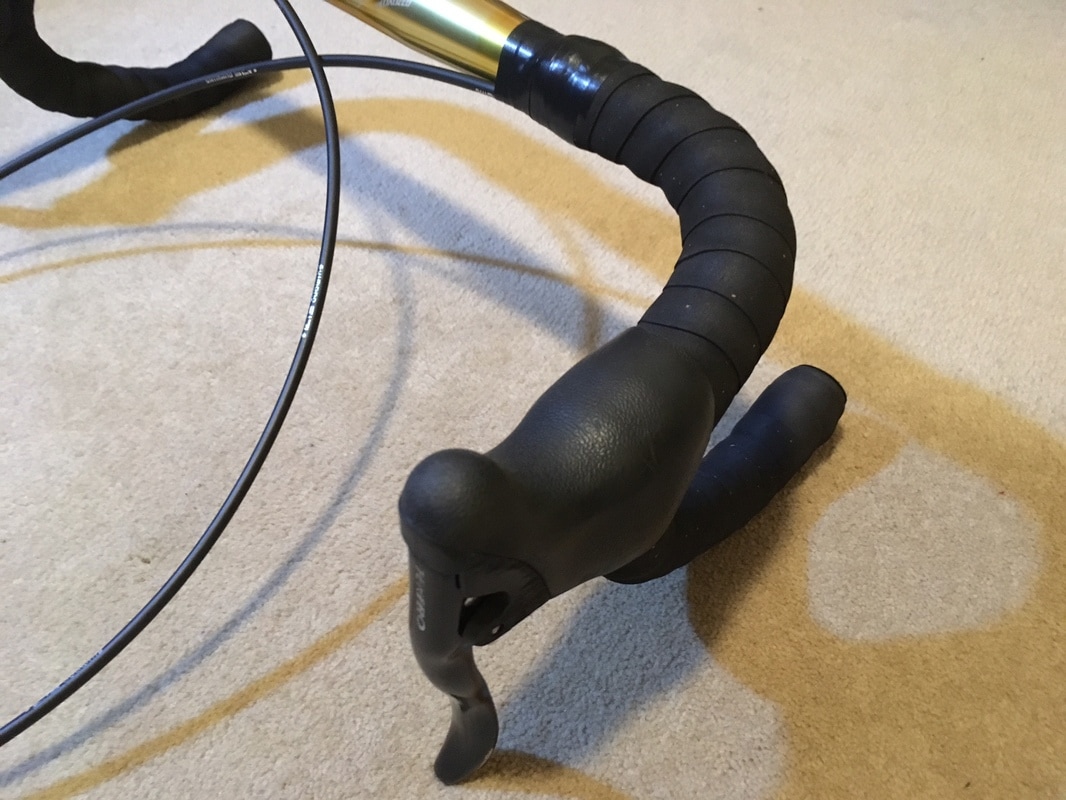
I cleaned up the handlebar good with some eucalyptus oil to get rid of the sticky residue from the previous owners bar tape. I really don't know why adhesive backed tape is so popular as the non-adhesive stuff seems so much better and you can also re-wrap if needed. Got some cable cutters, new end caps, p-lugs, inners and outers and of course my used bar tape. I have already inserted the cable ends into the brake levers at the rear and taped them up to the bar with some electrical tape.
The truth is I already wrapped the bars and taped them to finish but had to undo it! I did not place end caps on the ends of the cable outers before inserting them into the brake levers. Was near impossible to insert a cable throughout the hole after that. The caps help locate the cable. So here we go again!!
All done now!

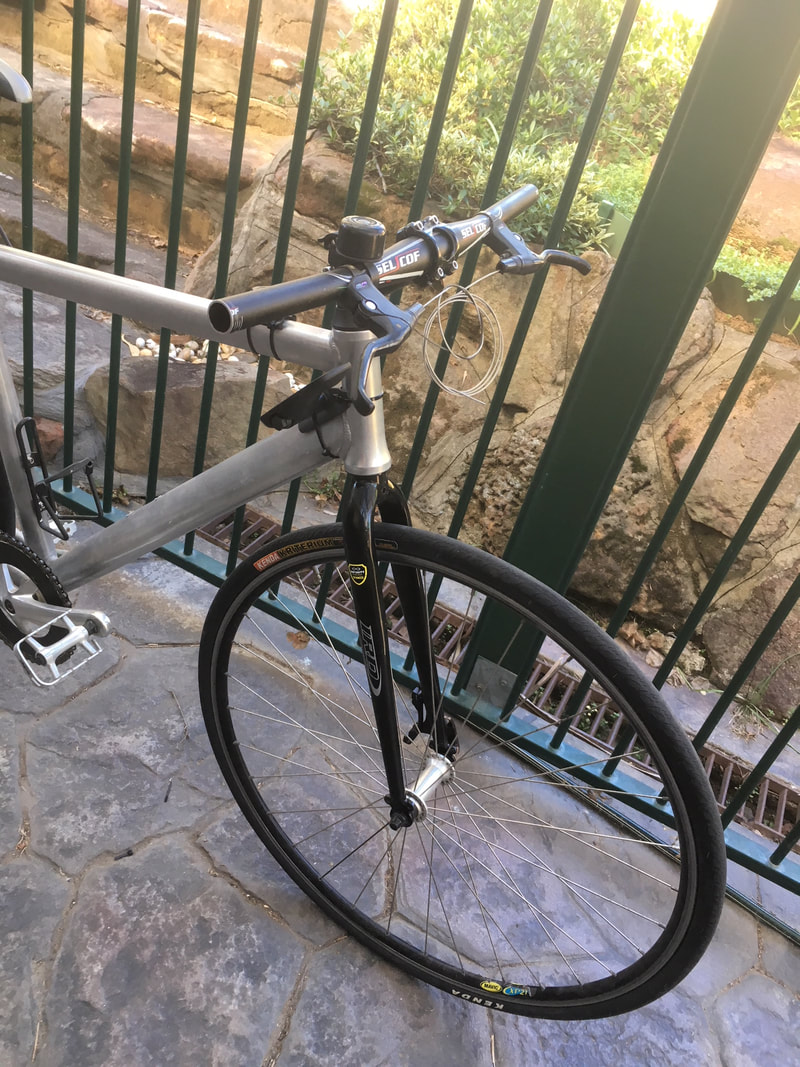
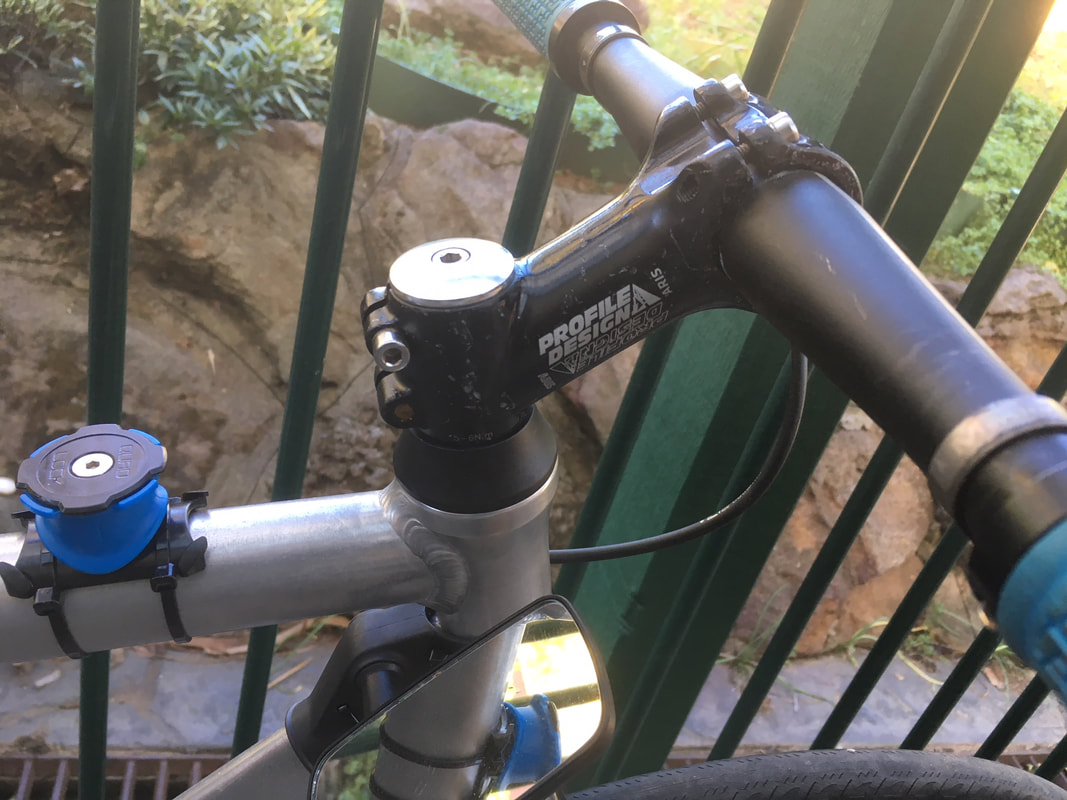
Stem Update - Profile Design Aris 80mm raised stem
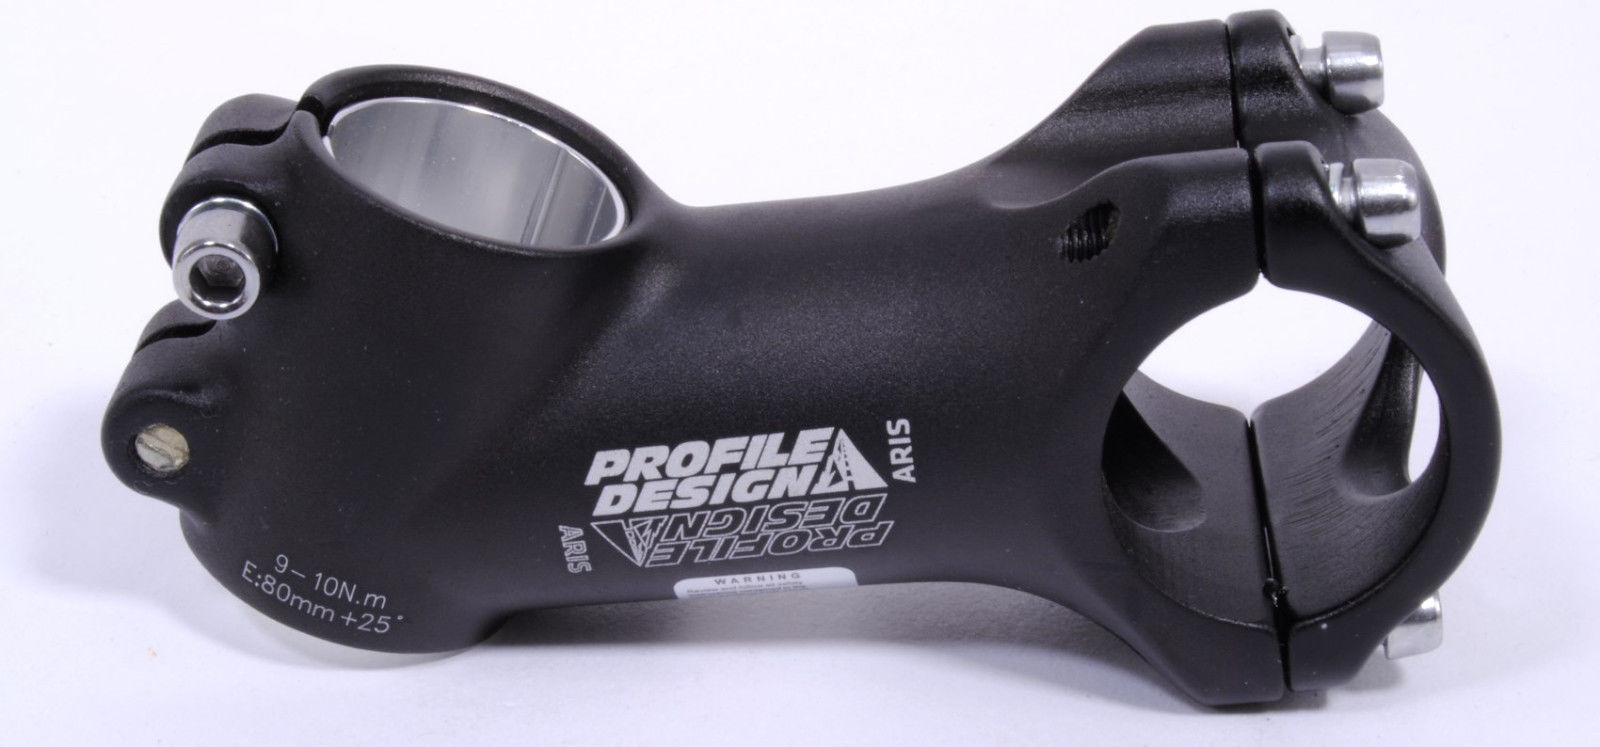
This is a raised stem. I'm not a super tall person (5'7), so wanted to raise the height a bit. Don't want to lean over too much when riding. I can always go back to the Easton straight stem or flip this one over for real aggressive riding. Will show you an overall picture of the bike completed with this on. Also my Aerospoke has arrived today so we're nearly there!
The bike in it's current state...
So I haven't updated in a while. Basically it is ready.
I know what you're thinking, where is the Aerospoke? Well I still have it, and I even have the correct length QR skewer for it. Unfortunately after consulting numerous bike shops and also attempting to do things myself, there has been no success. Aerospoke have kinda gone out of business too and I believe the new owner has started a new business called Encore Wheels. The issue I have been having is getting the right end caps/spacers for this hub so that the hub could fit snugly between the rear dropouts. At present the drop outs are just too wide for the Velocity hub which appears to have been epoxied in.
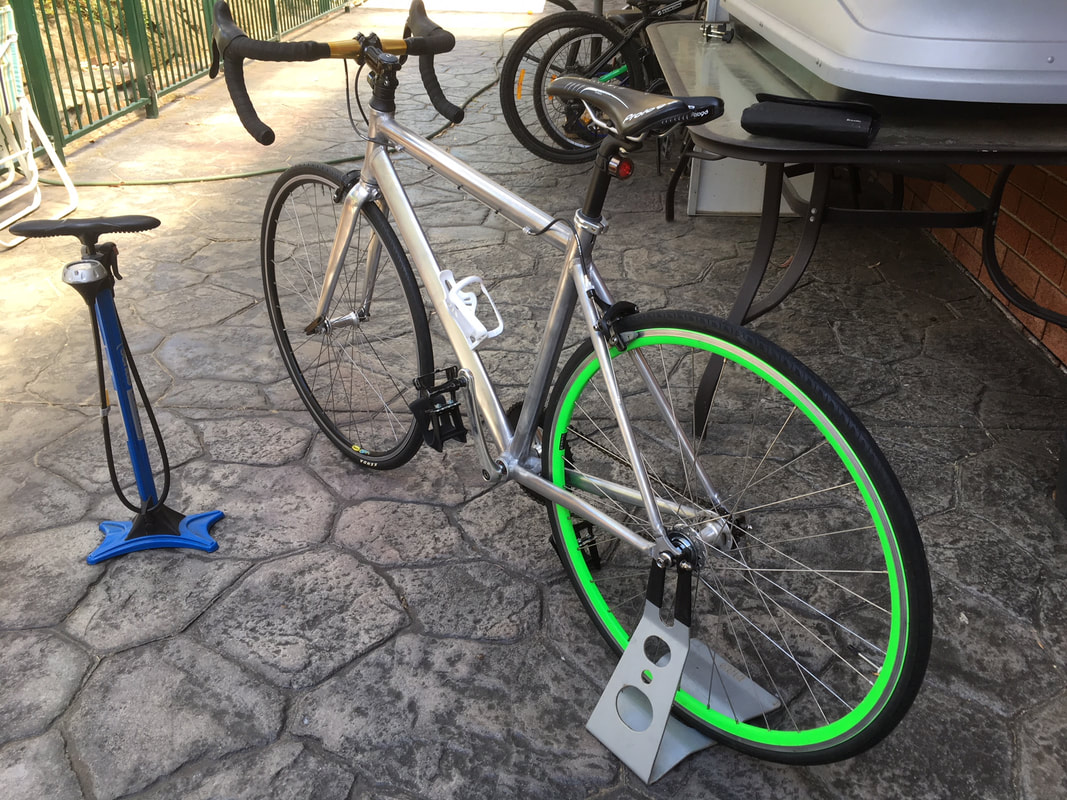
So the original Giant green rear wheel is back on and it really doesn't look that bad. Plus I don't have to worry with alignment issues for the chain etc as it is back to how it came from the factory. What you will notice is the freshly polished frame, some lights which I stole off my son's bike which he never rides, new bar tape, bottle cage (came with bike) and updated Mavic front wheel with Tiagra hub. Tyres are standard and I may upgrade to some Schwalbe's eventually but they will do for now.
I know what you're thinking, where is the Aerospoke? Well I still have it, and I even have the correct length QR skewer for it. Unfortunately after consulting numerous bike shops and also attempting to do things myself, there has been no success. Aerospoke have kinda gone out of business too and I believe the new owner has started a new business called Encore Wheels. The issue I have been having is getting the right end caps/spacers for this hub so that the hub could fit snugly between the rear dropouts. At present the drop outs are just too wide for the Velocity hub which appears to have been epoxied in.
So the original Giant green rear wheel is back on and it really doesn't look that bad. Plus I don't have to worry with alignment issues for the chain etc as it is back to how it came from the factory. What you will notice is the freshly polished frame, some lights which I stole off my son's bike which he never rides, new bar tape, bottle cage (came with bike) and updated Mavic front wheel with Tiagra hub. Tyres are standard and I may upgrade to some Schwalbe's eventually but they will do for now.
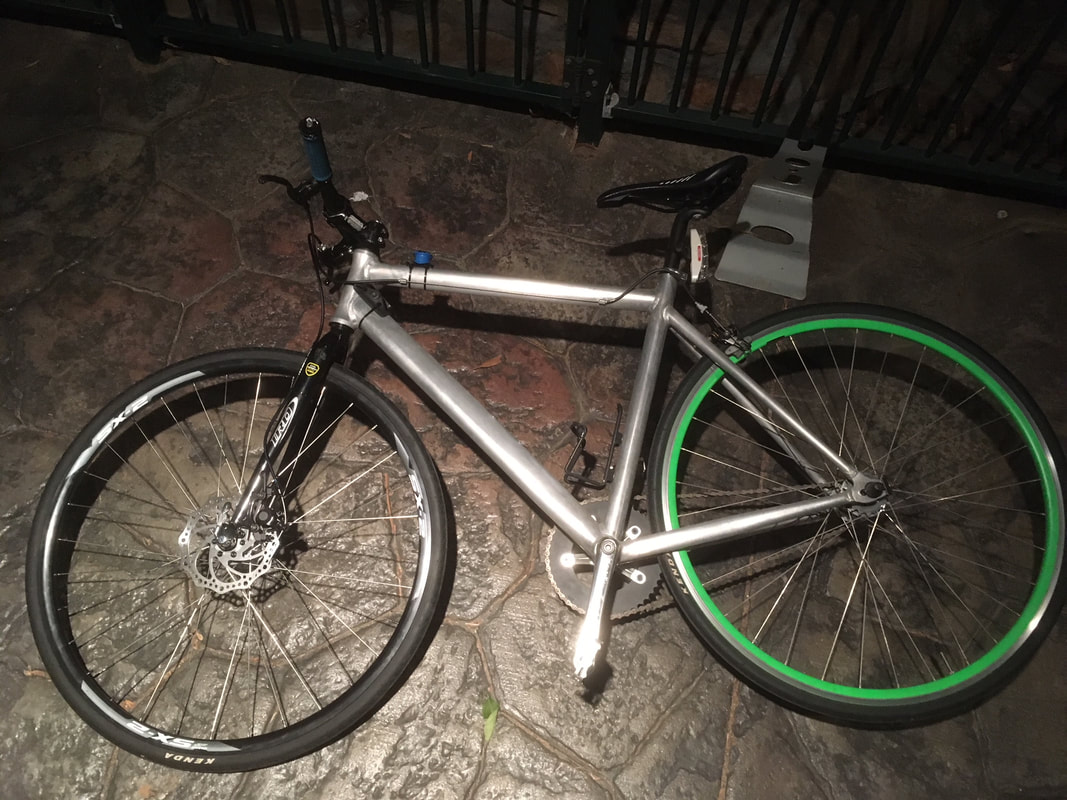
19/08/2018 - Updated to flat bars, disc fork and only one brake (for now)...
So I have recently gotten back into riding again and have been heading out with the kids almost everyday after school for 30 minute rides. It's winter at the moment so there isn't really much daylight so we've had to limit the rides. Still I quickly worked out that the drop bars were not going to cut it because, as I expected, I have difficulty reaching the brake levers using drop bars due to my smaller hands. So have switched over to flat bars and some old Altus C10 levers I had kicking around. My old Selcof flat bar came in handy, originally from my first fixie build. Had to remove the spacers to accommodate the new disc brake fork as the top tube on the fork was shorter. So I have remedied the height issue with a higher rise stem. All works well. Down the track I will be removing the rear brake, and only using a front disc brake. I will also be adding the aerospoke to the rear. Just gotta get the hub sorted. Front brake has been removed for now because the rear mounting bolt for the front brake caliper does not fit the new fork. I may just leave it off permanently until I get a disc wheel and caliper. I have also stolen the grips from the mountain bike temporarily until I can get some new ones.

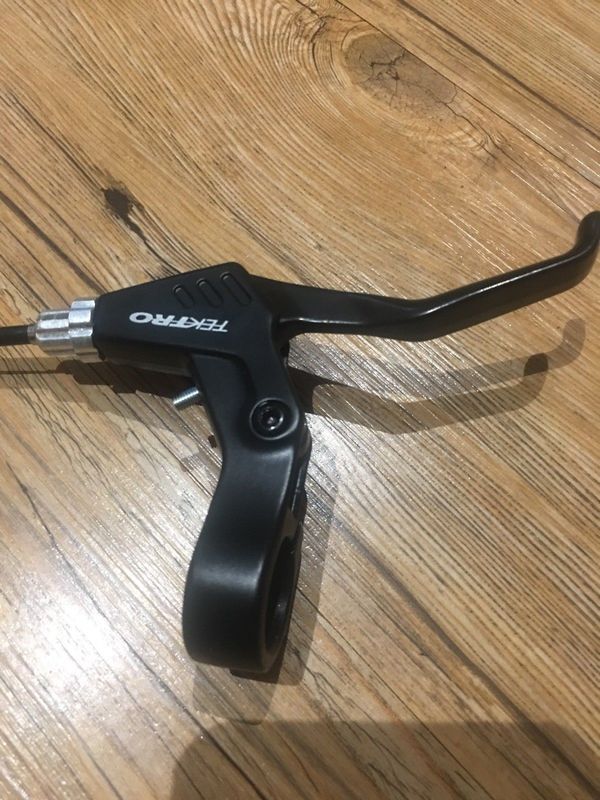
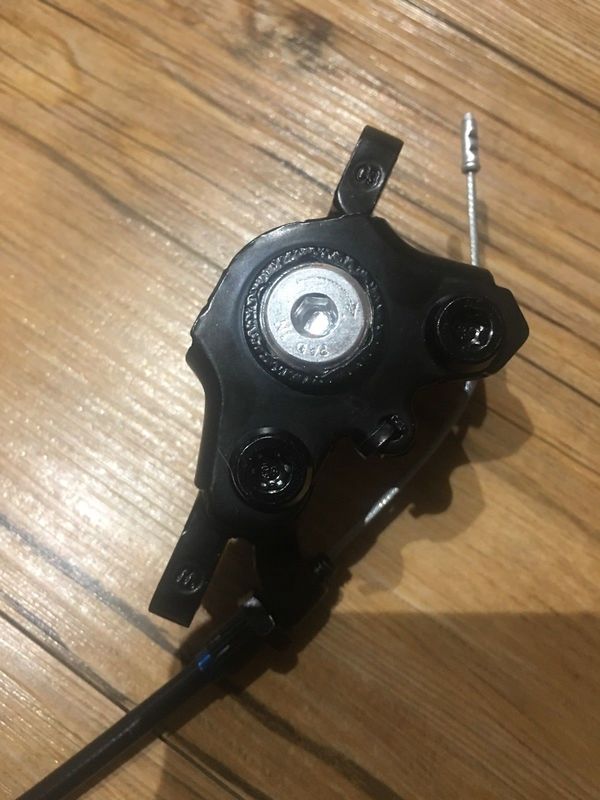
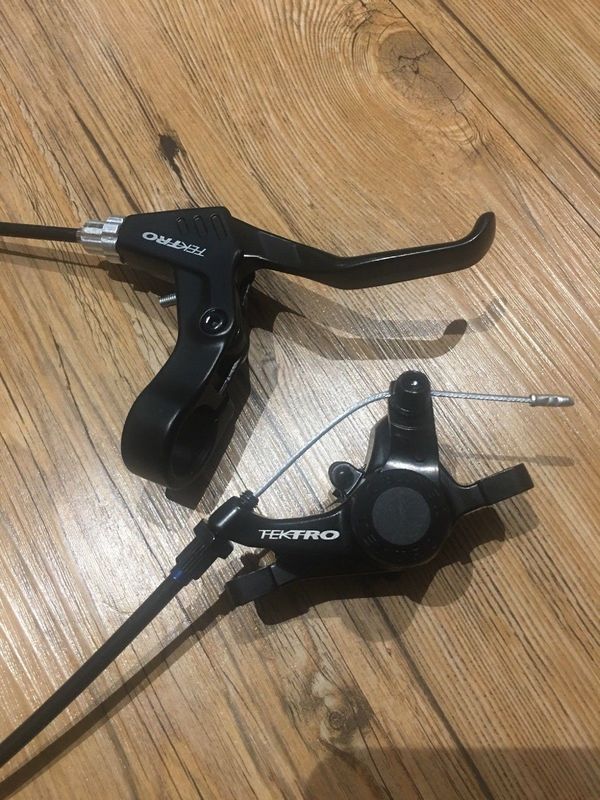
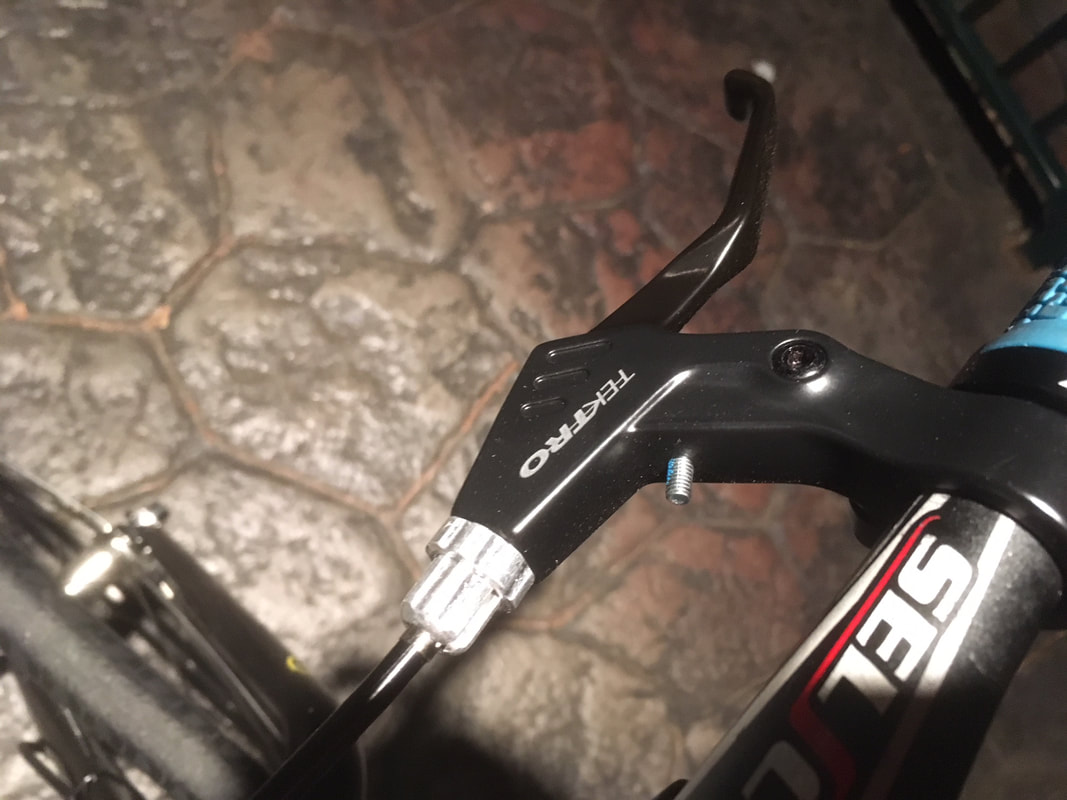
Tektro Brake Caliper and Lever
I bought this brake system for $25 delivered. It was taken off a Norco 250 downhill bike and is brand new, never been used. Will just need to make sure that I have the right adapter for it to suit the mounting for it. I generally prefer Tektro and Avid when it comes to brakes. Parts are good quality and don't have the crazy Shimano price tag! I only buy Shimano 2nd hand if I have no other choice. Once I get this system mounted I will completely remove the rear rim brake. Am planning to use the Aerospoke on the back so will not need a brake on there, even though the Aerospoke has a machined sidewall for a rim brake. Basically I will not have to worry about wheel rim wear anymore, either that or I'll leave the rear brake, but I can't decide! We'll see how things go. The green wheel will still be on there for awhile as I still need to get the hub sorted on the Aerospoke.


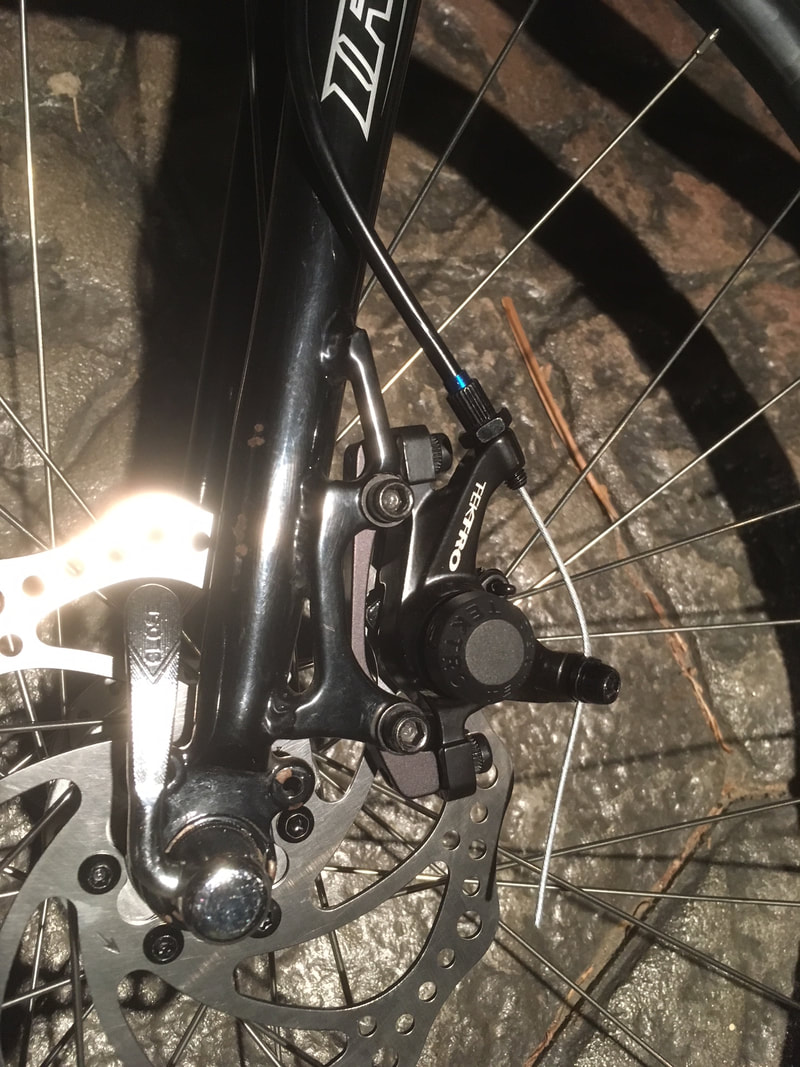
Brake Install Complete!
So I finally got around to installing the brakes and it was easier than I thought. The initial lining up of the caliper with the rotor was a bit fiddly but I finally got it dialled. I had read before the install that mechanical disc brakes had more slack in the lever and they do, however they stop great. I also ended up calbe tying the brake outed to the fork to make it a bit neater. I also decided to remove the rear rim brake calipers. Gonna just use the front rotor only. That is most likely how I will keep it when the Aerospoke goes on also.

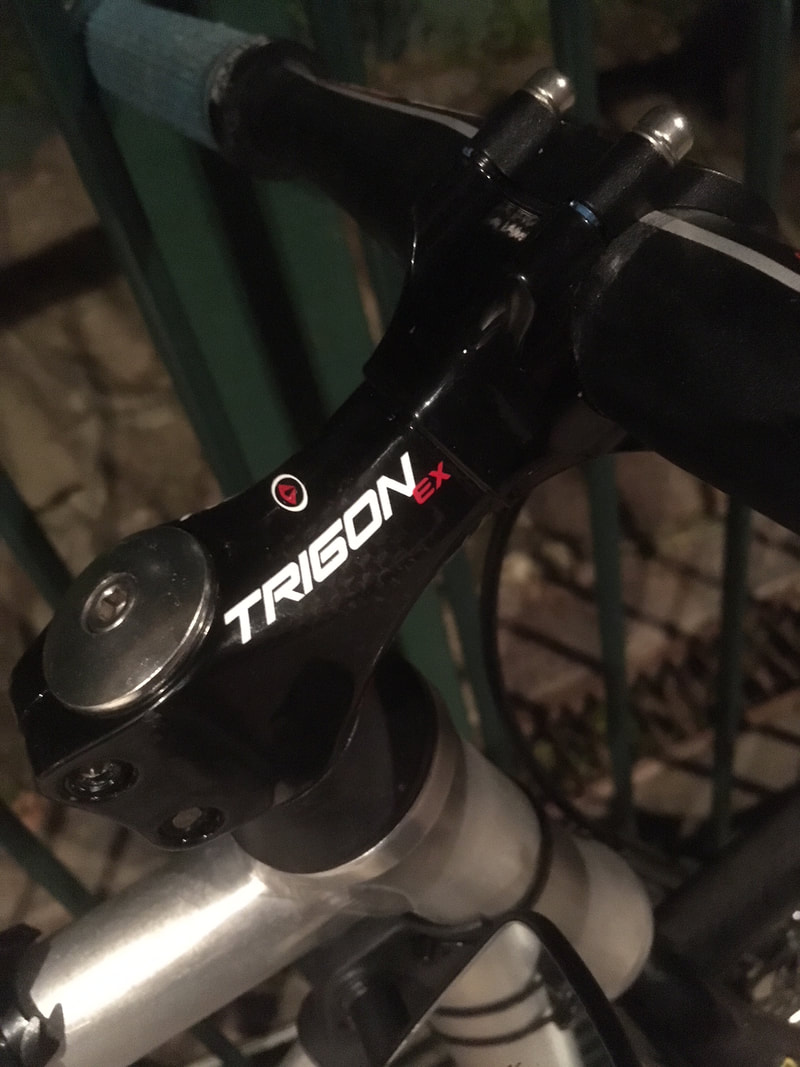
Trigon Carbon Fibre Stem
I have had this stem for about 6 years in my parts box. The reason I had not used it was because one of the bolts that lock onto the fork tube could not be tightened because it was a carbon stem. The threaded section that had been moulded into the stem to allow a screw to be attached kept spinning. I still have to figure out how to tighten it but the other one is tight and the top cap is tight too. Seems to be holding together. I'll have to fix it eventually. I figured because the caliper and disc adds some weight to the bike so I thought I'd lighten it back up by putting a less weighted stem on. Seems to be working fine.