REPCO TRAVELLER RESTORATION - November 2011
(Completion Date: 12 May 2012)
1987 Repco Traveller Roadbike
My latest project. Why do it? Because I recently have been doing alot of reading about single speed & fixed gear bikes. Plus I recently completed the 2011 Spring cycle and managed to tackle all the hills for the full 55km and never changed gear once! So I figured, I'll have a go at building my own single speed/fixed gear ride. Hopefully will be finished by my birthday next year.
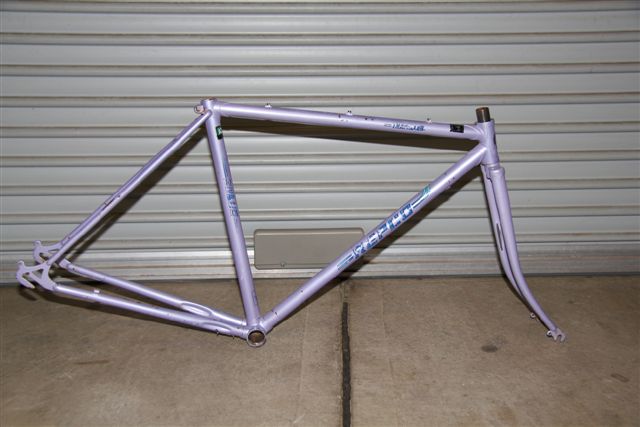
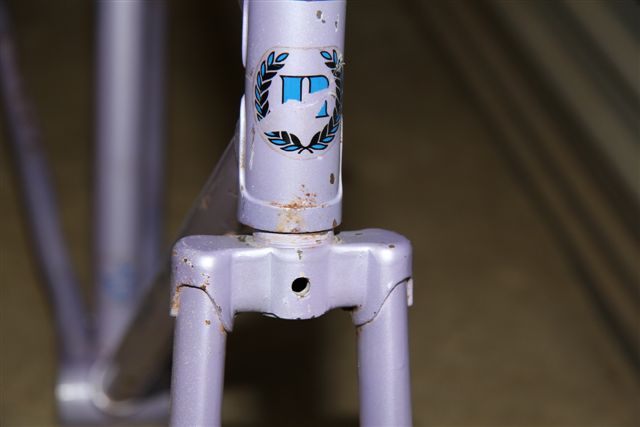
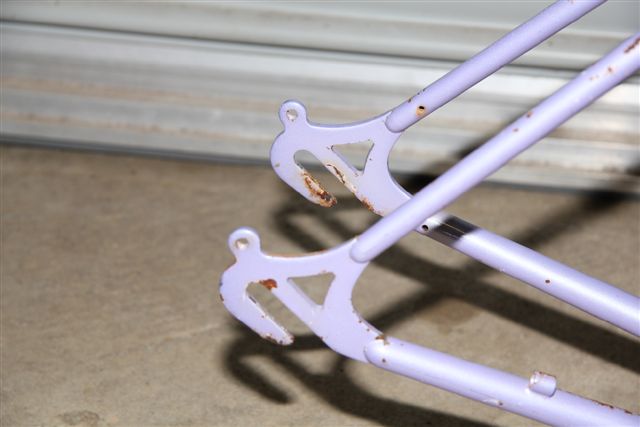
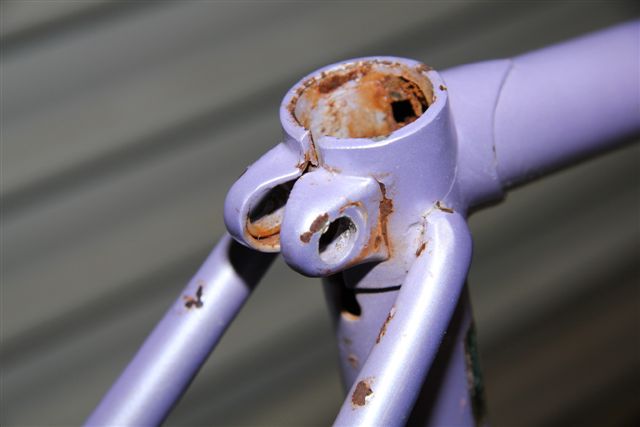
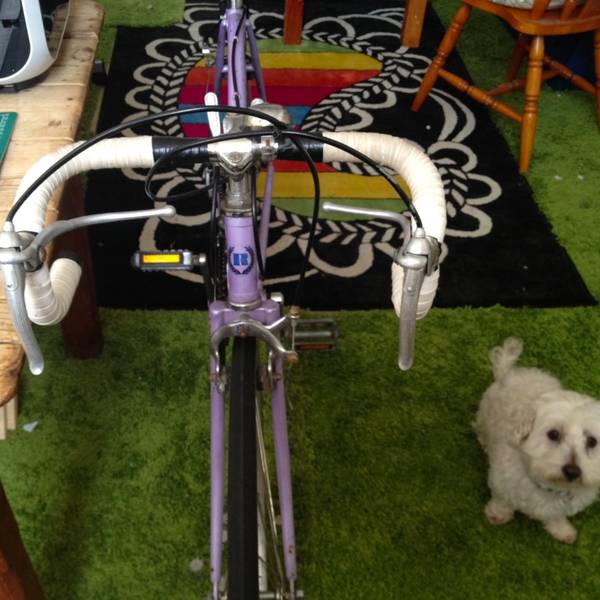
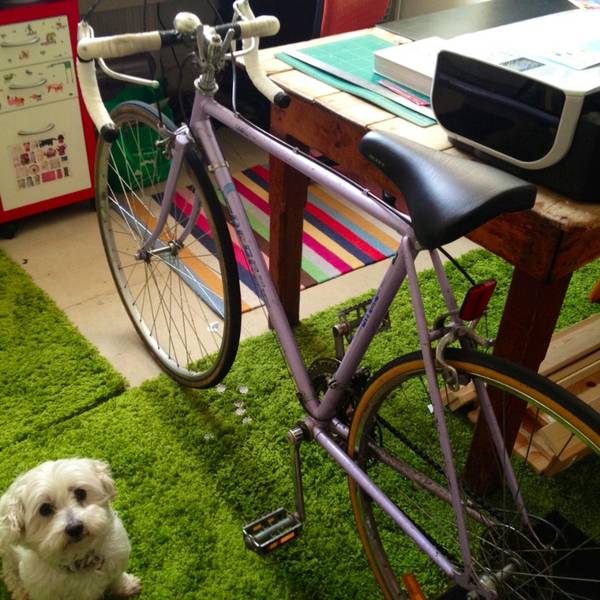
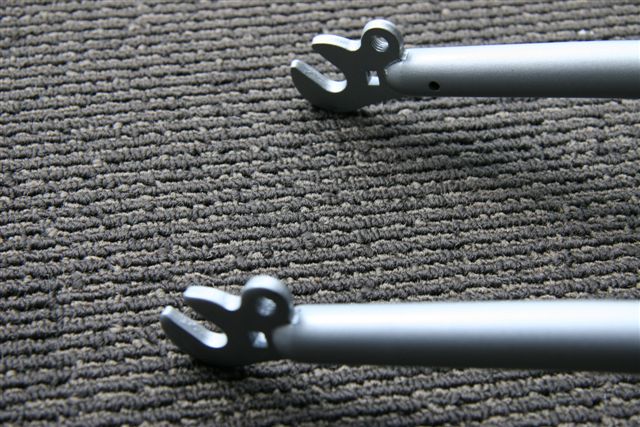
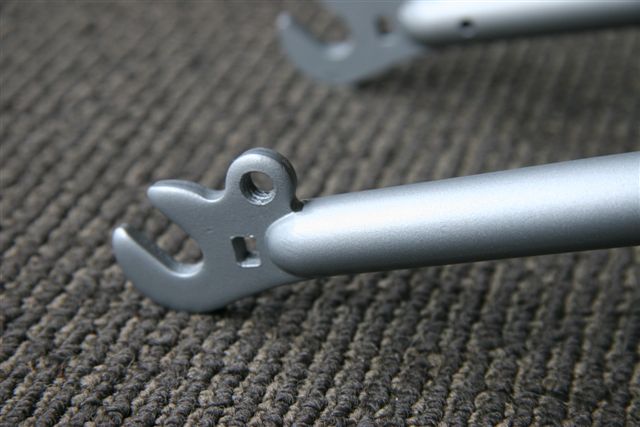
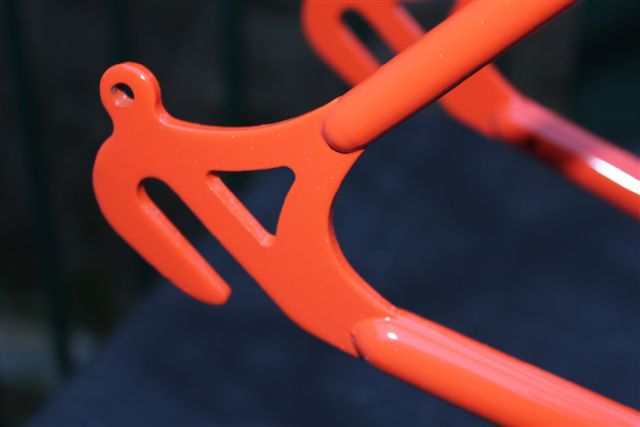
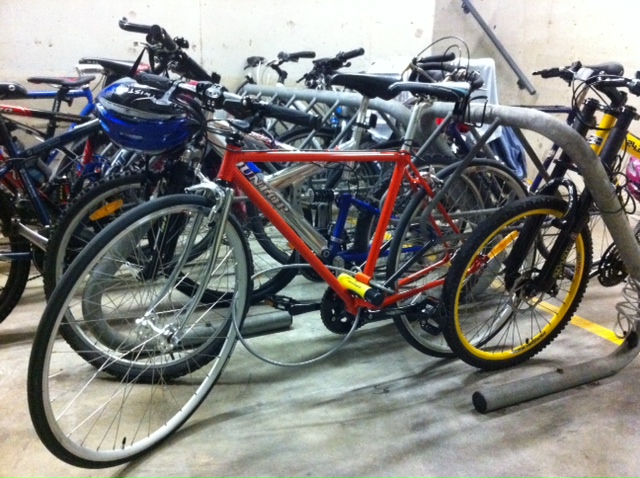
The rebuild. The frame is an old 48.5cm road bike. I bought it for next to nothing from the local bike shop. My intention was to go in to buy a new light, instead I walked out with a rusty old frame for $20!. The bike is from the early 80's. After abit of research on the web, looks like it may be from around 87 or 88. As you can clearly see, I am starting from a bare frame & fork that has a shitty two-toned paint job - lilac & rust! Luckily the frame is in good condition and it is only surface rust. It is a popular frame for a fixed gear conversion - retro, high tensile steel, near horizontal dropouts (for adjusting chain tension) on the rear triangles etc. For starters I had a look on the web to see if anyone else had restored this particular bike. There turned out to be a few people that did, and some even turned theirs into a single speed! So that was lucky! Below are a few more pictures that show the condition of the bike when I got it.
The rebuild. The frame is an old 48.5cm road bike. I bought it for next to nothing from the local bike shop. My intention was to go in to buy a new light, instead I walked out with a rusty old frame for $20!. The bike is from the early 80's. After abit of research on the web, looks like it may be from around 87 or 88. As you can clearly see, I am starting from a bare frame & fork that has a shitty two-toned paint job - lilac & rust! Luckily the frame is in good condition and it is only surface rust. It is a popular frame for a fixed gear conversion - retro, high tensile steel, near horizontal dropouts (for adjusting chain tension) on the rear triangles etc. For starters I had a look on the web to see if anyone else had restored this particular bike. There turned out to be a few people that did, and some even turned theirs into a single speed! So that was lucky! Below are a few more pictures that show the condition of the bike when I got it.

Original Example
Found some pictures on the web of what the bike would have originally looked like. Someone was selling theirs online so I snapped up the photos before it was sold. So you can really see a true before and after. The dog seemed real interested in the photo taking! Looks like the bike originally came with suicide brake levers - two areas for your hands to apply braking. 12 speed gears (2 on the front & 6 on the back) and stem mounted shifters and white handlebar tape. Also 27 inch wheels and of course that awful lilac colour. I'd say it was most definitely a colour chioce selected by Repco that was suited more to women. It is a female selling this one after all. Still, this has got to be the most original example of my exact bike that I have seen to date.


WORK BEGINS!!
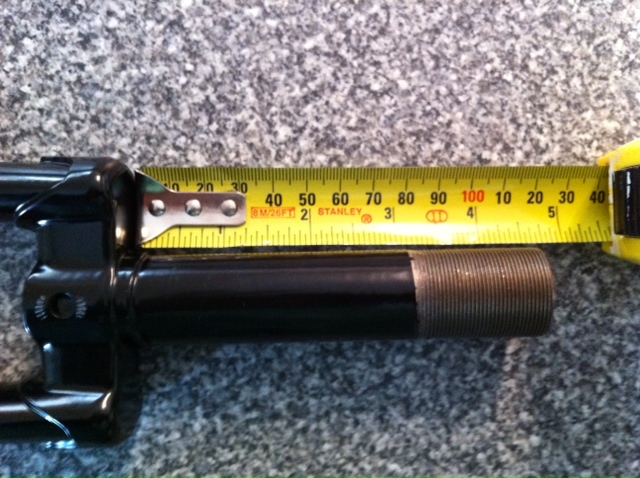
Front Fork Work

The front forks were stripped of their paint and rust with the help of some paint stripper, 230 grit wet/dry sand paper, 400 grit wet/dry sand paper, a wire brush, a chordless drill with rotating wire brush attachment and alot of elbow grease. I stripped it over the course of a few days, spending a couple of hours in the garage every night, after the kids fell asleep! One of the forks also had abit of metal stuck in it and it was rattling around all the time. I could have left it but that would have been a pain to listen to when riding around. I thought about just buying a nice new chromed threaded fork online. There were even some great second hand ones, but decided against it. Afterall this was my project on a budget so I stuck with what I had. I decided to attack that clanging metal bit! There was no way to get it out through any of the holes as they were too small. My original solution was to stick a tube into the holes and fill the forks with expanding foam. In the end I used some good old bathroom waterproof sealant and that seems to have done the trick. The gap in the frame is sealed in both tubes and there are no more rattles! This isn't a world class bike builder you know! I made sure I cleaned the forks thoroughly and rid them of any rust. Sanded it, washed it, wiped it down, cleaned off any excess grease or contaminants with some pre-paint cleaner, and then went nuts with the can. The frame was hung up and given a few coats of rust guard silver paint. This particular paint doesn't require primer if painting directly onto new or cleaned steel, free of rust. You can see the difference in the picture below after four coats. Not the best job but I am happy with it, for a first attempt. Still need to put some laquer onto them but will wait until the frame is complete and will do together. I'm abit more confident to do the frame now. Up until this point, I had never really spray painted anything before!


Main Frame Work
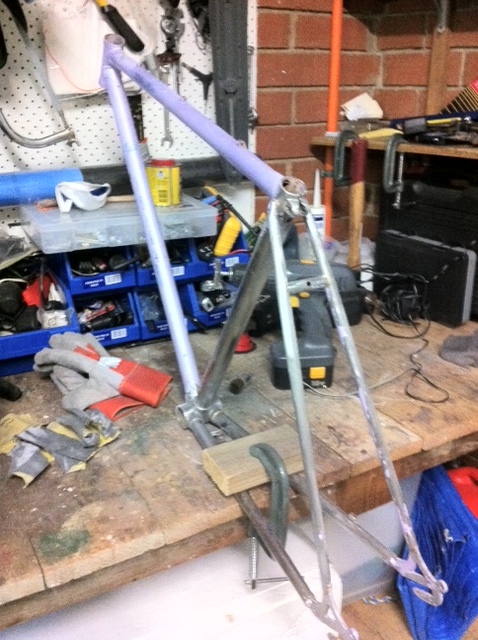
Today is the 9th of December. I started some work on the main frame a couple of weeks ago. Gave it a light sand just to get it a bit rough so that the paint stripper would penetrate better. Applied some paint stripper to the rear triangles and the seat tube to start. The paint still came off but not as easily as the forks. Had to re-apply a couple of times.
Once it was wire brushed and excess stripper washed off I surveyed the damage. There was still quite abit of surface rust on it and not all the paint was off. So began sanding and getting at it with the rotating wire brushes attached to a cordless drill. A direct power drill would be better for this as I had to keep charging mine all the time after about 20 mins use.
Getting into all the gaps to get at the rust is quite difficult and tedious plus you have to becareful with the brushes in case you take off too much metal resulting in deep scratches to the steel. In the end it was getting too late and I decided to get inside, have a shower, get the kids to bed and get ready for work the next day.
Was talking to a colleague that knew a powder coater. After the process was explained to me we gave this guy a call. So now it looks like it will be sandblasted and powder coated professionally! I was hesitant at first because the purpose of this project was to do everything myself. However I was finding it hard to even get the time to do it. Due to family commitments and work. But in the end the deal was too good to pass up. So I have given the frame and the fork (yes I know, all my hard work gooooone!) to the powder coaters and will be picking it up in early January 2012.

As you can see most of the paint has stripped away but there is still alot left. Some of the stickers were near impossible to get off. I tried everything I had around the house to get them off. I didn't want to spend more money on buying products that would only be used once etc. so I just did my best and have left the rest to the sand blasting. Doesn't really look like a bike does it? Without the wheels, seat or any of the running gear, you'd think it was a frame for a kids bike!
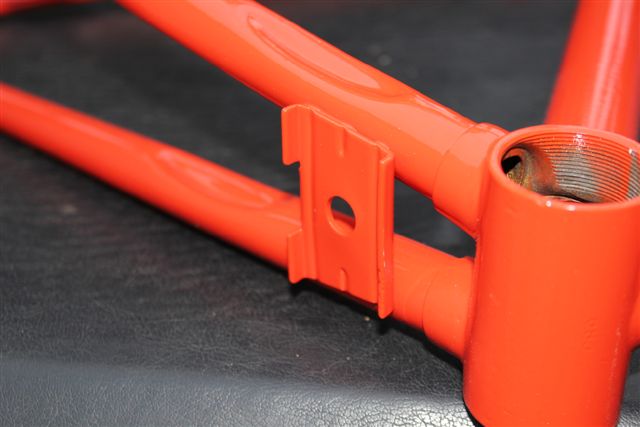
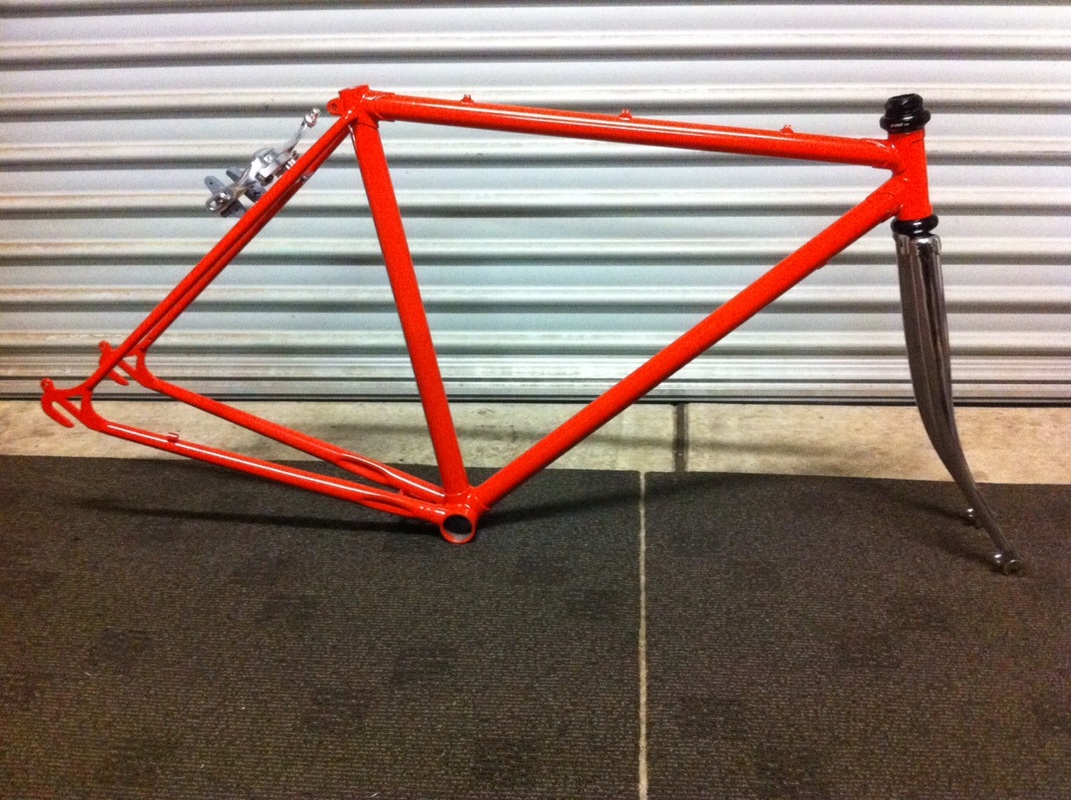
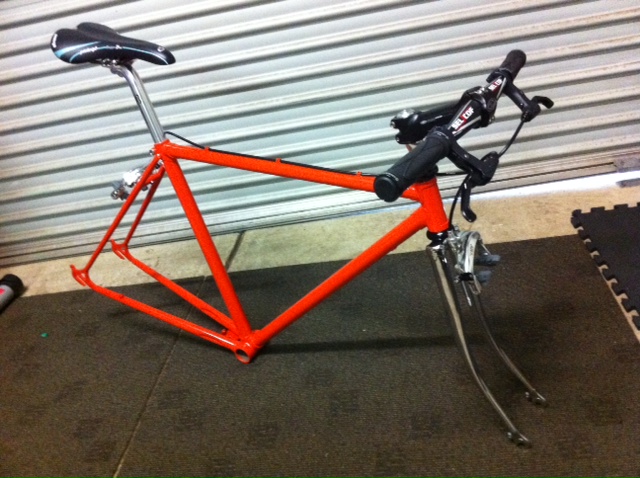
Work Complete! - Frame: Milano Red, Fork: Gloss Black
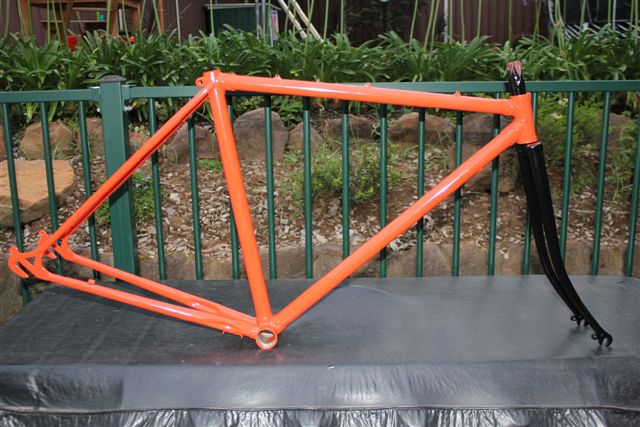
So here it is! The powder coaters sent me an sms yesterday (20/12/2011) and told me that it was ready. So I picked it up before work time at 5:30am the next day (when they open) after about 4 hours of sleep myself! I took the photos as soon as I got home so the deep orange color doesn't look it's best. I might replace these shots when there is better daylight and no need for the flash. The frame is also a bit dusty which does show up in some of the shots. I chose Milano Red as it was the deepest orange looking color that they had available. Gloss Black was an easy choice for the forks as I liked the black on my Azzurri road bike. Now the re-assembly work begins. One benefit is now that the frame work is complete, I can take my time in getting the bike ready as it is in no danger from rusting anymore. I still aim to have it finished before May 2012.


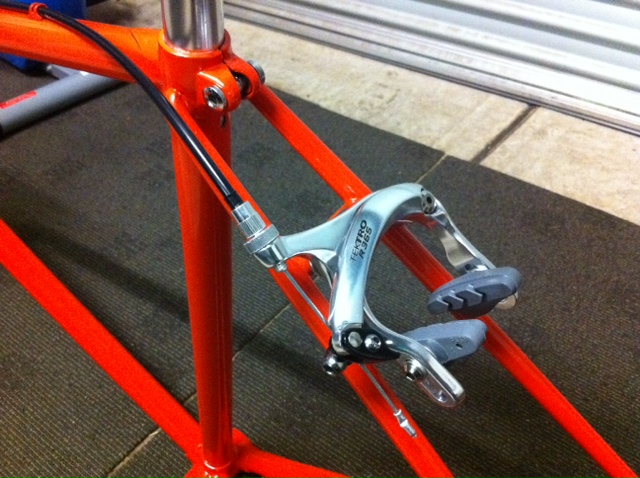
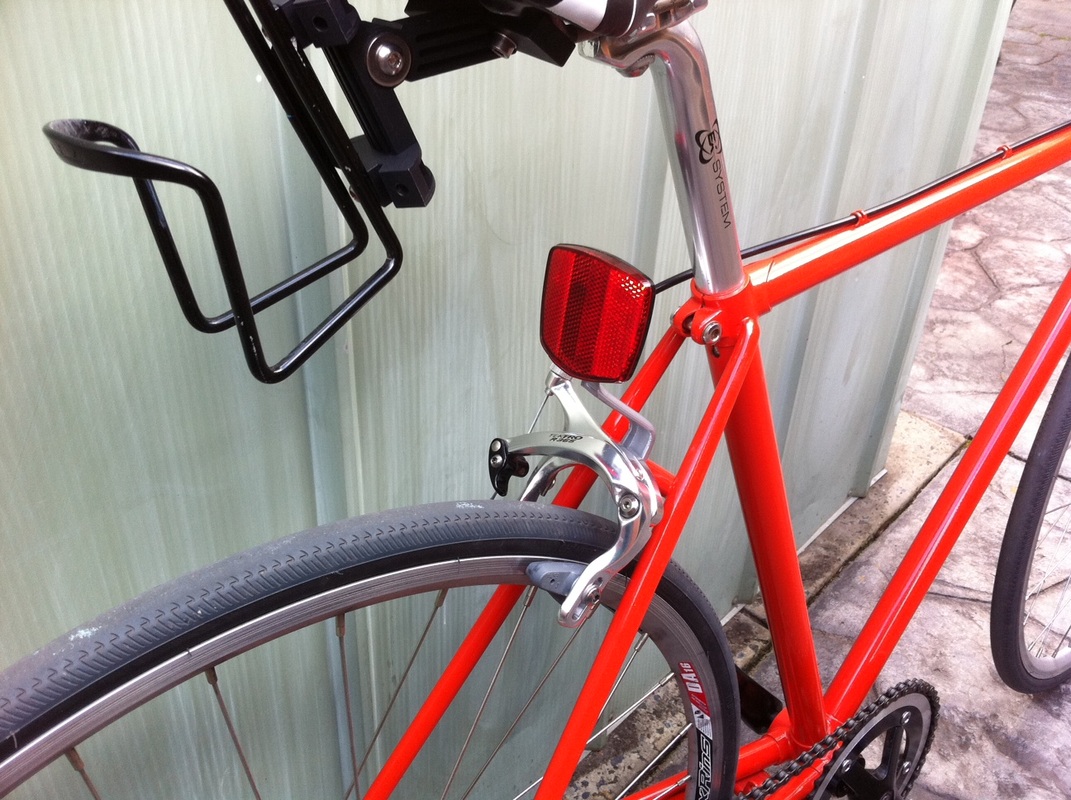
Brakes - Tektro R365 Front & Rear Longreach Brake Calipers - SILVER
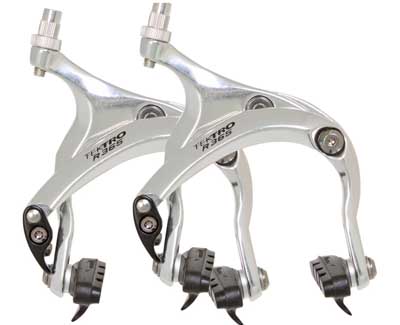
Probably the most expensive part of the build. I did some research on brakes and worked out that older bikes had larger diameter wheels. Because I will be putting 700x23 wheels onto the frame, the distance between the mounting hole on the fork & frame to the wheel rim would be further apart. Only found a few brands that did this. So I ordered the Tektro's over the web and they were posted to me in a few days for $70 complete. I told my better half that it would be my x'mas pressie. Nice and shiny. The picture on the left shows everything you get, calipers and pads.
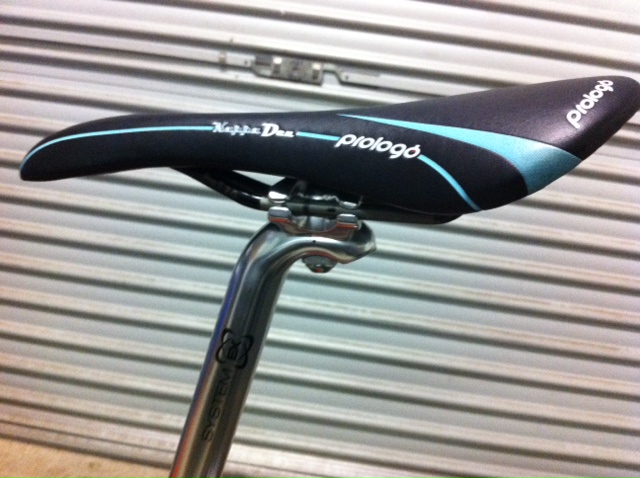
Seat - Prologo Kappa Dea Saddle - BLACK
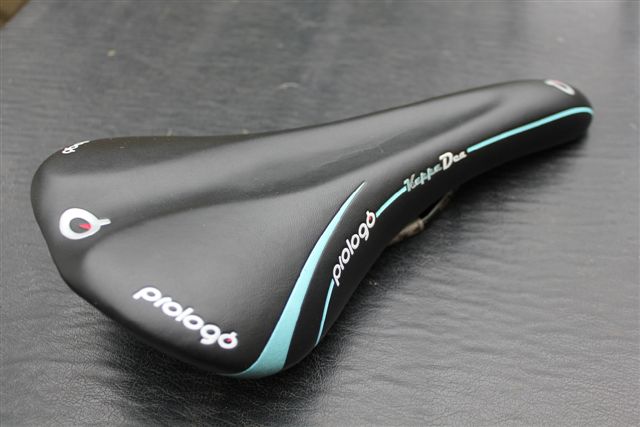
This was a bargain buy from ebay. Hardly used and was only $15.50! It is actually a model that was designed for women. The 'Dea' part in the name represents this. However it looks good, is comfortable and is not really that different from the mens version. So I'll be sticking with this.
Stem Adaptor for 1" Threaded Headset - SILVER
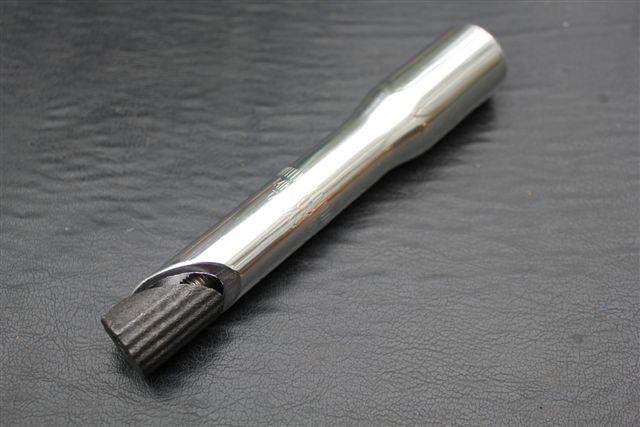
This clever adaptor will convert a 1" threaded headset and allow it to use 1-1/8" parts. $20 new from ebay. 1" is the threaded headset size for older bikes that would have used quill stems (integrated stem). 1-1/8" is the more modern size. It will allow me to fit modern handle bars and stems to the bike. I am looking to fit a mountain bike bar, stem & levers.
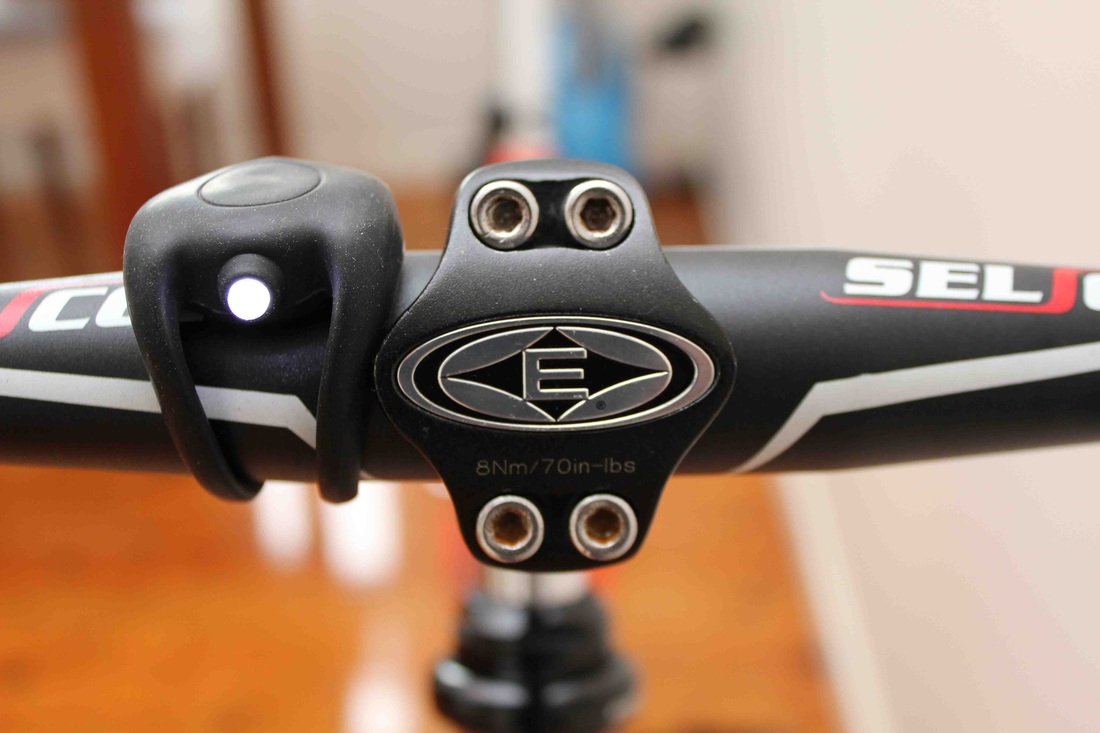
Stem - Easton EA30 - BLACK
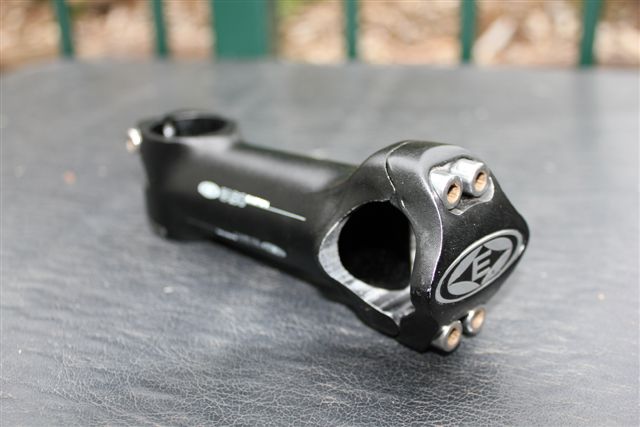
This stem has a few scratches on it but overall is in great condition. Bought second hand online for $16.50. It has a 6 degree rise or drop and has four bolts across the face plate. I prefer four over two. It will accept 31.8mm oversized bars and has a 1 1-8" steerer tube. This is from a mountain bike.
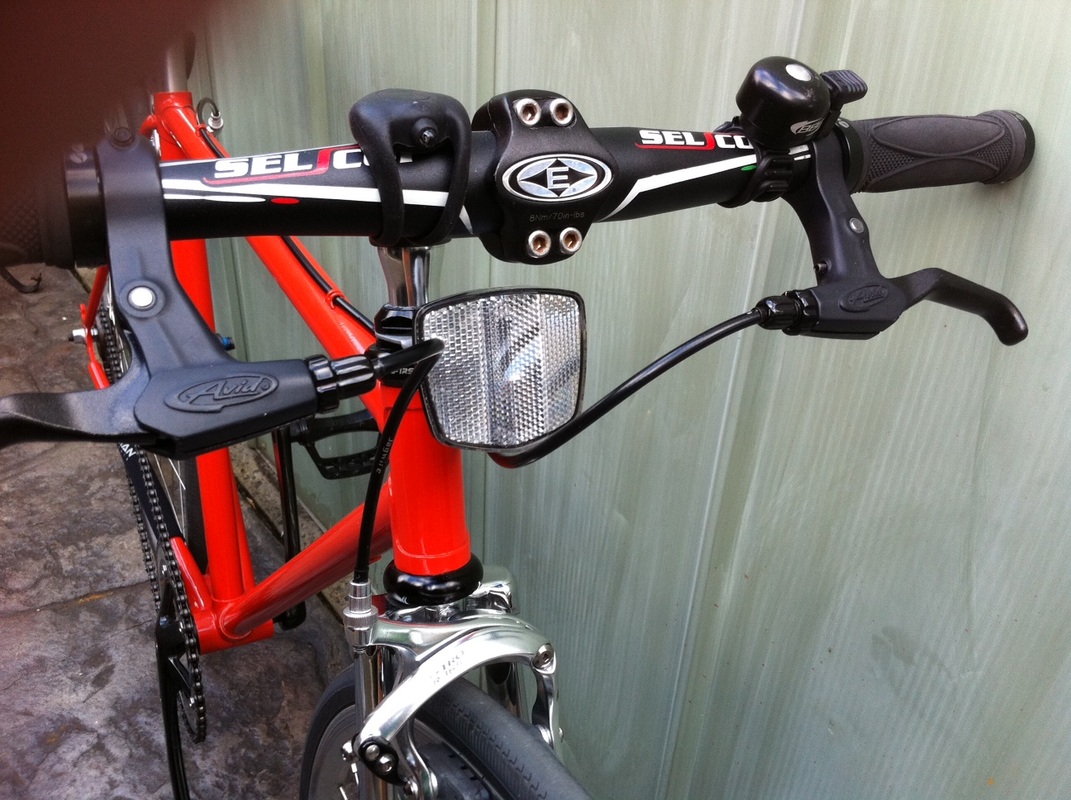
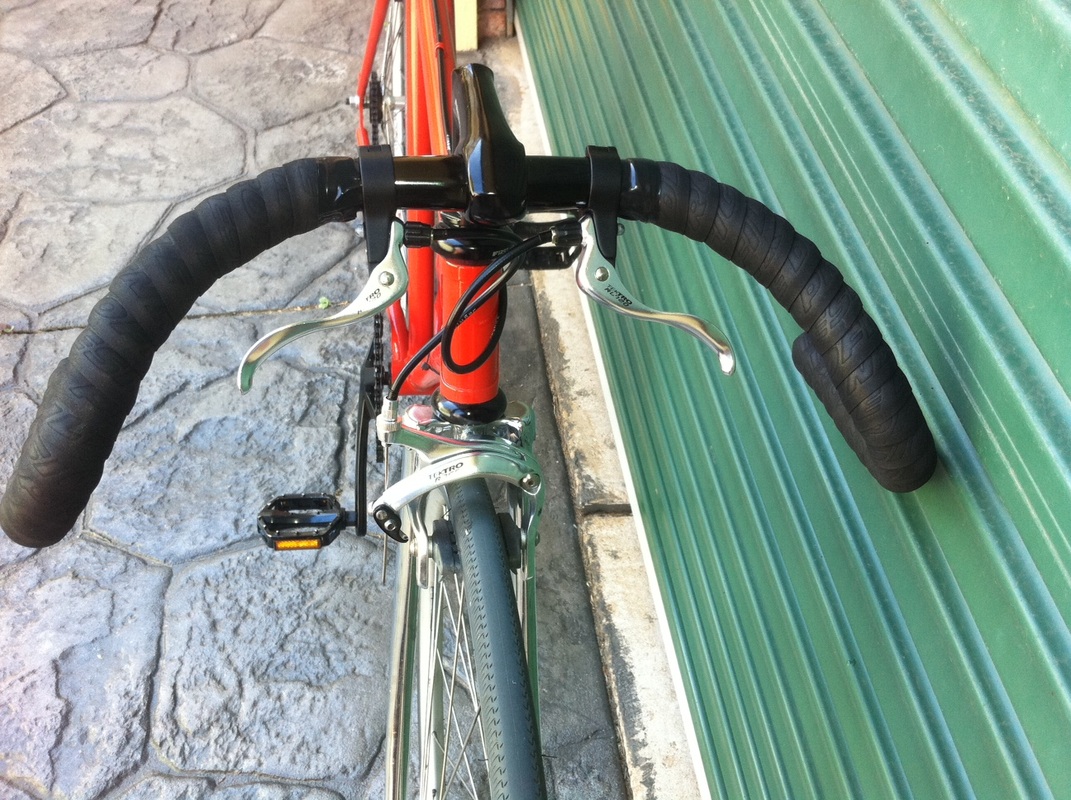
Handlebars - Selcof XC 60cm flat bar with Avid FR-5 Brake Levers - BLACK
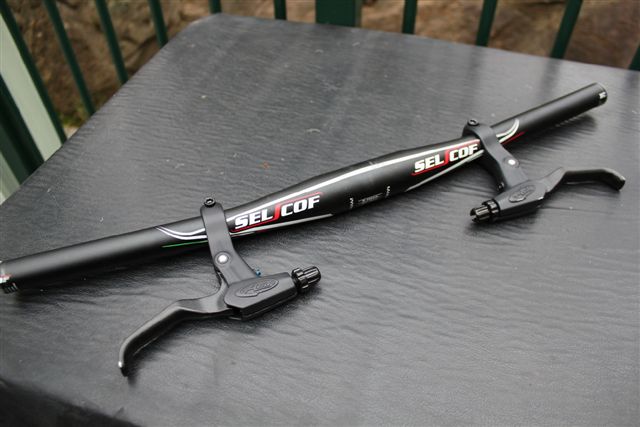
This was probably the best bargain buy that I scored. $20.50 for everything including the postage! The previous owner had the bars cut down to 52cm but never mounted them, which was fine by me because I was going to do that anyway. It is lightweight and also came with bonus brake levers! The levers have a few minor scratchers on them but nothing that obvious. Fits and looks great with the Easton stem. All it will need is some lock on grips down the track and some brake cables for the levers & calipers.
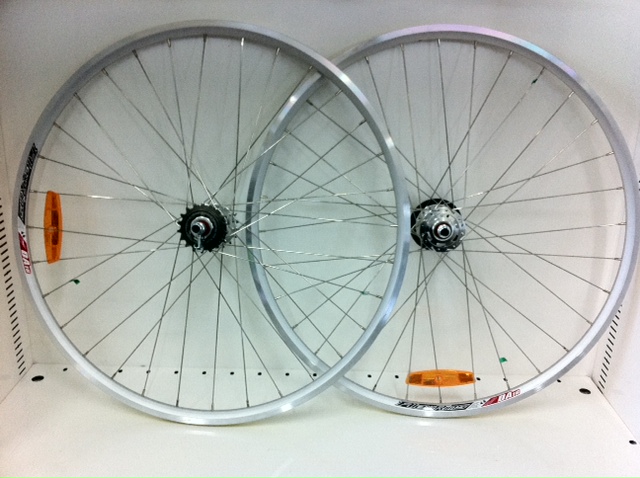
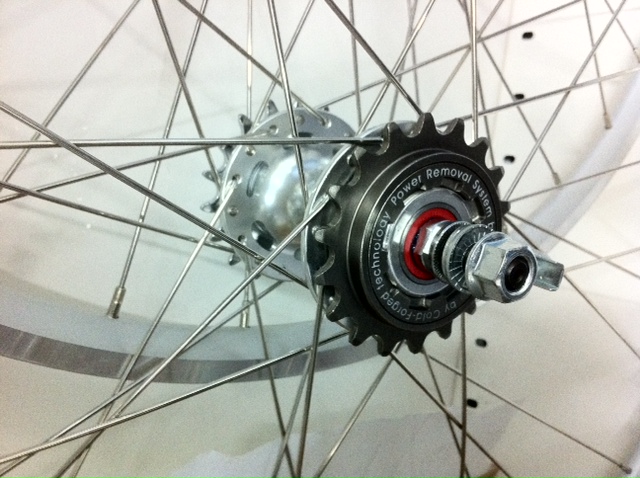
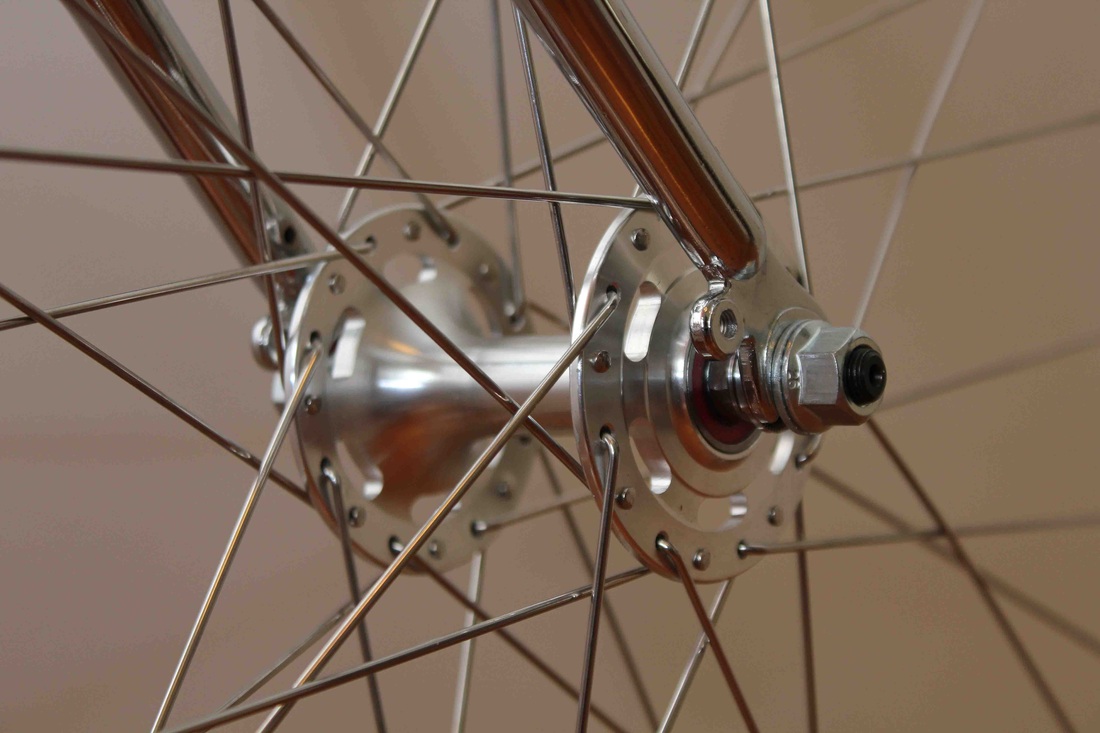
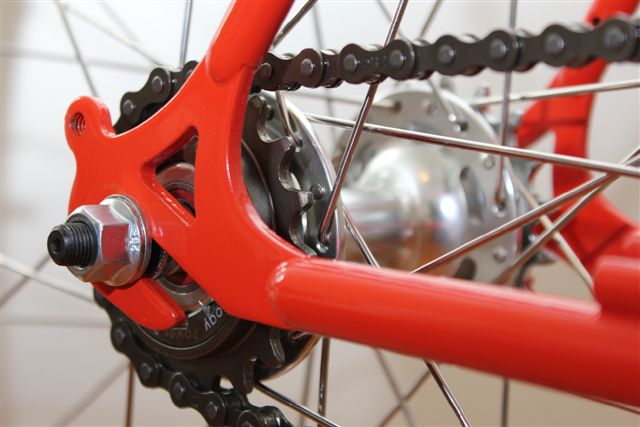
ALEXRIMS DA-16 Single Speed/Fixie Wheels
Almost forgot about these! They have been sitting in my cabinet at work for the last couple of months. Kept saying to myself that I will bring them home when I drive into work with the car but I keep forgetting. Because they are locked up and out of sight, I don’t see them!
I bought this set in mid November 2011 for the mere cost of $45! They came from a bike shop called Reid Cycles which is located in Newtown, NSW. I was not in a hurry to buy wheels as it was going to be one of the last few parts of the build. However when I was searching through the web just to get an idea of what tyres would eventually cost me (I have never bought road bike tyres before, still using my original Maxxis Xephyr’s that came with my bike!), I stumbled across these wheels. My current road bike has Alex DA-22 wheels and so far they have been great. So I thought why not go for the same brand? I don’t think they are a well known brand but it doesn’t matter to me. As far as I can tell they are decent quality and I have had no problems in my experience with them. Plus the price was very reasonable!
These wheels already have some yellow rim tape on them and are designed specifically for single speed & fixed gear use. They feature a flip/flop rear hub that has an 18 tooth free wheel sprocket on one side, and a 16 tooth fixed track sprocket on the other. This allows the rear wheel to be flipped over so that either cog could be used. I will probably never use the fixed cog but you never know, one day I might decide to be a hipster and ride brakeless too! (yeah right) It’s illegal to ride a brakeless bike in Australia anyway, and I would have been happy with just the single speed sprocket on its own. Now I just need some tyres, so back to my research!


FIRST Threaded 1" Headset - BLACK
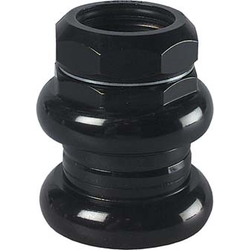
Colour: black, material: alloy, sealed bearing system (low maintenance), top nut size is 1”, top & bottom cup sizes are 30mm each, crown race is 27mm, total height is 33mm. Made in Taiwan.
This is a 1” threaded headset that I bought new through ebay for $25. I actually bought it mid December 2011 but stock had not arrived yet. Just got an email stating that it has now been dispatched (4/1/2012) and is on it’s way to me. I picked this headset because it has a shorter height than others, only 33mm tall. This was because my front fork has been cut quite short. When my fork is inserted into the bare frame I have about 31mm of thread to play with so hopefully this headset can be installed without the need for spacers. Most other headsets were much taller. If my forks don’t allow for enough thread to stick out once the headset is installed, then that could mean having to get a new fork, but I think this should fit fine.
Installing a headset can be tricky. The crown race ring needs to be inserted down the top of the fork and pressed onto the base of the fork itself first. It will need to be hammered down using a long pipe or some sort of press. I’ll have to find a ghetto DIY solution on youtube or check out some more forums.
Installing the top and bottom cups into the head tube of the bike frame should be simple enough. A proper headset press costs around $200-$300 but a bike shop will probably do it all for you for around $10-$20. I’ll give it a go doing it myself. All I’ll need is a vice (the in-laws have one) or a larger size C clamp, and a couple of bits of wood. Another option would be to use a long threaded rod, a couple of large washers that would be larger than the diameter of the cups and a couple of nuts to wind down with. Assembling everything else like the bearings, lock ring and top nuts will be easy but also could be tricky as I don’t have the thinner type bike spanners to tighten everything and hold it all together. We’ll see how I go.
Issue With Front Fork - Big Problem!
Well, I have hit a snag. A big one. A bit stupid of me and I should have seen it coming as I have wasted a lot of time with this. I was about to install the headset when I found out that the fork doesn’t have enough thread on the steerer tube. If I installed the headset which includes the crown race, bearings, top & bottom cups, top cap, lock ring and lock nut, then there would hardly be any room for the final top locknut to engage the thread. I would barely be able to get it screwed over one thread. I did measure everything in advance and bought the shortest headset that I could find. Still no luck. Either the original has a specific headset installed or they had cut the fork too short themselves and didn’t mention this to me which explains why it was on sale. Still, I'll push on....
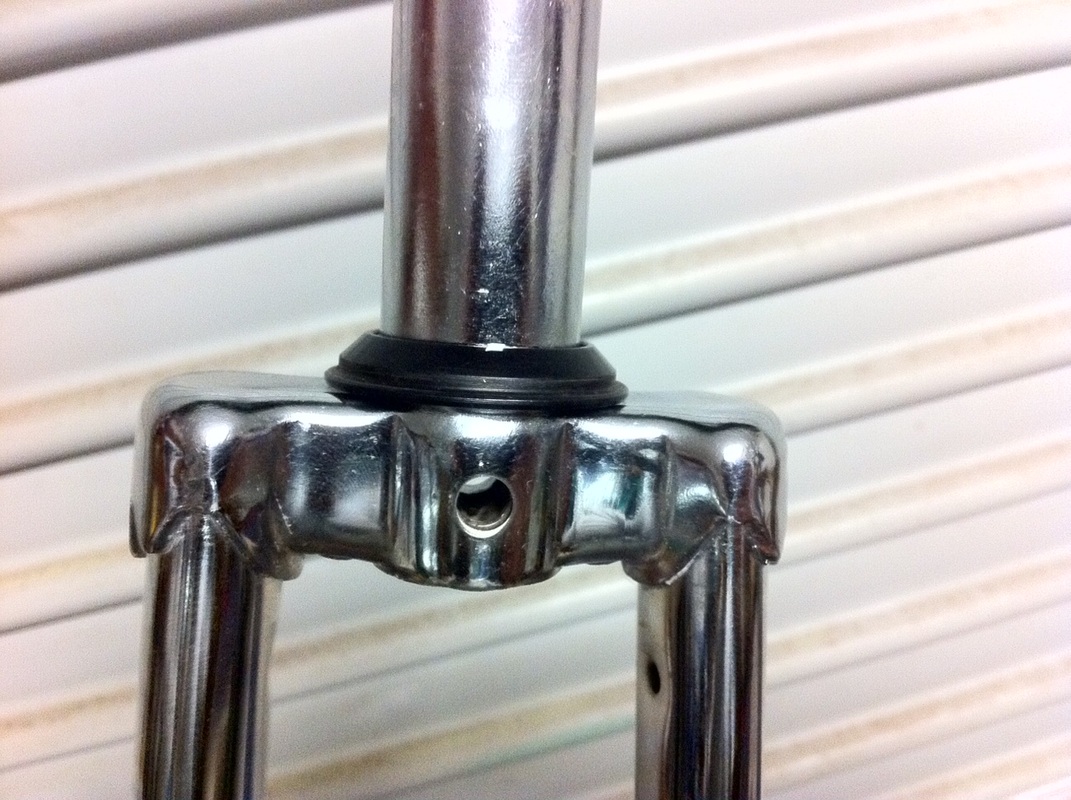
New Steel Fork - Chrome!!
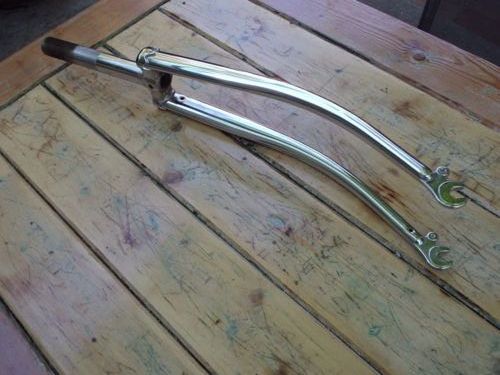
The picture on the left was taken by the seller and shows my new fork that I bought off ebay for $31. Listed as used but it has never been mounted. Yeah I didn't want to spend that much, ws thinking more like $20 but I ended up getting $91 for my old bars and shifters! So I can justify the cost. These forks are still made of steel and lugged which keep in the theme of my frame and its age. Has never been mounted, so the steerer tube has never been cut, which is good news for me. I'll be able to cut it to suit my headset height. Took me a while to locate a fork with a 27mm crown race seat too because I wasn’t interested in getting a new headset either. Most older forks I found had a 26.4mm crown race seat. So it looks like my second fork is now chromed instead and not gloss black. I’m not going to get it sandblasted or powder coated as it looks good and it would be a waste of money. Even if it has a few marks on it, doesn't matter. I was lucky to find it actually. I was going to look for a silver bottom headset cup and crown race too suit but will probably stick with my black one. Give it some contrast. So it now looks like the bike will be orange, black and silver! The other issue is that I may have to sell my front brake callipers and get some normal reach ones as I am not sure as to whether these forks are a newer style that accommodate for modern diameter wheels. My existing calipers may be too long. May not need long reach callipers for the front now. So we’ll see. I have not received it yet, hopefully will arrive in a few days time.
Update 17/1/2012 - Forks have arrived. They are in good conditon. Fits my headset/crown race perfectly, and as an added bonus, I won't have to get new brake calipers. Existing ones will do the job! Eeeeeexcellent!
Update 17/1/2012 - Forks have arrived. They are in good conditon. Fits my headset/crown race perfectly, and as an added bonus, I won't have to get new brake calipers. Existing ones will do the job! Eeeeeexcellent!
Michelin Speedium 2 Folding Tyres - DARK GREY/BLACK
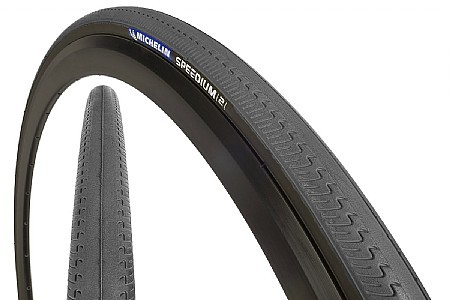
I’m not interested in different colours. I like basic black. Well, these are black with abit of grey. I ordered the black ones but got sent the dark greys by mistake. Still they look good so I'll use them. They are semi slick with a bit of grip on the edges. I had been doing some research on various types of tyres since starting this project. From hard case tyres to folding tyres. Both 700x23 & 700x25 seemed like they could do the job. I have a lot more clearance for bigger tyres with the Repco’s older style frame. Every review that I read about this tyre had mixed messages. Some say they puncture after 6km of riding, but then the next person says that they have ridden 600 miles through rock, forest, broken glass etc without an issue. Some say bad build quality with good enough puncture protection, others say there is zero puncture protection which isn't true. One review even went as far as saying that the tyres were like magnets that attracted nails and metal continually. In the end I read more positive reviews than negative ones but not a lot more. I also chose these because they were only $22 each online as opposed to buying them in a store for $49.95 each. Postage was free!
BBB 700 x 18/23C Inner Tubes
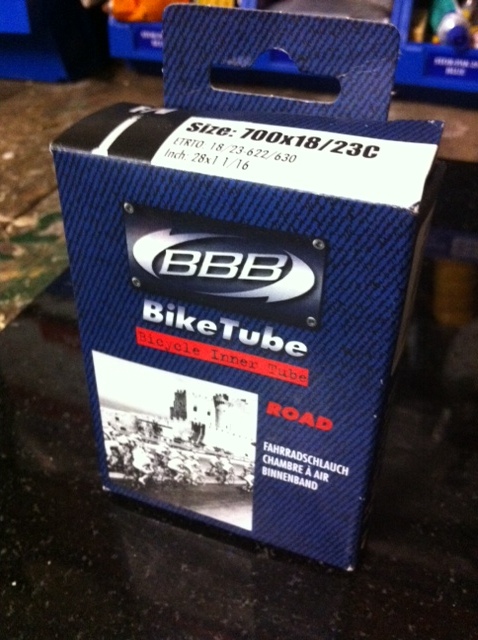
Picked up a couple of tubes from the local sports store (Rebel) for $10. Bike shops were still charging more by about $2-$3, even for a non branded tube! Didn’t need a spare as I will use my saddle bag from my other bike which has a spare tube and everything else in it. Will just switch it over depending on which bike I’m riding. I have been using BBB tubes on my other bike with no issue so it was a logical choice. I will mainly be riding this bike on bike paths and sealed roads, plus I always check what I roll onto when riding and try to avoid holes and sticks etc, so I believe punctures should be minimal. We shall see.
Seat Post Binder Bolt – 19mm (for 25.4mm seat post tube)
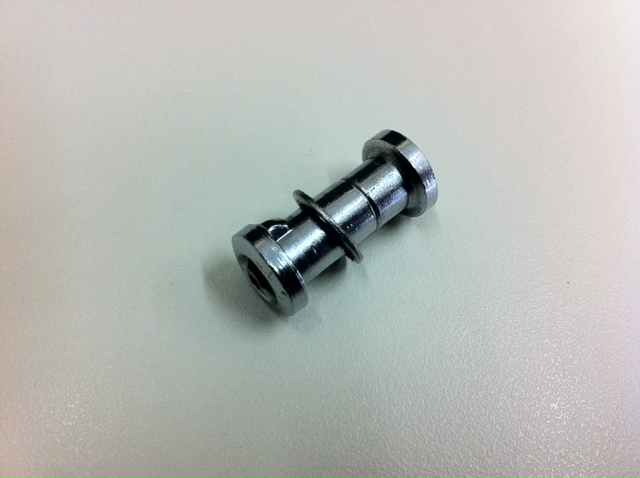
Measured my seat tube ears and they are 25mm end to end from the outer sides. This cost me $5 from the local bike shop and is a 19mm bolt. There was a 25mm version but that would have been useless as it would have been too long. This bolt has a small tongue that sticks out the side of one of the bolt heads which will then insert into a slot in the seat post ear. This allows the other end to be screwed in. Can be fastened with an allen key.
Seatpost - System Ex MTB XC 25.4mm / 400mm - SILVER
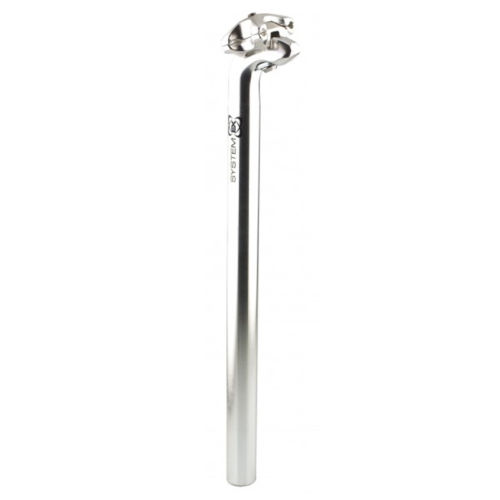
Got a silver post. Didn’t want to get too much black. Might go for a black seat post binder bolt if I can find one but no major issue if I can’t. I measured my post with a set of cheap measuring callipers that I had. Wasn’t getting a definite reading. So I contacted another guy on an online forum that had the same bike. He pulled out his post and had a look for me. Not a lot of places stocked a 25.4 seat post. The few places that I did find were charging too much. So once again I got online and bought this one from the U.K. Yeah it might be a bit of time while waiting for it but I am in no rush. $22.
Jagwire F & R Brake Cable Kit - BLACK
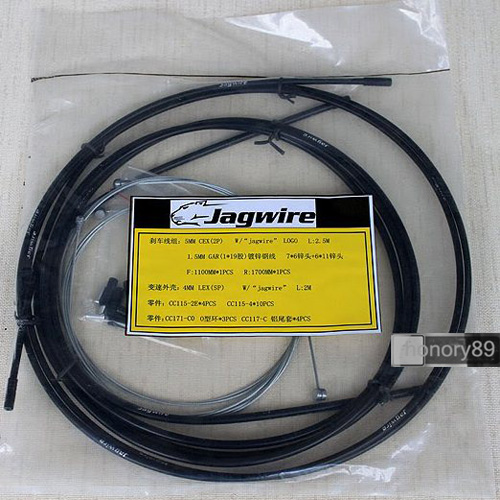
This kit was $11.99 from China. Cheap and easy. Cost a bit less because the shifter cables are not included which suits me fine because I have no gears to switch! Comes with all the other bits required to have a neat install. Yet to arrive.
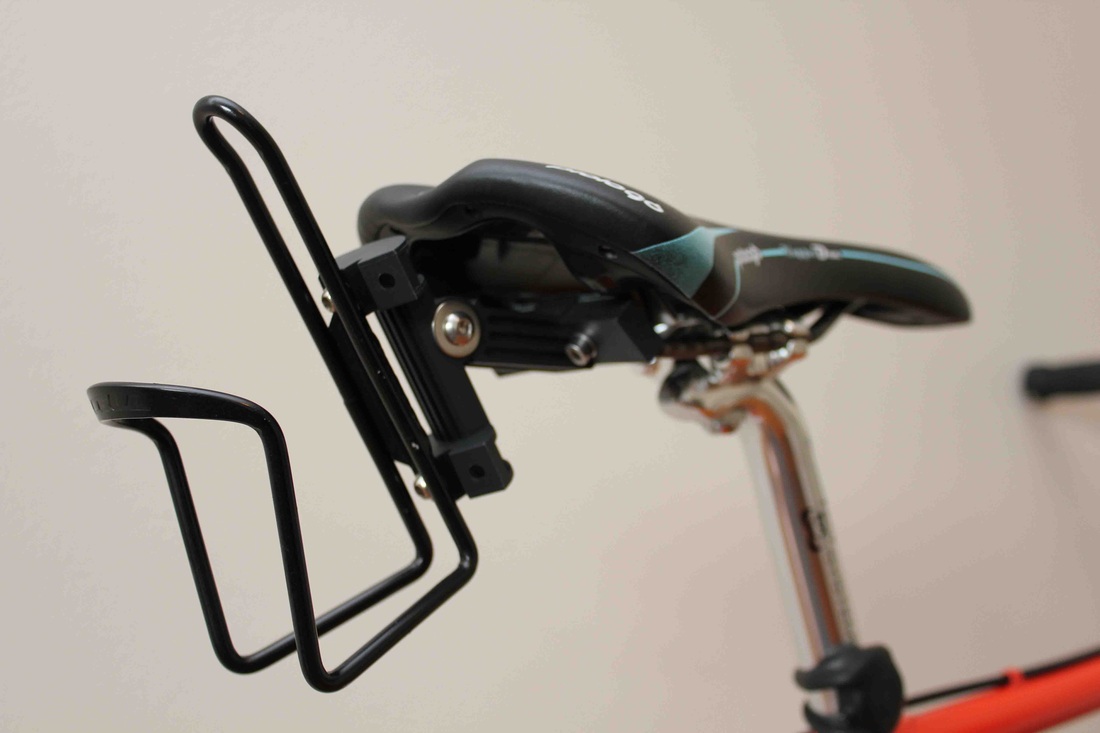
Bottle Cage Adapter - Tacx Saddle Mounted Adapter

This frame did not come with mounts for a bottle cage. I plan on riding this bike alot whenever I can and also to use it as a training bike. Needed somewhere to put my bottle. I already have a bottle cage. I didn't fancy drilling holes into the frame or mounting anything to it as I did not want to scratch the paintwork. So after a bit of research online, this is the solution that I found. Will be delivered from the UK soon. Once again, local prices were ridiculous so I got onto the web.
Lights - Knog Frog Safety Lighting - BLACK

I wasn't about to mount reflectors onto the bike. I always use lights, sometimes even during the day. These little lights are great. They have two lighting modes, constant or flashing. They do the job. Will mount to almost any part of the bike. Again looked locally for decent lights but prices were bad. This pair will be coming from interstate. One for the handlebar, one for the seatpost.
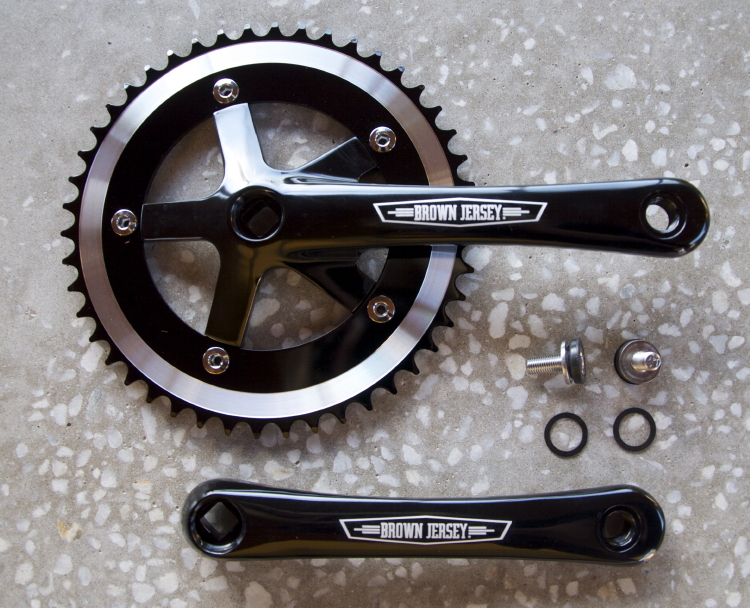
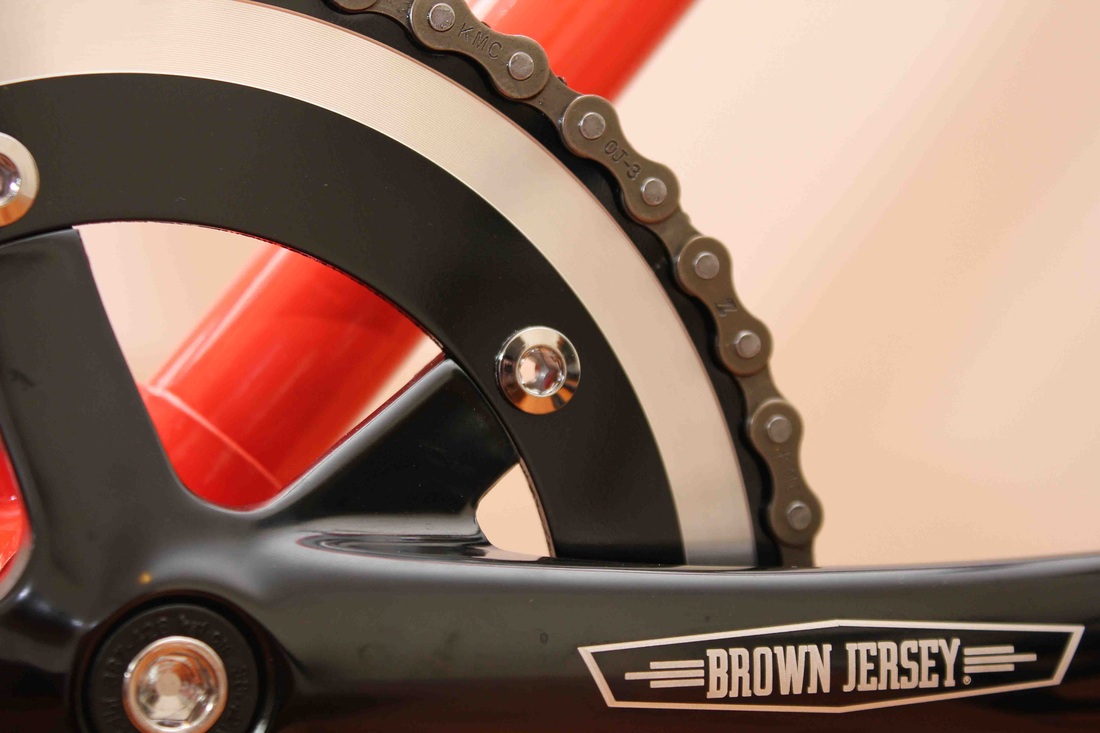
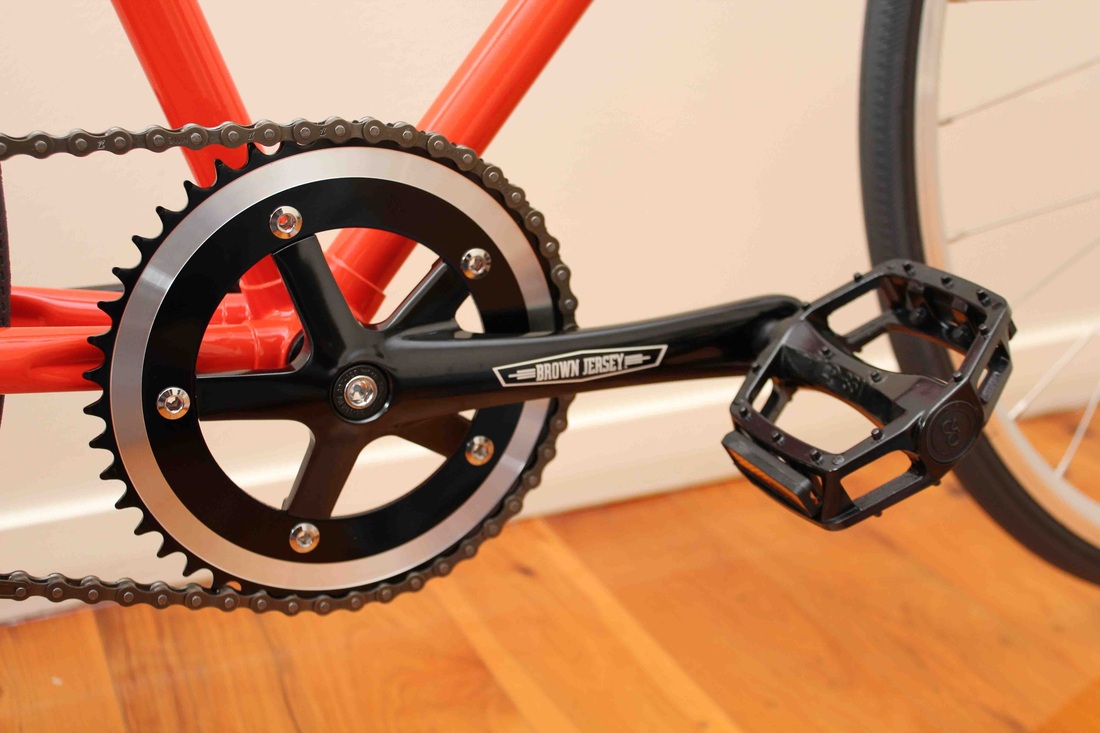
Brown Jersey 'Messenger' Crankset - BLACK
To be installed on 25/2/2012 @ Brown Jersey
Specifications:
- Square taper chainset.
- CNC machined anodised black aluminium
- High end quality
- 170mm crank length
- 46T chainwheel
- 130mm BCD.
Specifications:
- Square taper chainset.
- CNC machined anodised black aluminium
- High end quality
- 170mm crank length
- 46T chainwheel
- 130mm BCD.
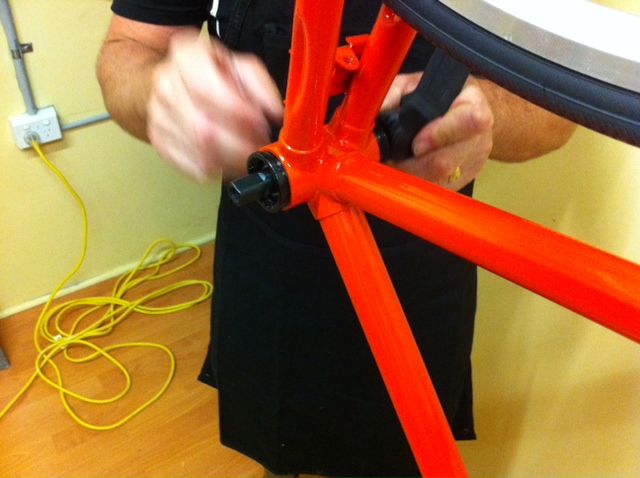
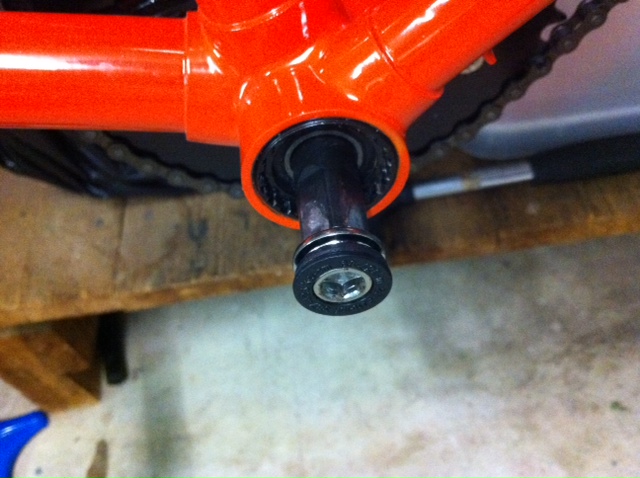
NECO Sealed Cartridge Bottom Bracket (square tapered)
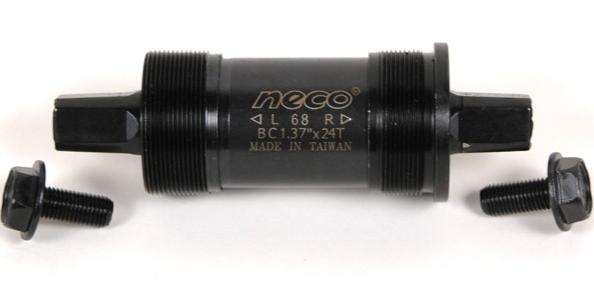
To be installed on 25/2/2012 @ Brown Jersey
Specifications:
- Square taper ends
- Sealed cartridge bearings
- For English thread
I'll need BJ to run a tap through my bottom bracket housing as I noticed recently that some of the orange powder coating had gotten into the threads. Once that is done, grease it up and this unit should slide in nicely.
KMC 1/8" Single Speed Chain - SILVER

To be installed on 25/2/2012 @ Brown Jersey
Specifications:
- High quality
- 1/8" x 1/2" x 96L.
- With joining link.
Specifications:
- High quality
- 1/8" x 1/2" x 96L.
- With joining link.
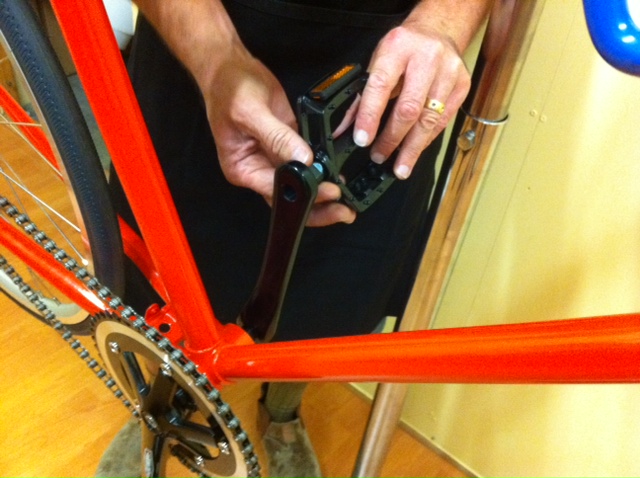
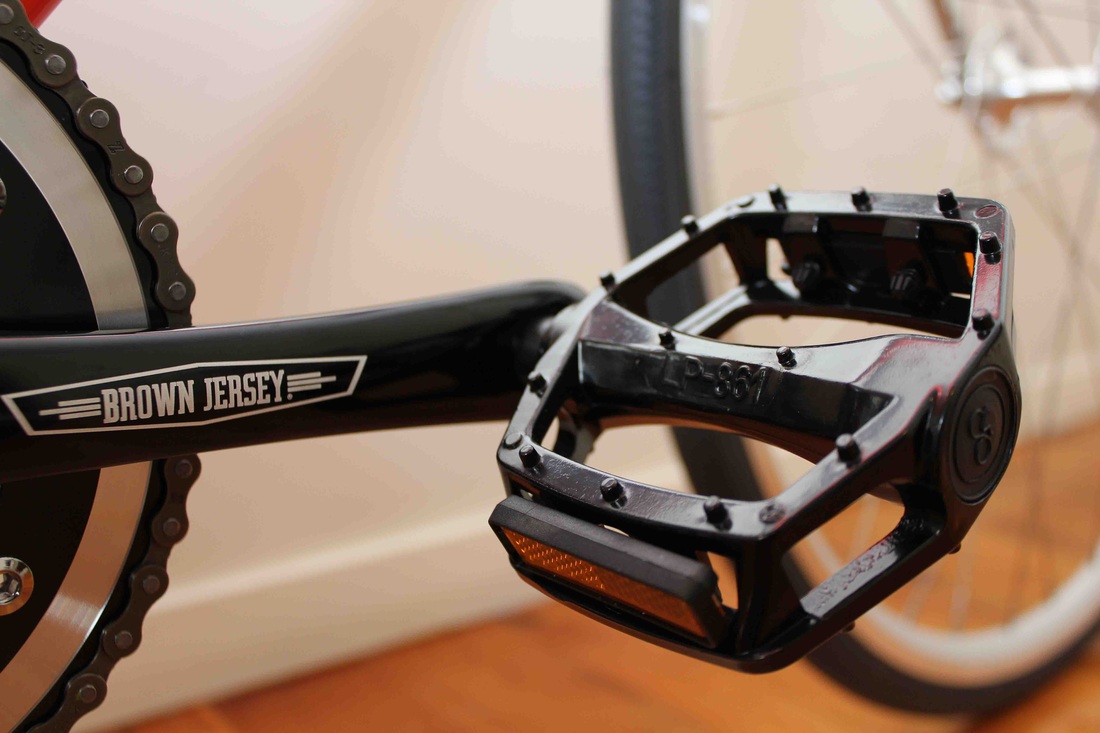
Brown Jersey Alloy Platform Pedals - BLACK
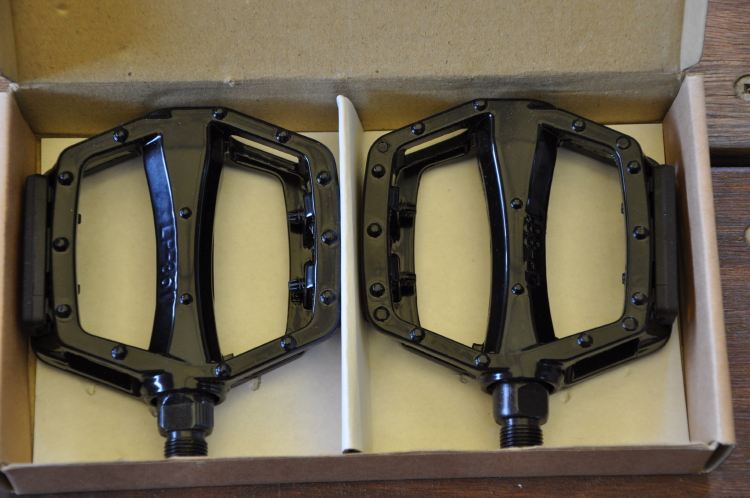
To be installed on 25/2/2012 @ Brown Jersey
Specifications:
- High quality forged alloy platform pedals.
- Heavy duty bearings and hardened steel shaft.
- Epoxy finished in Black Lung
- Front & Rear reflectors
Specifications:
- High quality forged alloy platform pedals.
- Heavy duty bearings and hardened steel shaft.
- Epoxy finished in Black Lung
- Front & Rear reflectors
PUTTING IT ALL TOGETHER!!
Artists Interpretation - How It Will Look
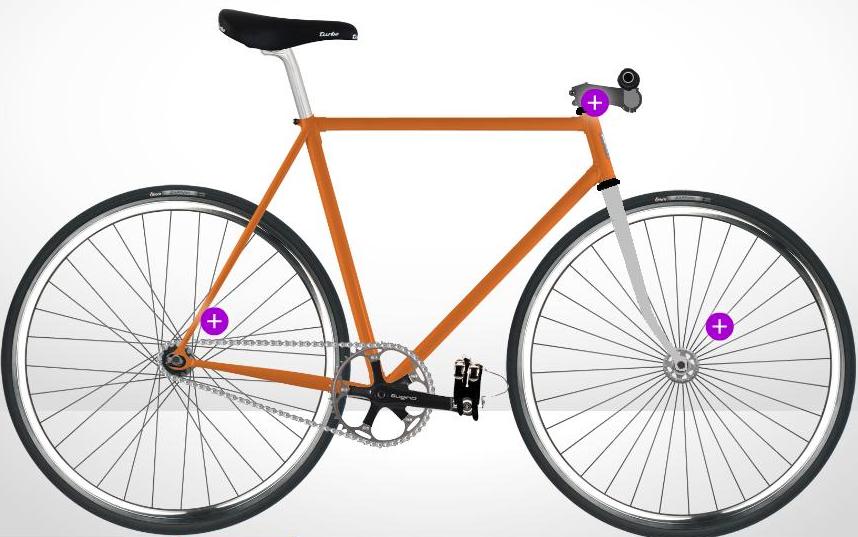
Came across this site that allows you to design your own fixie. Most don't let you customise the bikes as much as this one. But all including this one don't allow you to use different colours for the forks and headset. I have manually coloured them in using MS Paint. Website: http://custom.14bikeco.com/#/custom14-workshop/default
I would have liked a deeper orange but this was the best that I could get from the programs colour range. Was tossing up between a black or silver seatpost. After discussion with some work colleagues I'll be going for silver. Gives it a good contrast between all three colours. I will use black tyres for the rims. Keep it simple.
Let the rebuild begin!
Headset Cups
Well, last night I thought I’d give it a go installing the top and bottom cups. Ended up mounting the bike stand to the bench temporarily, using two large ‘C’ clamps. Then mounted the bike to the stand itself. As the stand sticks out from the bench a bit, I was able to swing the frame around so that the head tube only rested on the bench. Inserted the bottom cup, placed a piece of wood underneath it, then placed some wood on top of the head tube with some padding in between, and started hammering away. The angle wasn’t a problem, because all I had to do was readjust the height of the frame a few times in the stand. Flipped it over and did the same thing for the opposite cup. Both cups are in tight now.
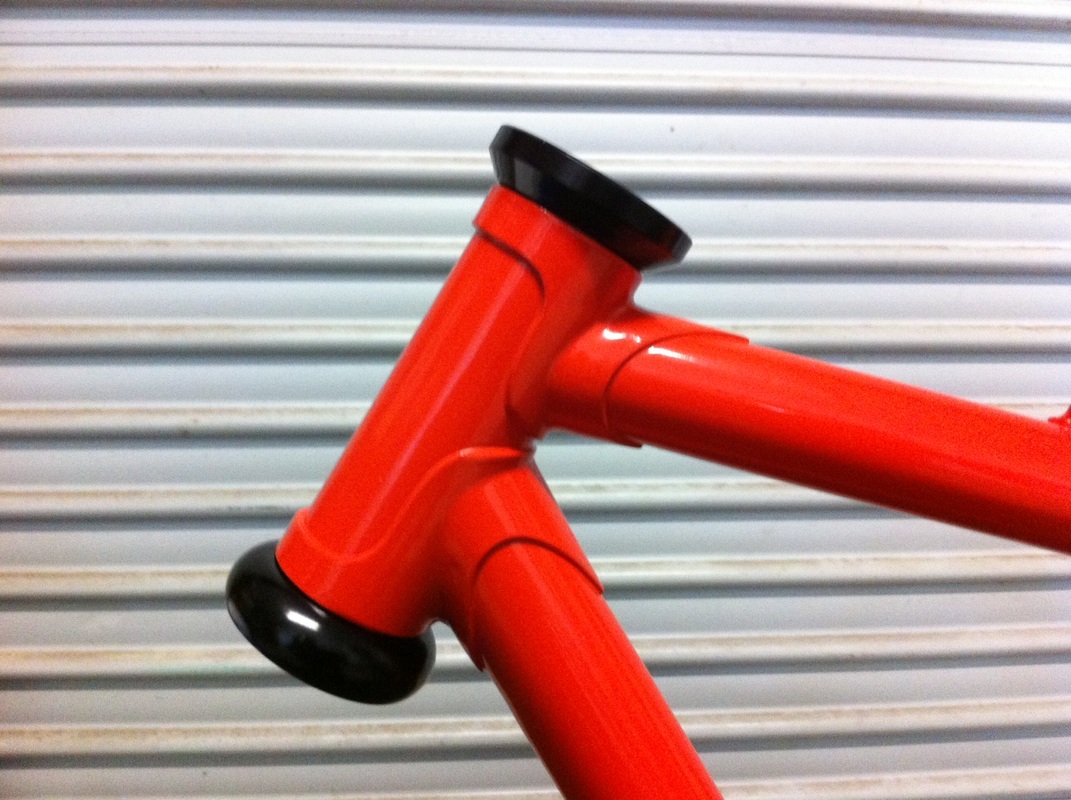
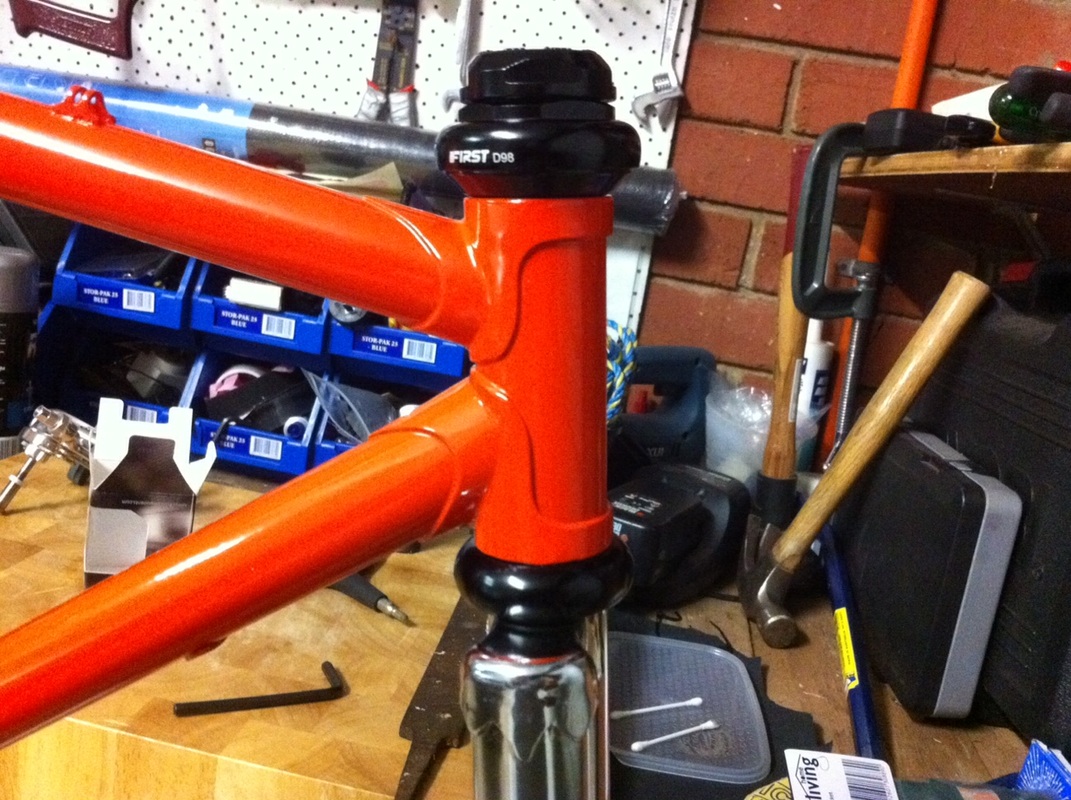
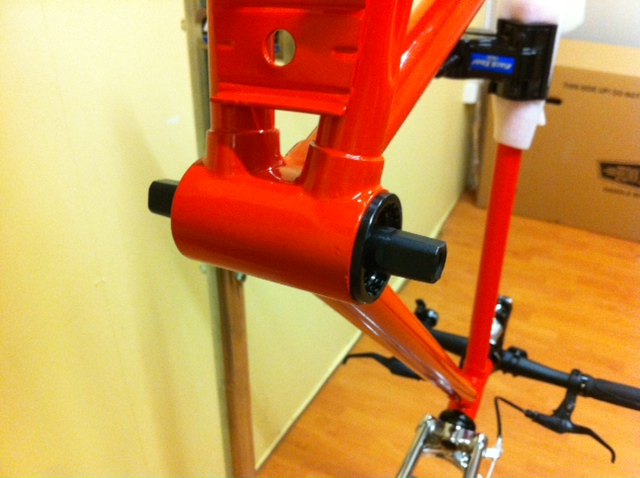
Frame & Fork Are Now One - Completing Headset Installation
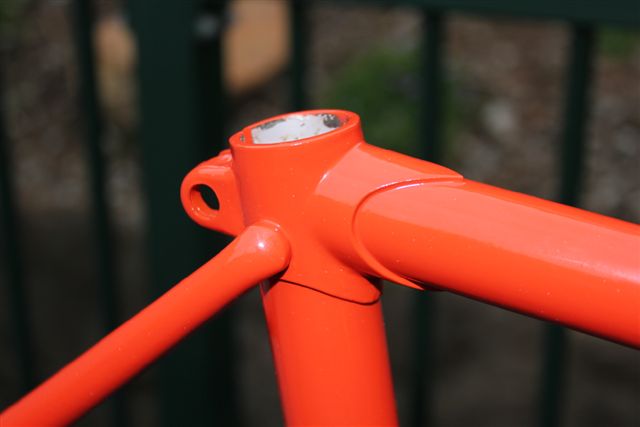
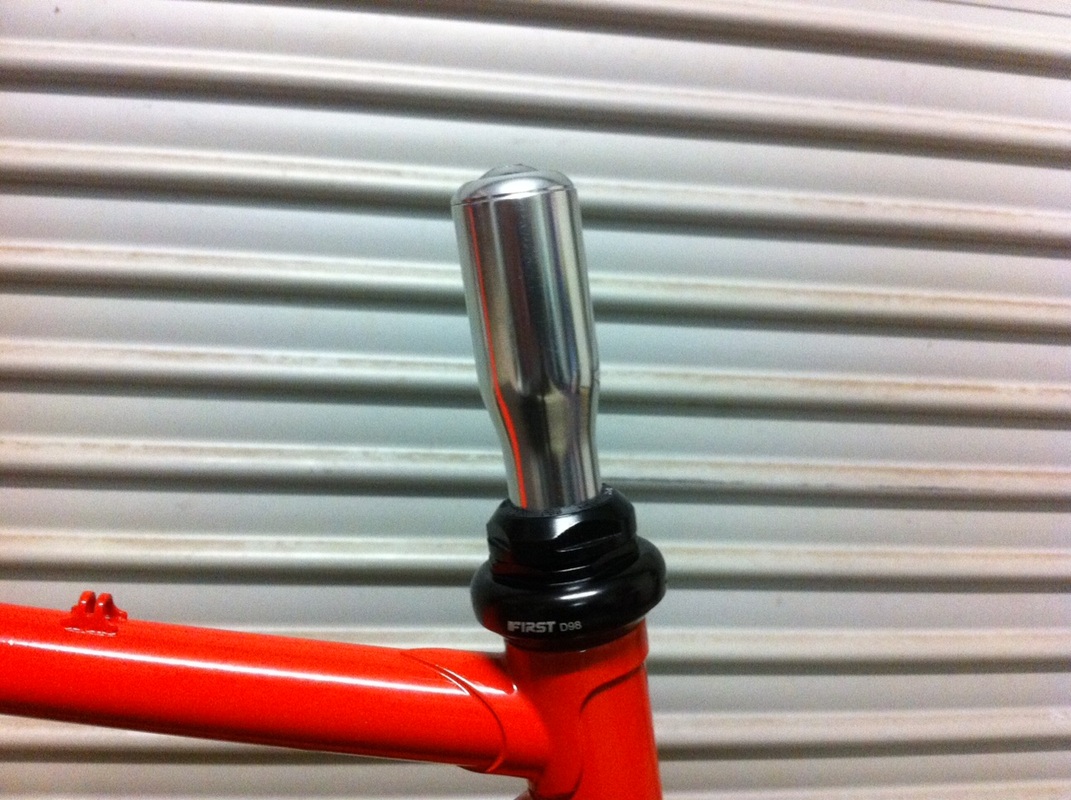
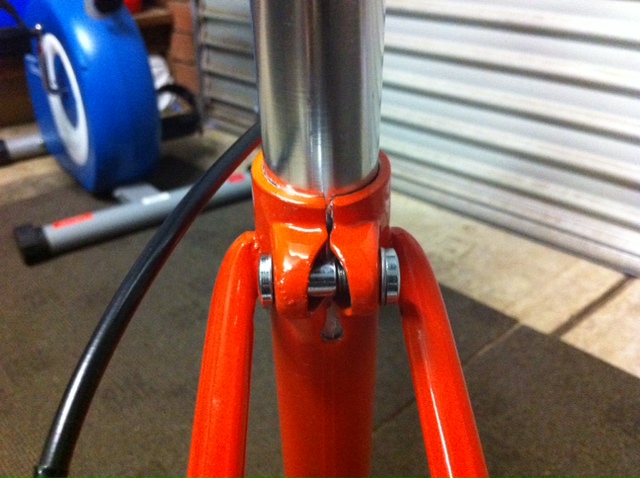
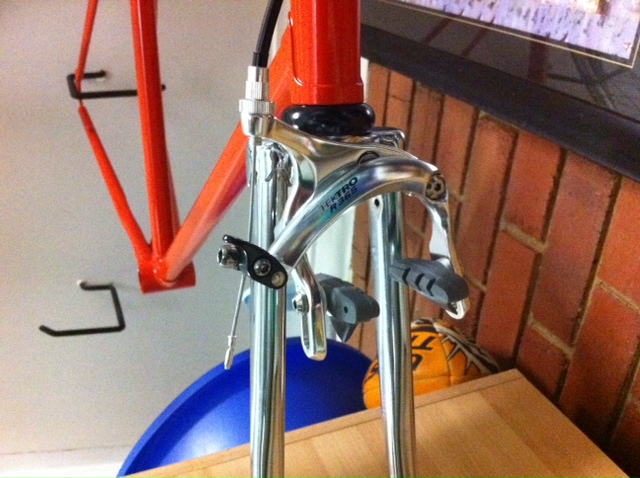
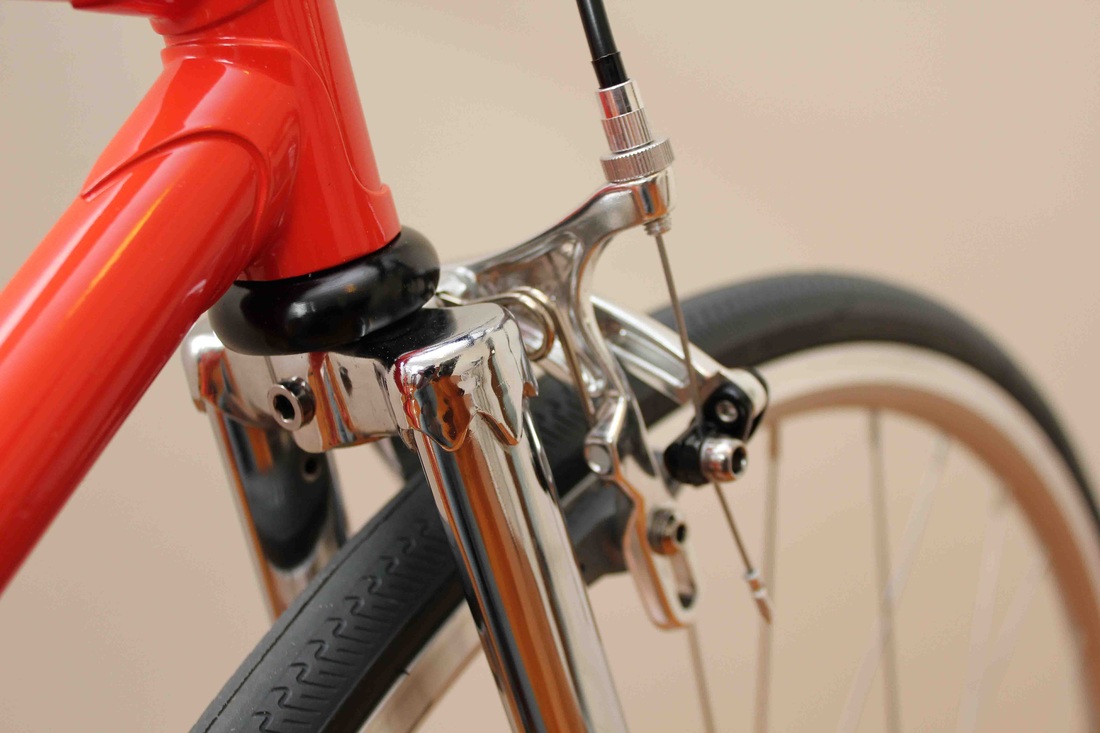
The installation took me a bit of time. All up about 40 minutes. First I had to remove my front brake from the fork. Then I had to install the crown race (1st image below) using the crown race setting tool. Worked a treat. Basically placed the crown race down onto the steerer tube as far as it could go. Then placed the 1" adapter over that, then used the main tube tool to hammer down onto the adapter about 5 times. I knew it was installed when I heard a different sound the 5th time it was hit. Then I installed the bearings in the top and bottom cups, placed the fork from the bottom in and then screwed on the first ring. At this point the fork was installed and smooth. Then placed the lock ring and could clearly see that this fork was too long as the top nut bottoms out and cannot be threaded down any further (2nd image below). So I placed the top nut next to the threads as far down as possible, held it there, marked it and then attacked the fork with a hack saw. After this I had to do a bit of filing as the fork was still slightly long and I also wanted to get the starting threads in good shape for threading on the nuts. All up I installed and re-installed this headset about 4 times to get the sizing and steerer tube height right. I did not want to have to use spacers if I could help it. The third picture below shows the full headset completed and installed. Looks good.
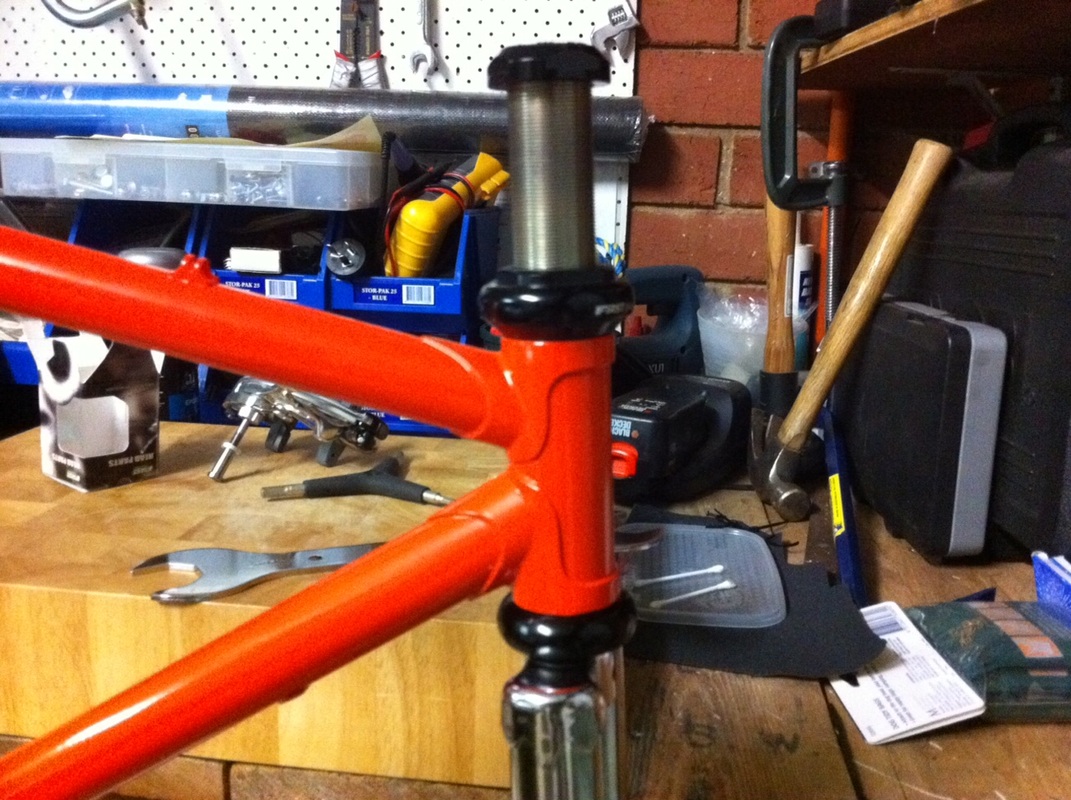
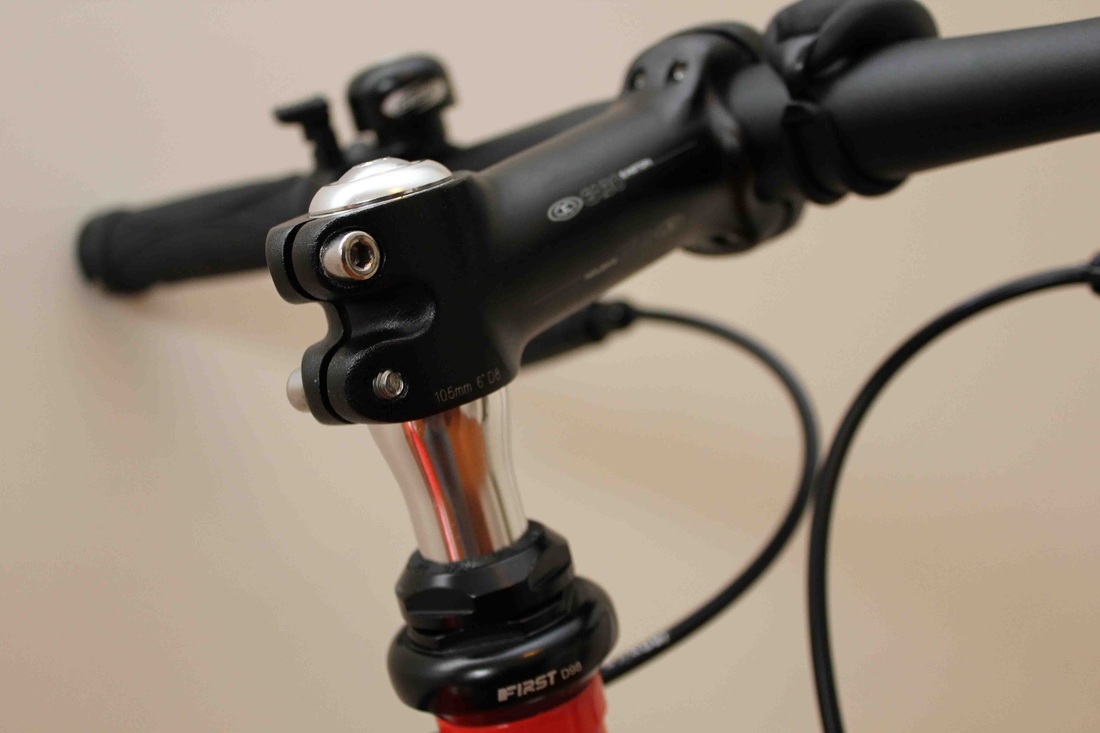
Installing the Stem Adapter
This was quite easy. Greased up the inside of the steerer tube and placed it in there. The first try was hard because there were bits of metal sticking out inward from where I had cut the fork. So I just ran the back of the file (the pointy end) through the inside of it and it all smoothed out. The adapter then went in without issues. I may look at getting some spacers later on as the stem I am going to put on covers about two thirds of this adapter from the top down and leaves abit of chrome exposed. My handlebars, levers, stem and brake cables will be all black. Then again, I may leave it alone. Might give it some character.
Tyres & Tubes Fitted!

I read that these tyres were a pain in the arse to get onto a rim. Getting them on wasn’t easy. A good mate of mine and I were pulling apart his old mountain bike in the garage to try fix it up a little. Was about 1am in the morning when we finally packed up. Then I looked at the rims hanging up as well as my new tyres and we both thought we'd give it a go installing them. We fluked the front tyre and got it done first go! Put a little air into the tube and everything went smoothly. The rear tyre was a different story. Took 3 turns because we kept wedging the tube between the bead and the rim. Eventually we got it done. We'll see how they both hold up when I finally get around to riding the bike.
Seat, Seatpost & Binder Bolt Installed!
The binder bolt installation was only a very small job to do and took all of about 10 seconds, but it is an important part of the bike and I am really pleased with how it looks and works. I was a bit worried as to whether it would fit as I had measured the ears first, then got the bolt from the shop without taking the frame in (which would have been easier). Walked over to the bike shop on my lunch break as it was the only time I had free to get it. Luckily it fits nicely. My seatpost arrived a few days ago and it has now been installed together with the seat.
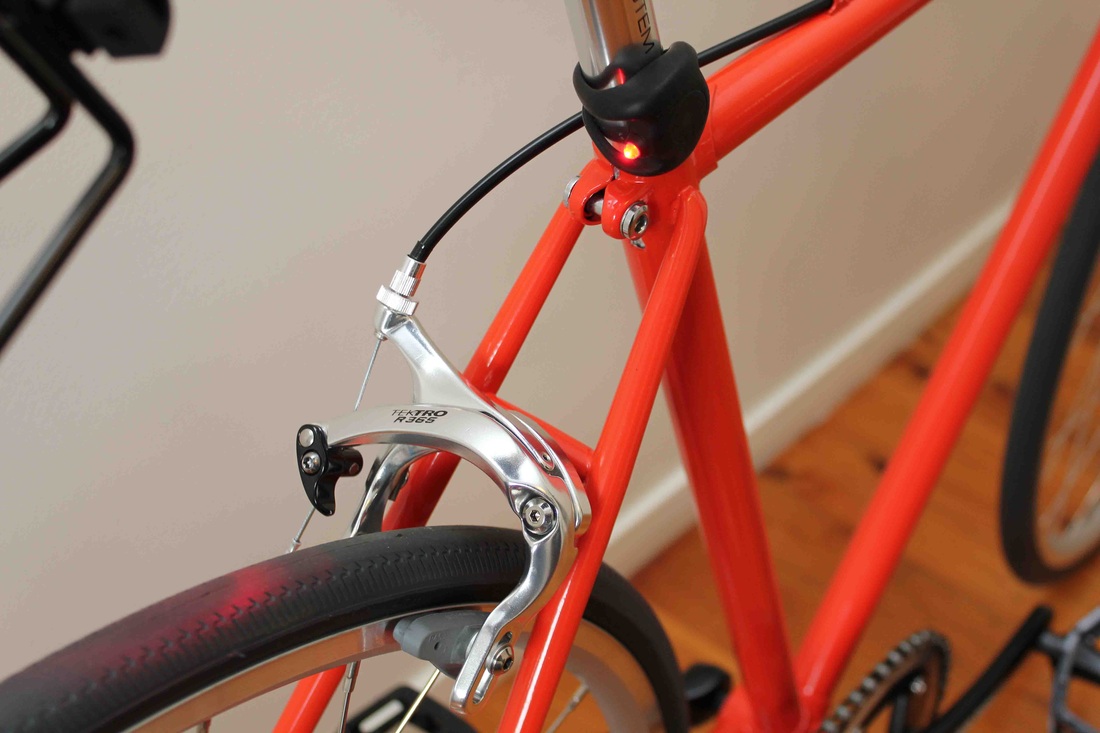
Brake Assembly Fully Installed & Ready for Stopping!
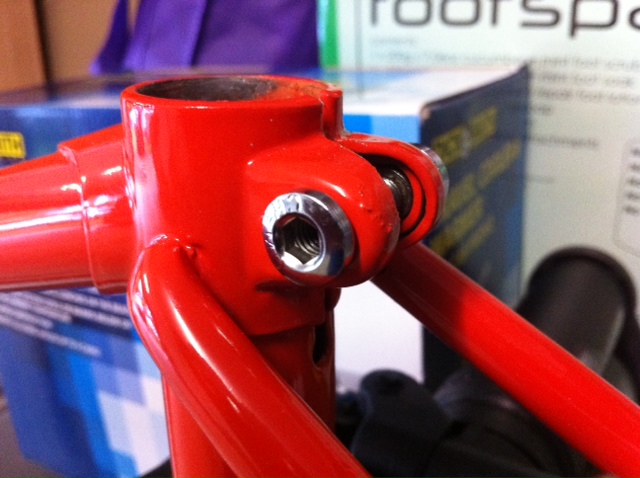
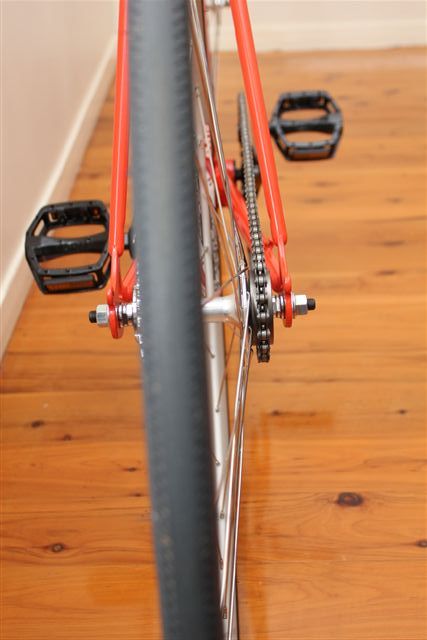
Well today is 17/2/2012. My brake cable kit arrived a few days ago, so I was super excited. The last job for me will be to install the brake cables and housings. To install the calipers abit of drilling had to be done. The bolt for mounting the front caliper is much longer than the rear. I had to drill out the rear hole in the front forks & frame to accommodate the fitting. Brake cables, ferrules and ends were installe ithout fuss and was quite easy. Took me all of 15 minutes. I had to mount the wheels just to make sure they were working properly and set at the right angle. I will have to re-do the rear caliper and cable adjustment once the chain is put on. The positioning of the rear axle in the dropouts will determine the position. Handlebars were also installed and brake levers are now operational.


Next Stop: Brown Jersey
I have made an appointment with James, from Brown Jersey (www.brownjersey.com.au), to sort out the remaining parts and also to install them for me. Work will be carried out starting at 8am on 25/2/2012, so not long to go and I can hardly wait to see the end result! It has been four long months of work in the garage, waiting for parts to arrive and also the assembly so far.
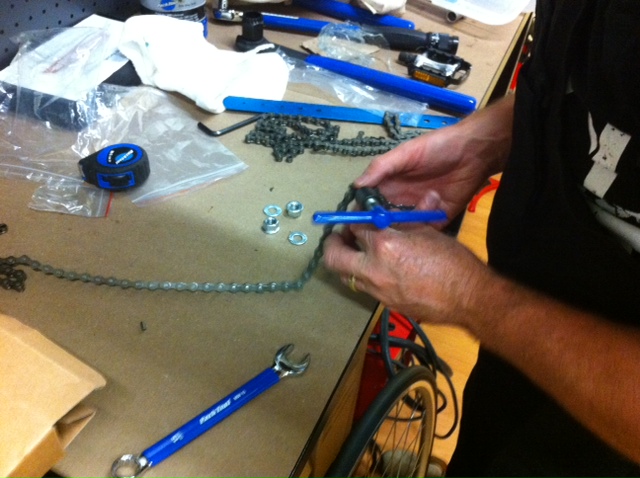
Update 25/2/2012:
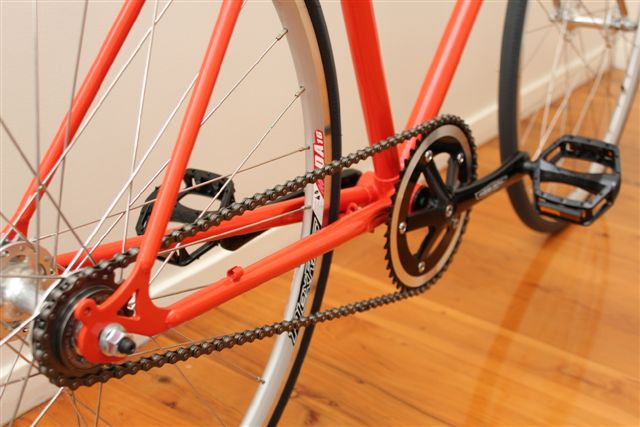
Parts installed at Brown Jersey. Bottom bracket, chain, crank set and pedals have all been installed. The chain had to have four extra links put into it to fit this bike. Chains do stretch after awhile so there is a chance one of these links may have to come out after a few 100kms. This will allow me to have more room to play with in the rear dropouts should I need to adjust the tension. Below are the pictures. Enjoy!
Update 25/2/2012:
Parts installed at Brown Jersey. Bottom bracket, chain, crank set and pedals have all been installed. The chain had to have four extra links put into it to fit this bike. Chains do stretch after awhile so there is a chance one of these links may have to come out after a few 100kms. This will allow me to have more room to play with in the rear dropouts should I need to adjust the tension. Below are the pictures. Enjoy!


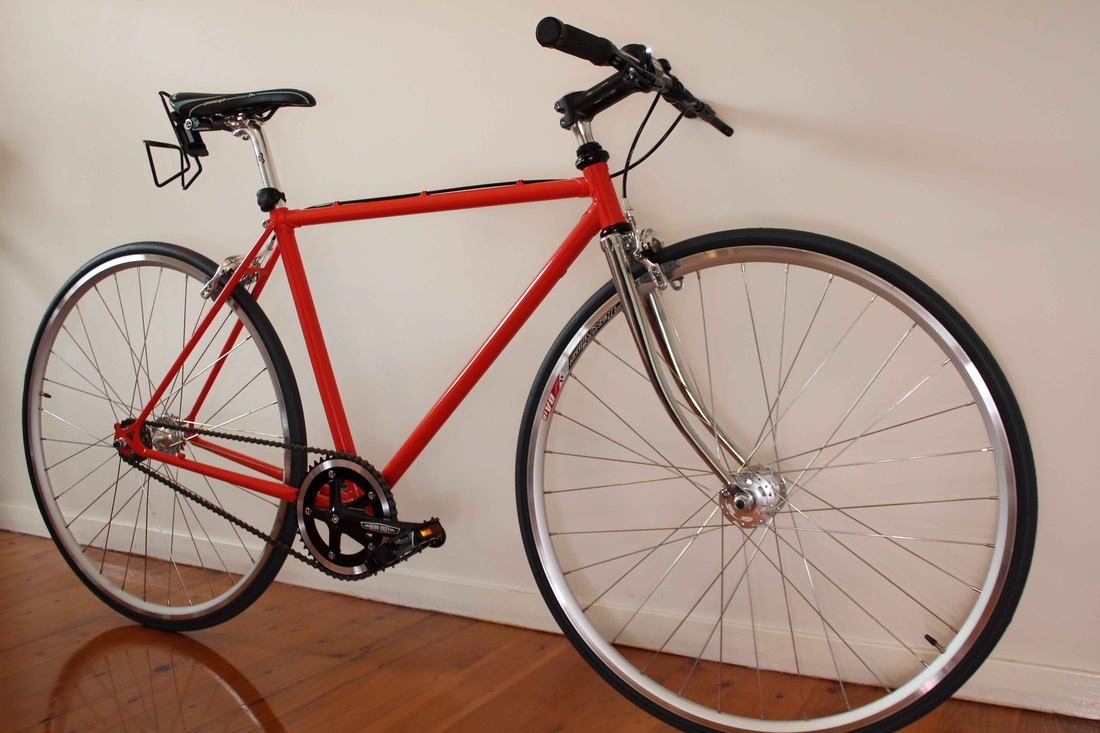
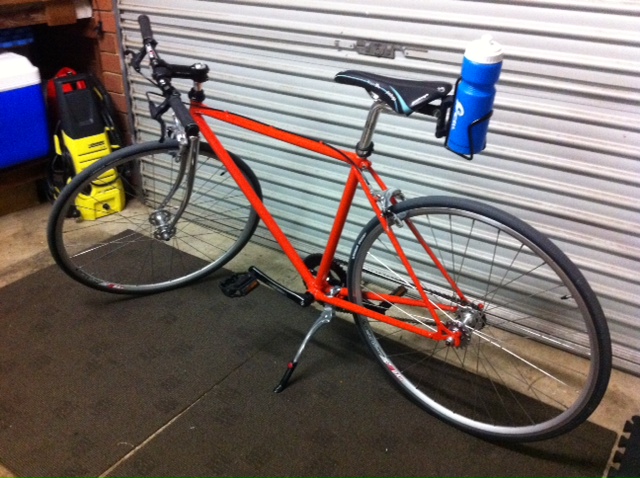
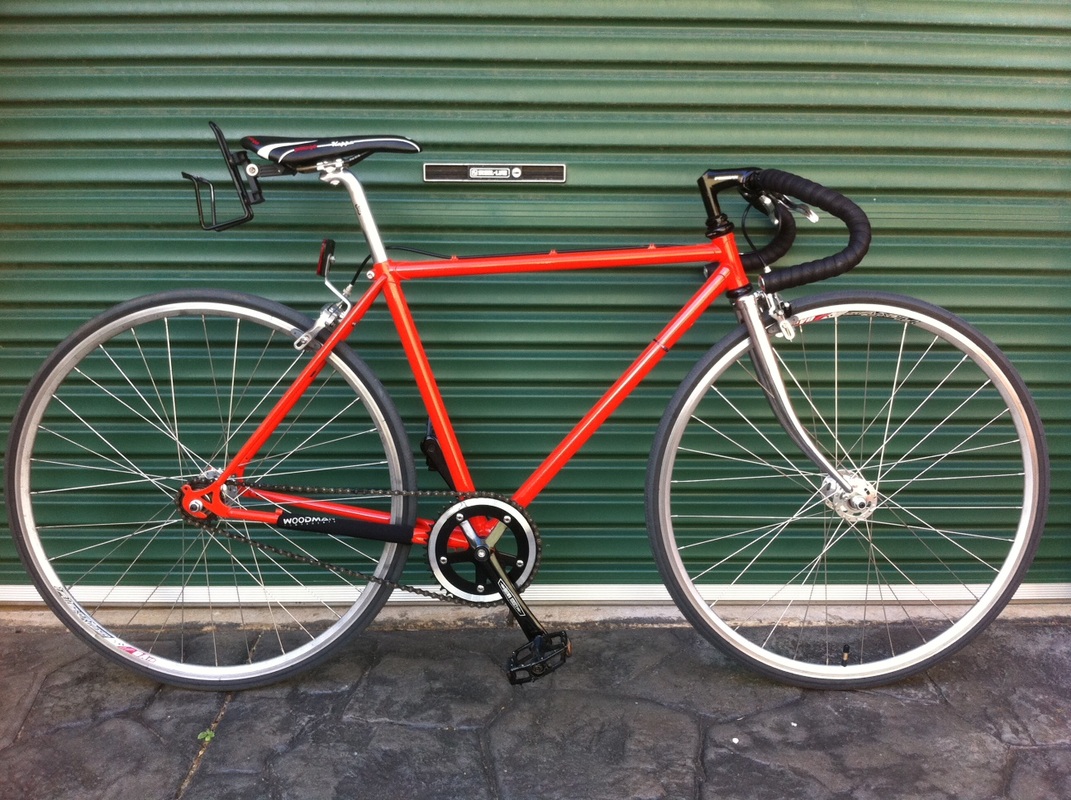
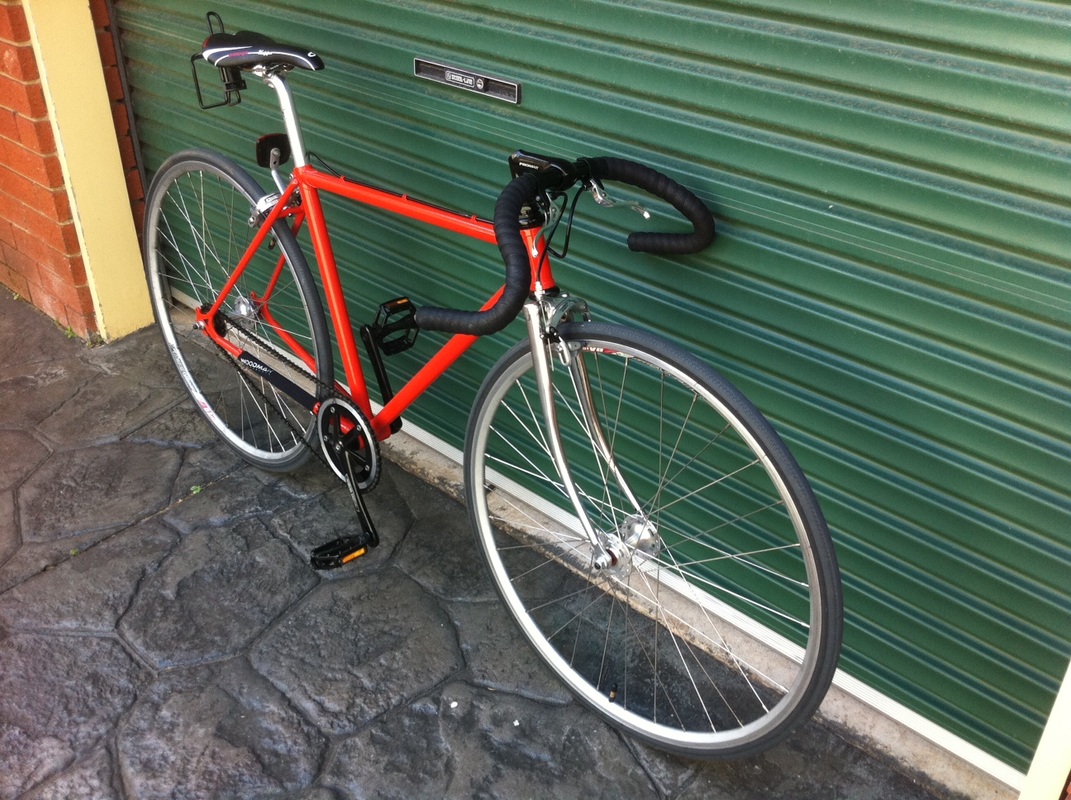
The Traveller is Re-Born!
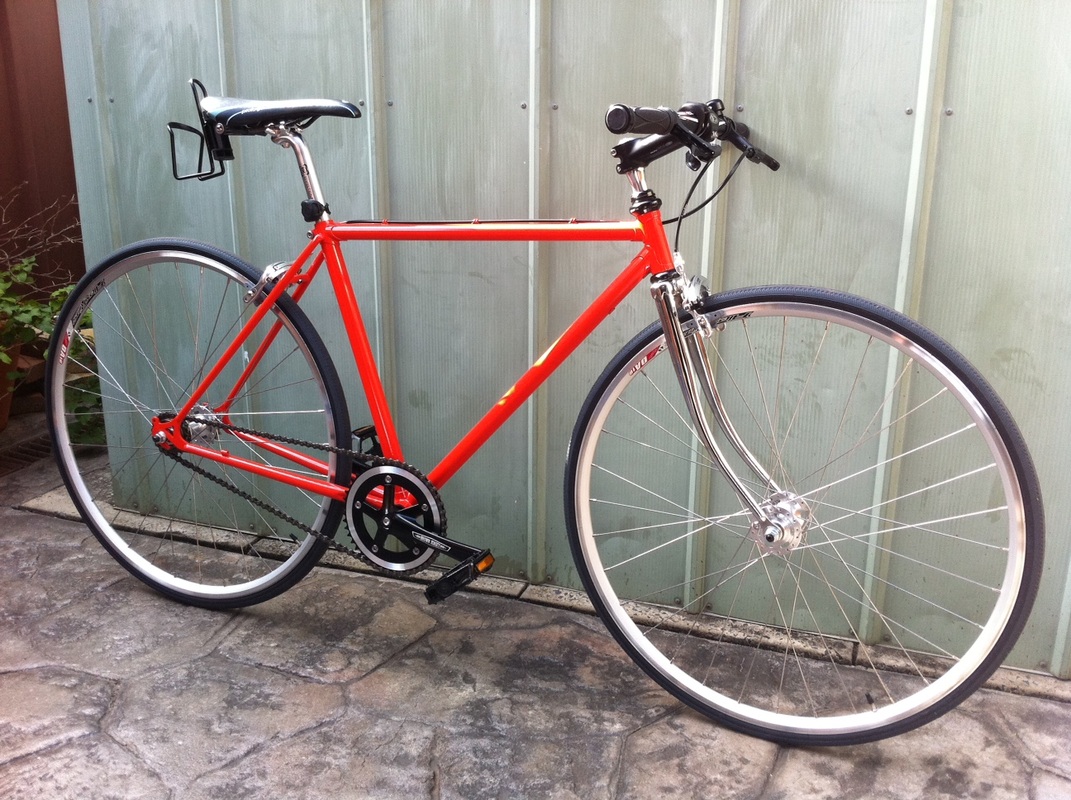
After four long months my dream bike is complete, two and a half months ahead of schedule! It was also the first bike that James from Brown Jersey has worked on after moving to their new premises. I have learnt a lot about bike building through this project. Took my time in getting the parts that I wanted and finished it off with a nice new drivetrain. This bike looks and rides brilliant. It is super smooth. We weighed it when it was finished, and it weighs a total of 10.7kgs. Not bad for a steel framed bike that is nearly 30yrs old. I also found out that James used to ride one of these himself, so it brought back a few memories for him. We both took it for a spin in the carpark. The best thing about this project is knowing that I did it all myself (apart from the last few bits!) and it is a custom made bike that has mostly been designed by me and now I can say that it is truly mine!


First Proper Ride - 26/2/2012 - 8pm
We were going to visit my wife's aunt over in the next suburb, so I told her to take the kids and go and that I would meet them there. Got on the bike, and took it for a spin. Glides like a peice of silk! Absolutely no sign of anything rattling, shaking or creaking. This thing is so stiff and is great to chuck around. The knog frog lights work a treat and are brighter than the cateye's that I have on my road bike. The bike took on every hill that it came across and did it with ease. The Tektro/Jagwire/Avid brake assembly combination is superb, I had never used Tektro calipers before, always been Shimano's. The drink bottle holder came in very handy too, don't have to reach down anymore, just reach behind my back. Love the way it looks, love the way it rides, and this is definitely my new favourite of all my bikes. I'm glad I stuck with my decision for a mountain bike flat bar, brake levers and stem. They give you great control. I still love my road bike but this thing has converted me, I am now also a single speed rider! Can't wait for tomorrow! :-)
Update on Fixie - 18/4/2012
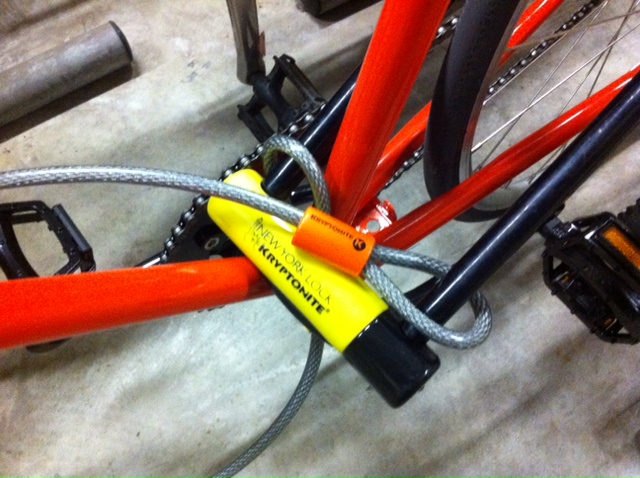
Well, two months into riding my new bike and have learnt a few things. I started riding it and was being very paranoid about it. Particularly the paintwork. Was worried about stone chips, dirt, handlebars swinging around and the brake levers banging into the top tube etc. But I found I wasn't enjoying my ride as much because of these worries. I even managed to buy a second hand Kryptonite (new york) lock & cable for $50. Completely theft proof and resistant to bolt cutters. I use the lock when I park the fixie at work. Even though it is secure undercover, underground parking, I was still being paranoid!
In the time I have had the bike I noticed that the headset was coming abit loose and so was the connection point from the handlebar to the stem. Noticed it when I mounted a kerb and felt a slight rattle. I had to re-tighten these. Now all is good with no rattles. I also managed to get a flat tyre on one of my weekend rides with a mate. Luckily it was a very slow leak and I managed to get back home fine. I only saw the flat the next day and replaced the tube in the comfort and warmth of my home. While watching tv to be exact! I remembered the folding tyres are a pain to put on the rims when they were new, but after being on the rim for awhile, it had changed it's shape to suit the rim more, so it was quite a quick and easy change.
The real bad news was my left crank arm. Everything was supposed to be re-tightened after a couple of hundred km's but I neglected to do this. As a result my left crank arm started coming off on one of my rides to work. It should have occurred to me when my headset came loose. I didn't have an 8mm allen wrench with me to re-torque it so had to hand tighten it and keep going to work as I was already two thirds of the way there. The multi-tool that I carried only went up to 6mm. When I got to work I parked the bike & locked it up. At lunchtime I headed out to the discount shop and spent a couple of dollars on an 8mm allen key. Tightened the crank arm and left it. On my way home it came loose again, about three times. I contacted James from Brown jersey. The reason was because I kept on riding before realising the problem and as a result the inside of the square tapered crank arm got mangled and mashed up. So it will now never sit properly on the square bottom bracket shaft, and will always come loose. I will be getting a new crank arm on the weekend, and have also booked in with Brown Jersey to have my bike checked over.
The chain will possibly need to have a link taken out of it as well because it may have been streched more by now. I'll need more room in my rear dropouts if I want to be able to adjust the tension in future. At present the chain is so long that the rear axle is mounted way back into the rear dropouts. hardly any room left for adjustment. I'll also be changing my tubes from presta valves to shrader valves (car type). Due to the fact that presta's are so fragile and could easily snap when pumping or attaching a pump ( I know coz I have snapped one, not mine, a friends!). The car valve will allow me to attach my hand pump to the tyres easier and also I'll be able to stop at any service station to use their compressor pumps too. For the tyres that I have (100+psi), a portable hand pump will only do a temporary job until you can get to either a floor pump or a service station air compressor.
I bought a bike stand for it too seeing that me and my mate always stop somewhere on our rides. His bike came with a stand and I am always looking for somewhere to lean my bike against or put it on the ground. So I thought a stand might do the trick. There was a mount on the frame just waiting to be used for it. In the end the stand was mounted, I took a photo of it, then decided that I hated it. So took it off the bike. But at least you can see what it would have looked like in the pic below! It added weight to the bike and didn't seem to flow with it's super smooth lines either. So I have decided against it.
Met my wife after work at a business we were having a meeting with, she drove directly from her work and I rode there. I wouldn't have had time to get home, drop the bike off and then get my car. I would have been late for the appointment. So I rode directly. Dealt with abit of traffic as it wasn't my usual ride home mainly on bike paths. Found a bike rack, got out the big bastard heavy duty d-lock and cable and secured my baby. It's a really heavy lock and really should only be kept at your destination (where the bike is locked up) but I didn't have any othe lock available so took it with me. There is a smaller size Kryptonite lock and cable available for around $60 new so I may look at getting that one at some point down the track. After all this trouble with the bike that day I didn't seem that fussed about leaving it all by itself in unfamiliar territory, I had had enough of the crank arm issues. On the ride home (damaged crank arm and all) I realised that I really loved riding this bike. I seemed to be able to tackle every hill I came across, it felt smooth, and is as basic as bikes get. Plus it looks good and I built it! I have already sold my road bike and folding bike and haven't had them for a few days now. I was sad to see them go but was happy that I still had my fixie. This is currently the only bike that I own now. Then again I am picking up my new Trek 4300 mtb tomorrow evening from the Trek store, but the fixie will still always be my favourite. Gets me to work and back fast and efficiently, excellent as a commuter. I am also less paranoid now when riding the bike. Bikes are gonna get damaged, chipped and things can go wrong, that's life. That goes for the riders too! I have accepted that fact and am enjoying the bike even more now.
The new mountain bike will become the weekend toy for trails and anything else, but I'll never get rid of the fixie as I still enjoy riding it for nothing. I will ride this one until it needs another restoration, and after that is done, I will continue to ride it, until it needs another one! :-)

Brown Jersey Visit #2 - Repair & Check Up - 21/4/2012

The picture looks abit strange but James from Brown Jersey is shown here installing a new left crank arm with a big torque wrench. All good now. He also checked my chain tension and said that I could do with another month of riding before we remove a link from it. The inner tubes were also replaced for shrader valve tubes (car valves) so that I could pump it up at a station if needed. This is my daily commuter after all. I also bought a box of 10x inner tubes to keep as back up. Good as new now. All back up and running! Thanks Brown Jersey!
Reflectors Installed - Cateye Front & Rear (From 1989 Roadmaster MTB)

These reflectors were removed from my mate's Roadmaster mountain bike. The one that I have turned into a stool! When they were removed they had alot of surface rust, but the reflectors were like new and they are huge! Real retro looking. After a bit of a sand and a re-spray in silver they are good as new. These are high quality units made by Cateye. The front one is integrated into the headset and can also act as a spacer. The rear one is installed through the brake caliper mounting hole. Now, even if I forget to mount my lights, the bike is still road legal!
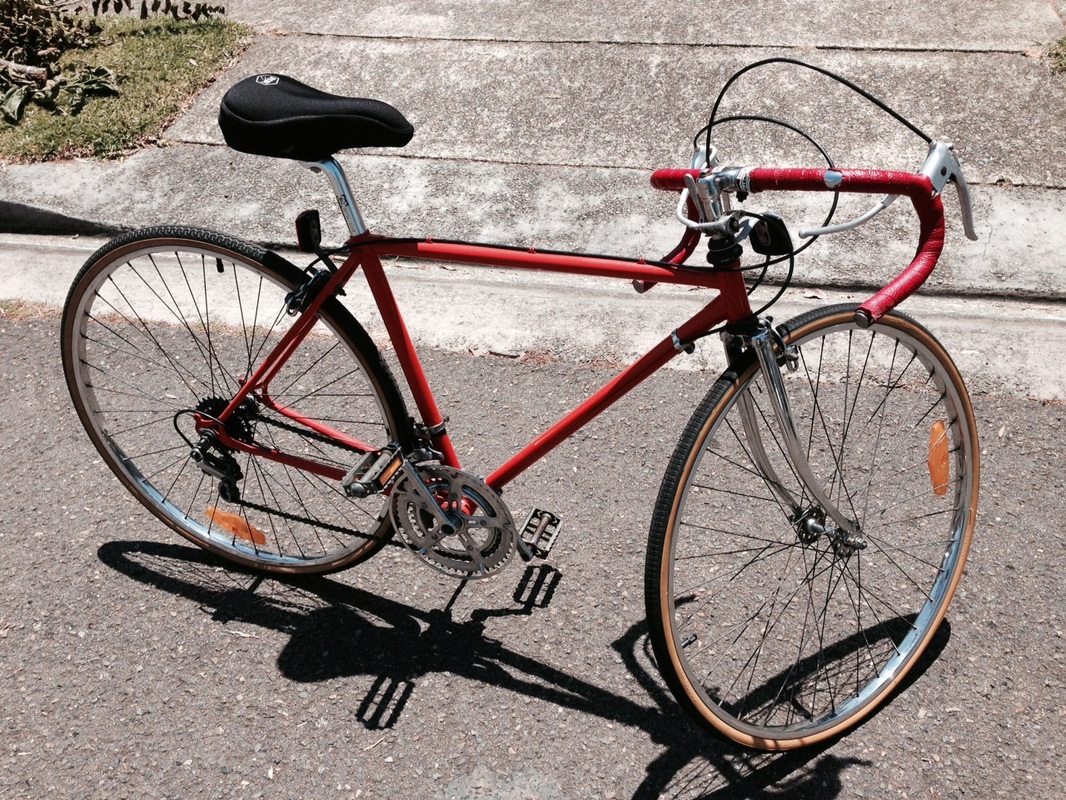
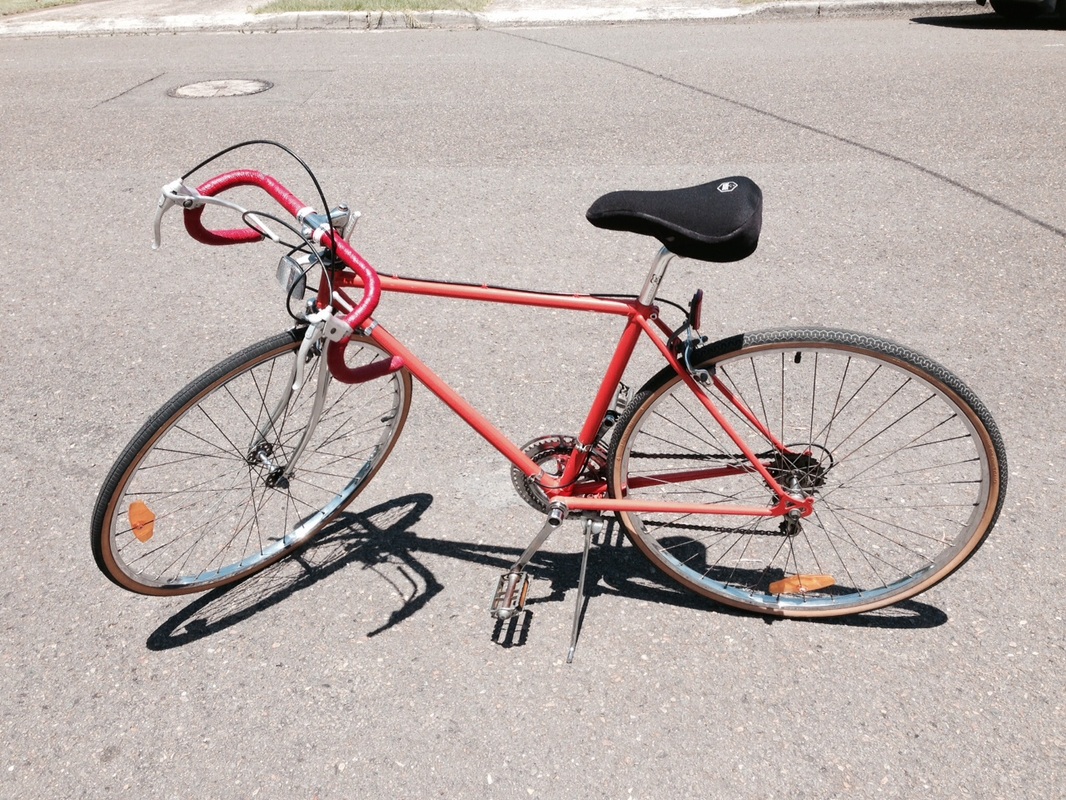
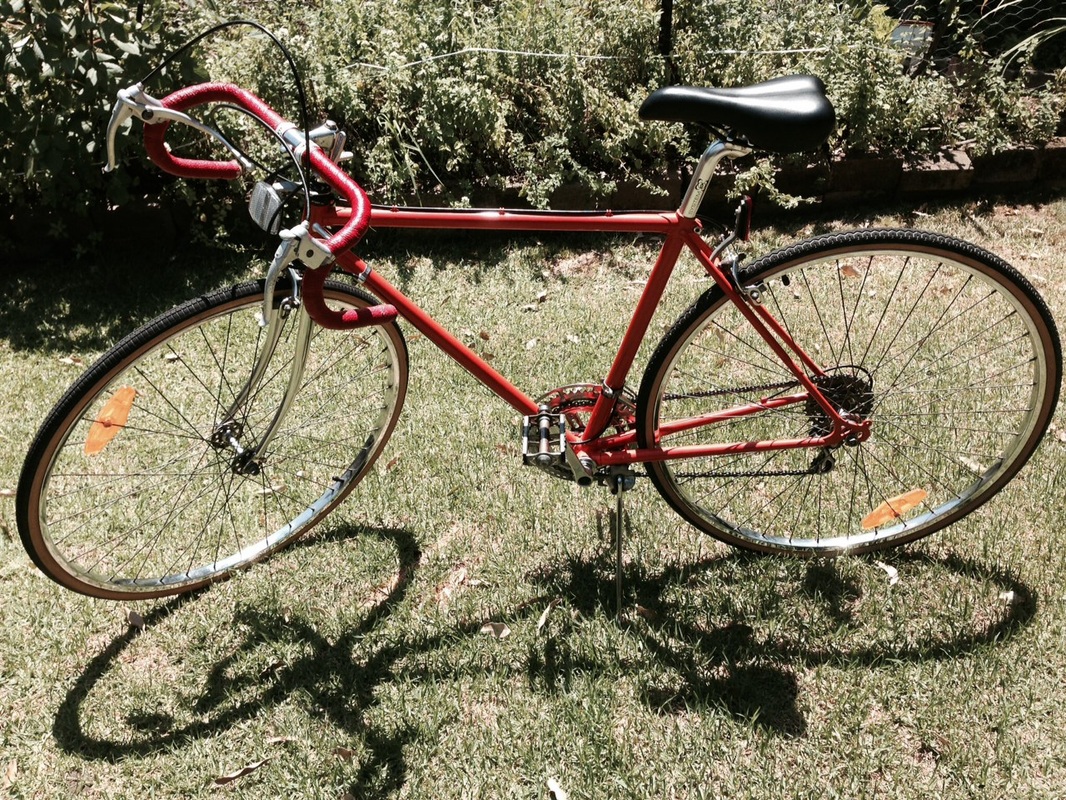
Fixed Gear Tryout...never again!!
I got the fixed gear bug and wanted to try it out. So I took the chain ring down from 46 teeth to 42 teeth. Flipped the rear wheel and installed a 17 tooth track cog, got some second hand track bars, bar tape and some cross brake levers and cabling. Installed it all. Had to remove the front reflector bracket to accommodate the bars and brake levers. Even got some pedals with straps and cages but didn't install them. I'm using the pedals and brake levers for another project now. Anyway to cut a long story short, I tried riding it, was ok but not so comfortable. Track bars look cool but are a bitch to ride with everyday. Also you're limited to braking at the top of the bar which there isn't much room to hold onto aster mounting lights, bell etc. Climbing was hard too. Add all that to riding with a fixed gear and that's one hell of a workout. It wasn't enjoyable for me. So the bike is back to being the way it should be, freewheel, flat bar and comfortable. I'll sell the bars and stem but may look at going fixed again down the track with the more comfortable riding position. The bike did look awesome though. You really had to lean far forward when holding the drops and riding. So here are the only three pics I took before pulling it all apart and putting it back to normal again!
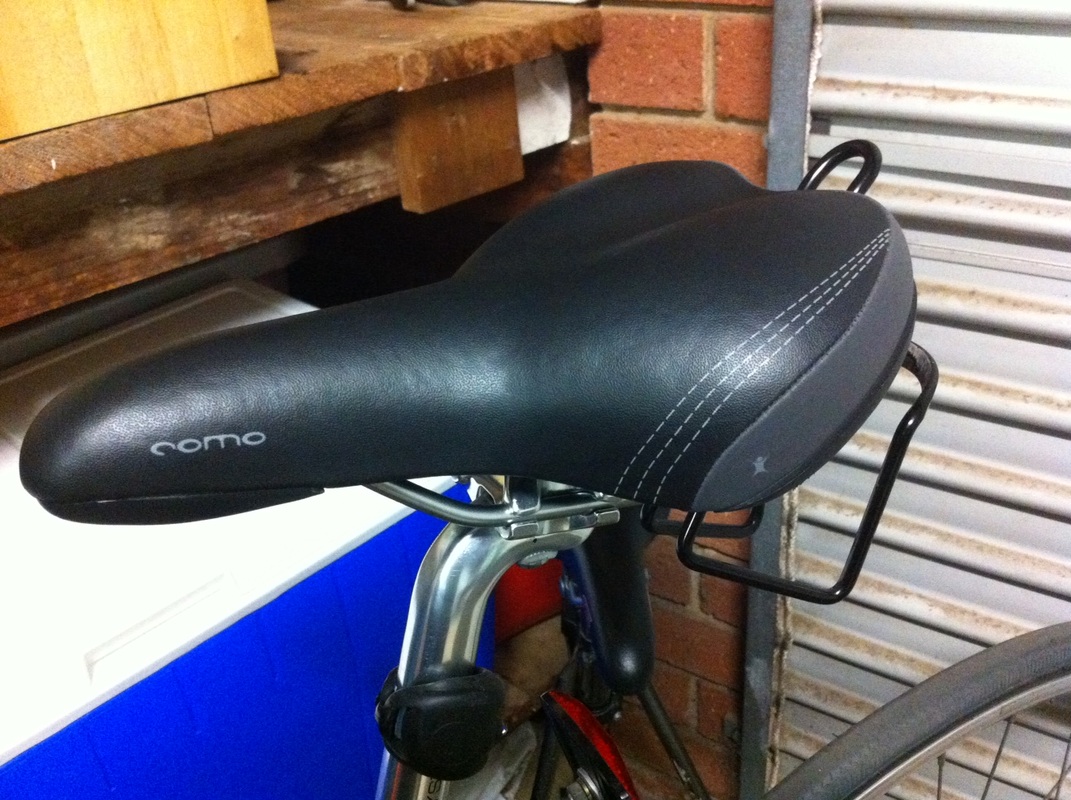
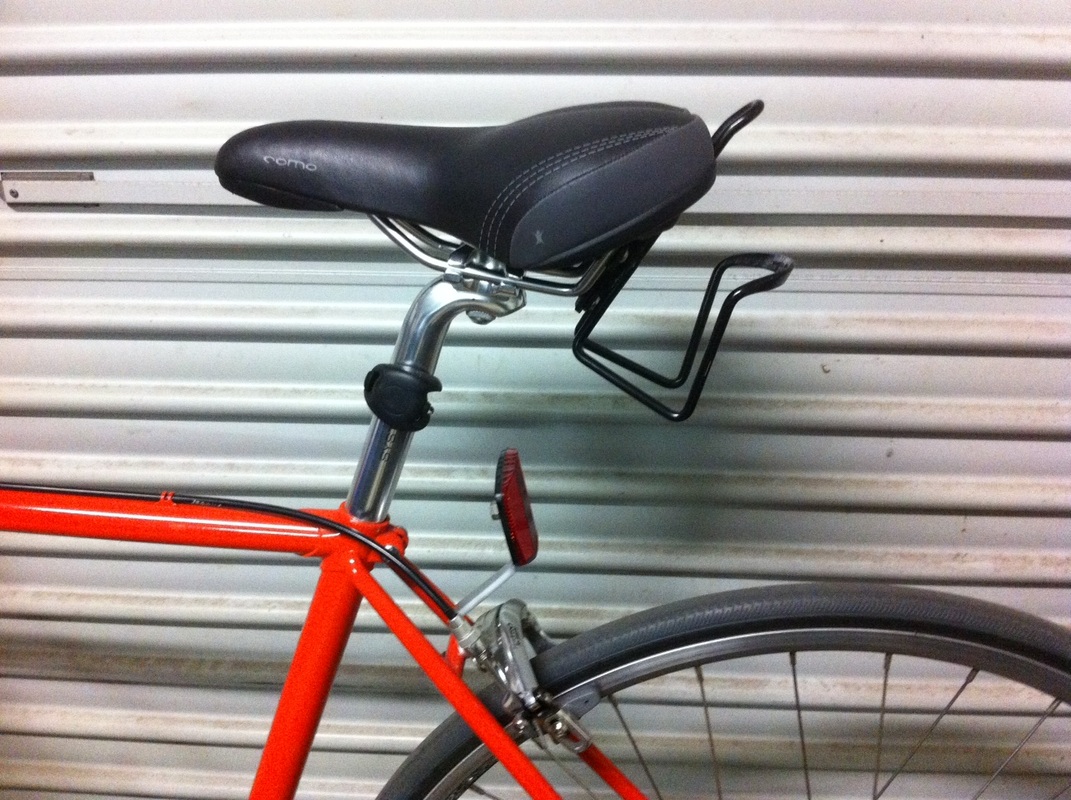
Saddle & Bottle Cage Mount Change
I've enjoyed using the Prologo but I think my arse is too big for it. Also I am very anti bike shorts so I decided to put on a comfort saddle. This one is a Biologic Como saddle that came off a Dahon folding bike. Was saving this one for my Raleigh Stowaway project but that seems to be going nowhere in a hurry. I also got hold of a rare vintage Specialized bottle cage mount. See the Brown Jersey Johnny Appleseed page for more detail. Even though the saddle is for a more upright riding position I have lowered the seat post abit to suit due to the height of the saddle because of the extra padding and adjusted the saddle accordingly. The ride comfort is amazing and the bottle cage is now even stiffer and will not budge at all. I used to have to tighten the Tacx one all the time. It's the 28th of december. I am currently on leave but I've gotta ride into work tomorrow to do abit of photocopying so will give it a test run in the early morning ride.

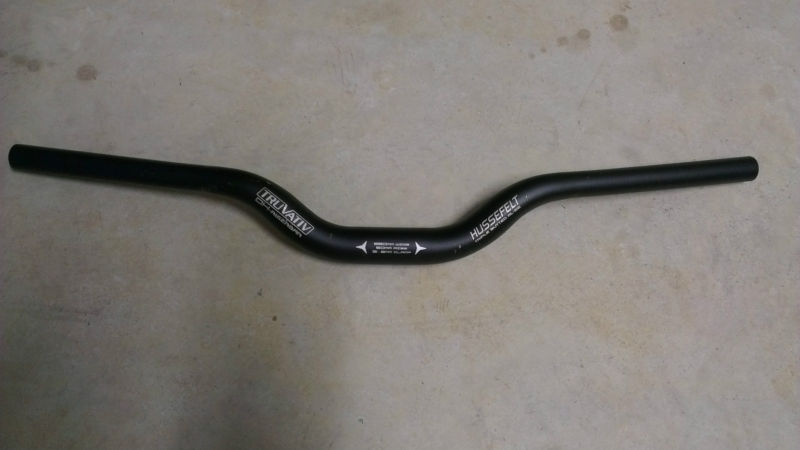
Riser Bar Upgrade - Truvativ Hussefelt MTB DH Bars - used
I decided to upgrade the handlebars to a set of riser bars. As you can see, the rise is quite high, 50mm. Now that I am using the Biologic Como seat I am really happy with it and want to ride in a more slightly upright position. These bars will allow me to do more slight climbs still sitting in the saddle. I got these very high rise bars because I also want to flip back over the stem and put it back in the road bike position, pointing less upward. Currently it is pointing up with flat bars. I like the look of my other bike with the stem pointing down but the riser bars still pointing up. Gives it a more agressive look. The combo of the stem and bars will give me just that little bit more of a higher reach on this bike. More pics soon.

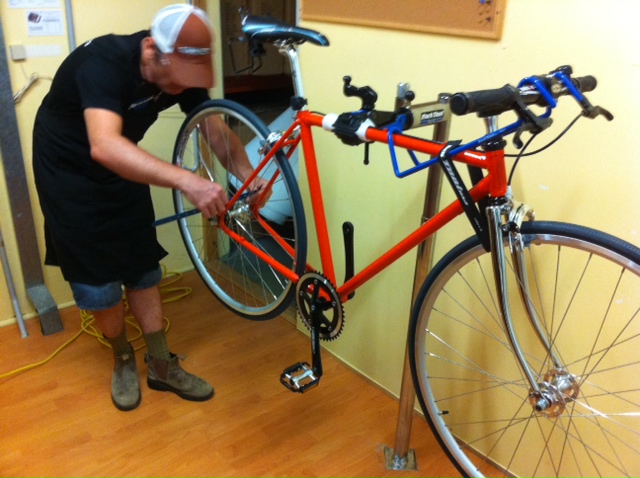
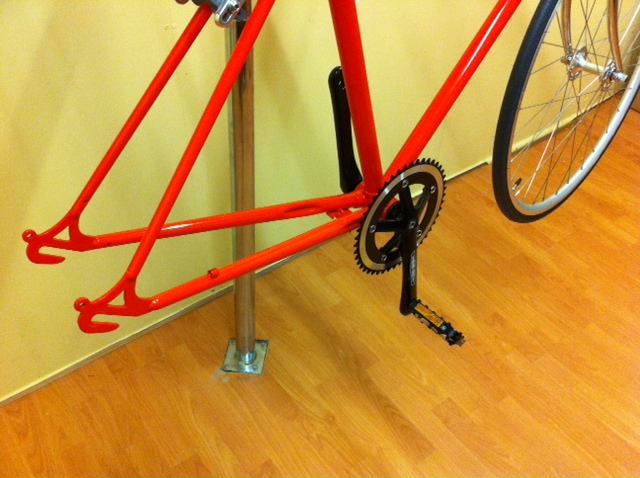
End of an Era - Dismantled! - 9/9/13
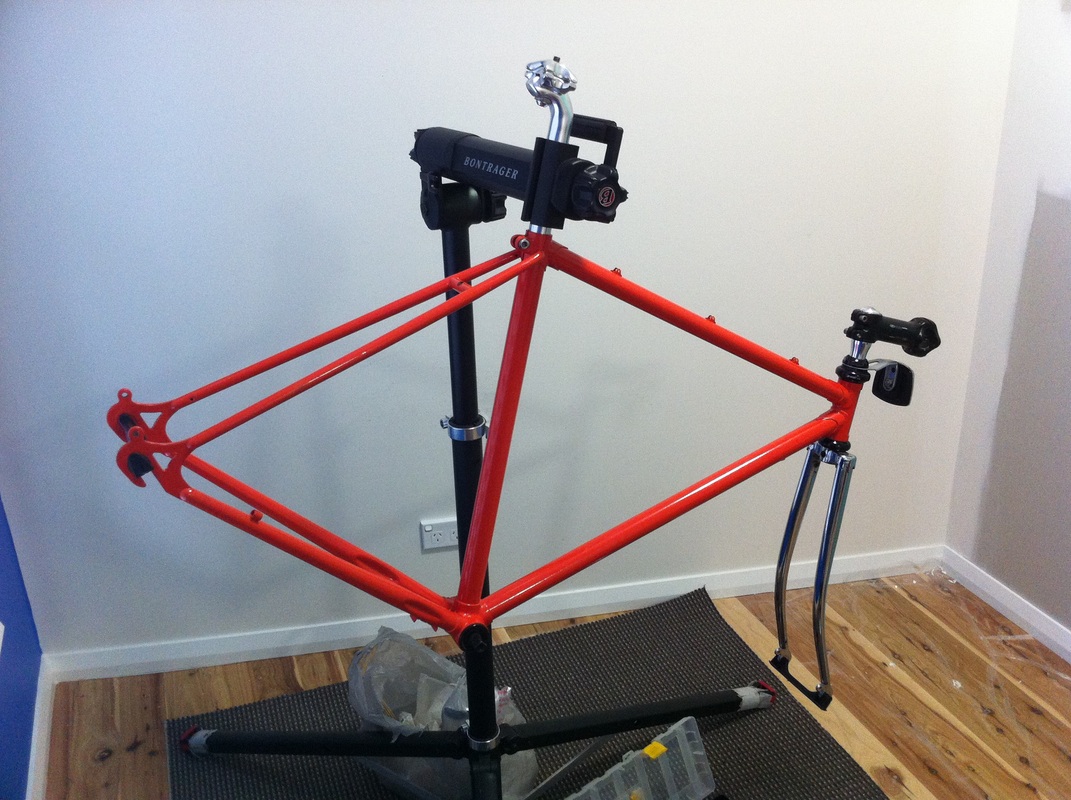
The time has come to pass the Repco onto someone else. In this case Phill from work! He's looking to build one so he has inherited it from me. I have removed the parts I need to transfer to my new BJ Johnny Appleseed frame and the rest is going. Seatpost, bb, stem adapter, and stem are all going with it.
Also gave me a chance to use my new (2nd hand) Bontrager work stand which worked a treat. As you can see from the picture, technically I am still working in my garage but it has been converted into a room now. After this, the builds and repairs will be happening outside with the cats!
Also gave me a chance to use my new (2nd hand) Bontrager work stand which worked a treat. As you can see from the picture, technically I am still working in my garage but it has been converted into a room now. After this, the builds and repairs will be happening outside with the cats!
Update From The New Owner - 9/1/2014

Phill recently scored an original black Repco Traveller on ebay which was abit too big for him, but is the same vintage as the orange frame. He has begun transferring all the components and everything so far fits like a glove (as it should). The original 27 inch wheels have been returned too! All that's left to do is attach the chain, adjust the brakes and gears and then out for a spin. The Repco will live to ride another day! Will update with a picture of his finished bike soon.